Home Home Home Home Home Home Home
CakeSpy

Featured: 

My adventure at Ben & Jerry's in Vermont!


Unicorn Love: the Eating Disorder Recovery Blog


 Buy my brilliant books!

Buy my new book!

Buy my first book, too! 

CakeSpy Online Retail!


Archives
Gallery

Fantastic appliance for cake making on DHgate.com

everyrecipe.co.nz

Craftsy Writer

Entries in guest blog (62)

Tuesday
Aug302011

Going Dutch: Cake Gumshoe Kate Lebo Investigates the Dutch Letter in Iowa

CakeSpy Note: When I heard a rumor that Kate Lebo of Pie-Scream (I'll tell you more about THAT soon) was headed to Iowa to judge the pie contest at the Iowa State Fair, I had a request: FIND MORE ABOUT THE DUTCH LETTER. This elusive sweet seems to be an Iowa specialty...but why? Here's Kate's report.

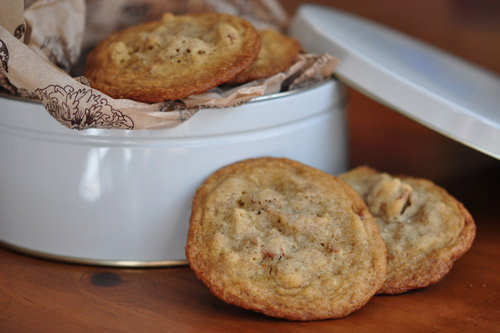
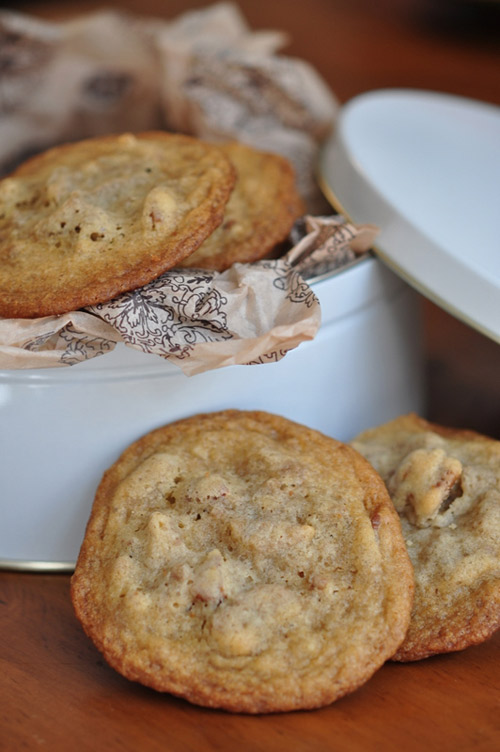
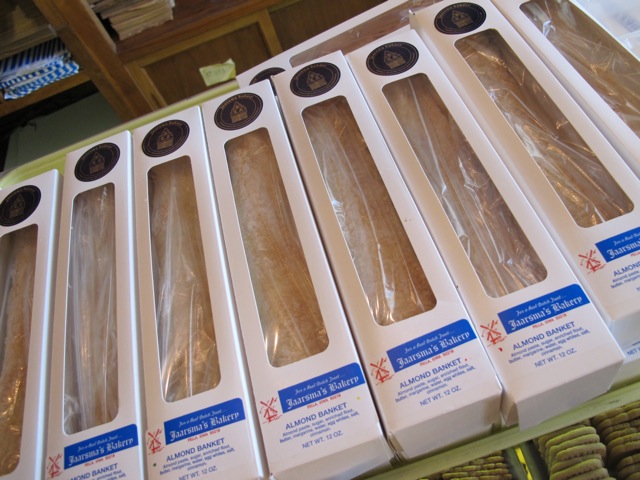
  1. “If it’s almondy and crispy, it’s Dutch” said Cassie Van Wyk of Jaarsma Bakery in Pella, Iowa. I’d asked her why so many of the peach pies I’d tried at the Iowa State Fair had almond extract in them. I’ve seen that addition in cherry pie, sure, but peach? It makes peaches taste canned! Cassie’s response also applied the baked goods she was selling me: Almond Banket (pictured below), St. Nick Cookies, and what I’d driven an hour down I-163 to find, Dutch Letter Cookies.
  2. When Jessie Oleson found out I was going to spend two weeks in Iowa so I could judge the State Fair pie contest and spend some time baking with Beth Howard of The World Needs More Pie at the American Gothic House in Eldon, IA, she asked if I’d take on a sleuthing assignment for Cakespy. “Dutch Letters,” she said. “Ever heard of them?” Nope. What did they look like? “They’re S-shaped pastries. Apparently they’re an Iowan specialty.” The S-shape brought to mind the S-cookies my mother used to feed me when I was a small child in Southern California. She’s from Iowa, so the connection isn’t as far-fetched as it seems. That’s how my search started with a phone call to Mom.
  3. “Dutch? I’m pretty sure they came from an Italian bakery.” There goes my S-cookie theory, I thought. “When we moved to Washington, I couldn’t find them anymore. They were the perfect snack for small kids because they were just a little sweet and soft, not crumbly or flaky, so they didn’t make a mess when you snacked on them.” That’s my mom, Ms. Practical down to desserts. I remembered S-cookies as being about five inches high, golden brown and lemony. And the texture--Mom had that right. It would dissolve in your mouth before crumbling in your lap. But Italian? That couldn’t be right. Dutch Letter Cookies are, well, Dutch.
  4. So I asked my mom’s other sister, Gail, the one I’d be staying with in Des Moines, if she’d ever heard of Dutch Letter Cookies. “Oh sure. I have one in the freezer. But they’re not called Dutch Letter Cookies. They’re called Dutch Letters.” Ah ha! When I got to Iowa, my quarry would be waiting for me.
  5. Gail's Dutch Letter had wilted in the freezer, but I could get the general idea with just a couple bites: flaky pastry stuffed with mildly-spiced sweet almond paste, studded with chunky sugar and arranged in an S-shape. Why an S? I asked Gail. “Santa? I’m not really sure.”
  6. The day I met Beth Howard at the Iowa State Fair, it was 90 degrees in the shade but still not too hot for pork chop on a stick. While we wolfed down our snack, I told her about my Dutch Letter quest. “You have to go to Pella,” she told me. “It’s a Dutch community about halfway between Des Moines and Eldon, so that’s perfect. Most of the bakeries there make Dutch Letters, but the Jaarsma Bakery’s are the best.” A couple days later, after eating mountains of almond extract-flavored peach pie, I charted a course for Pella.
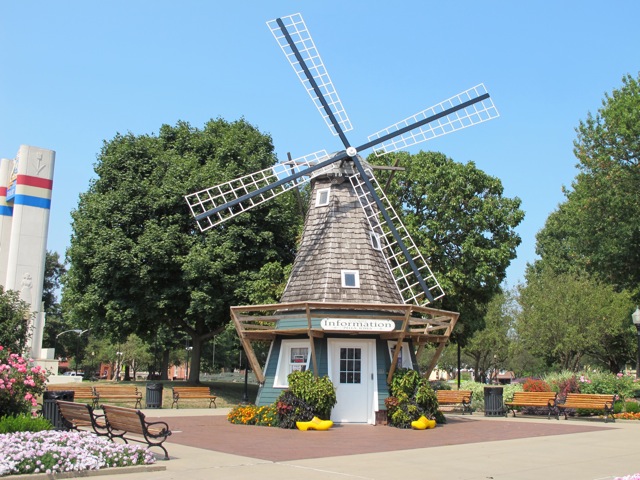
  7. Pella has windmills. Huge windmills. Plus lots of antique shops, old European storefronts, and dutch bakeries, Jaarsma chief among them. When I walked in, I noted the white lace hats the workers wear and the fact that Jaarsma’s dry goods section carries De Ruijter, a Dutch treat I’ve been dreaming about since I last made it my daily midnight snack during a week-long stay in Holland. De Ruijter are essentially soft chocolate sprinkles you serve on hot toast. They melt where they touch the bread but stay crunchy on top, and unlike Nutella they have no nutritional value whatsoever. I picked up a box and made my way over to a pastry case full of S-shaped stacks of Dutch Letters. “Why the S?” I asked Cassie Van Wyk. “It stands for Sinterclaus. It’s also the easiest letter for our bakers to make. Way easier than E or an R.” Except for I, right? I asked. “We have those too,” she said, pointing toward a pyramid of boxed I-shaped pastries labeled Almond Banket. They’re surprisingly heavy. “That’s because they’re super-stuffed with almond paste. My boss says that one Banket is the equivalent of about four Dutch letters. When I have one, I have to share it with two or three friends.” Thinking of Beth and the folks that I’ll soon meet in Eldon, I added one to my shopping basket.
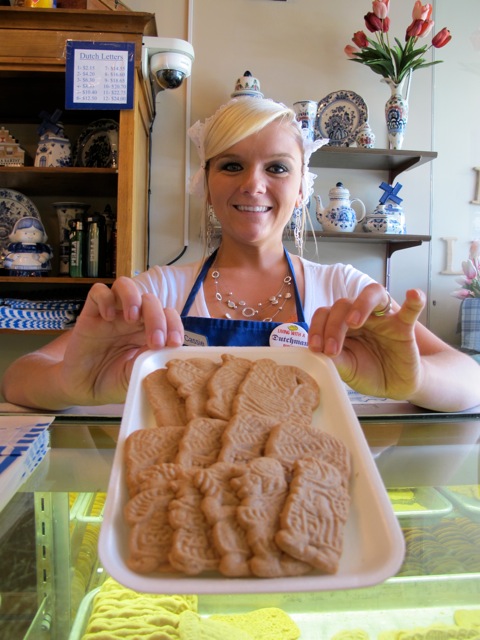
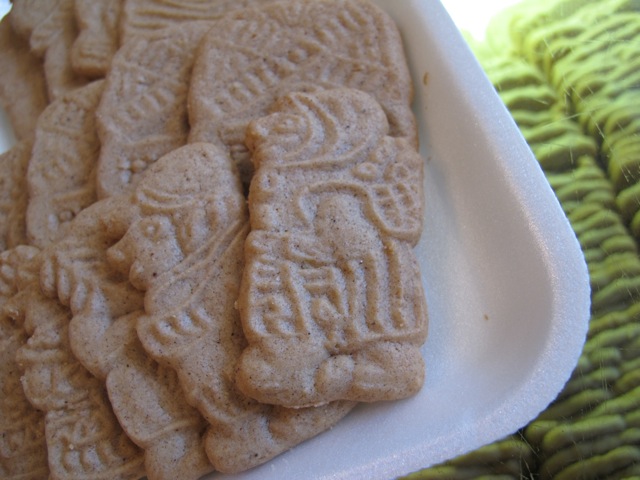
  8. Cassie told me that Jaarsma is still owned by the family that opened the bakery in 1898. The owner is a direct descendent of founder Harmon Jaarsma, who brought traditional Dutch recipes with him when he emigrated from Holland. The spices they use in their Dutch Letters and other pastries are imported directly from Holland, as are their Pickwick teas, licorice, and De Ruijter. “We make our own Dutch Rusks though.” Dutch Rusk? “It’s a crispy, twice-baked biscuit (like zwieback or digestives) you dip in your coffee.” St. Nick cookies--thin spiced crisps in windmill and other shapes--serve that purpose as well. That’s how Cassie and I got on the subject of crispy almondy things. She said it’s still custom in Pella to have a plate of these crisps with coffee when guests come over. I asked her if she’s Dutch. “Nope, Bohemian. But I married into a very Dutch family.”
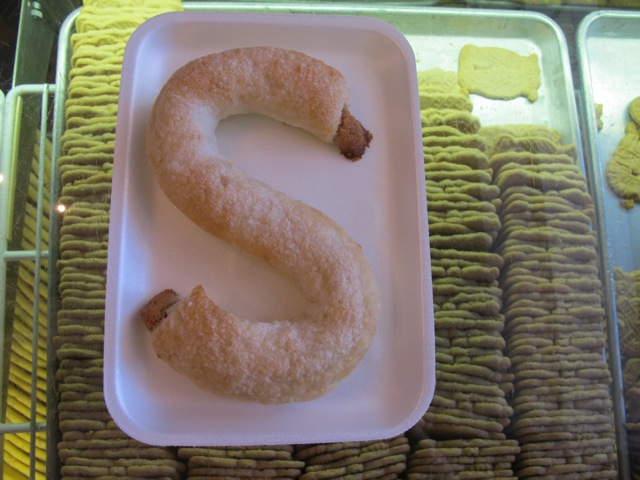
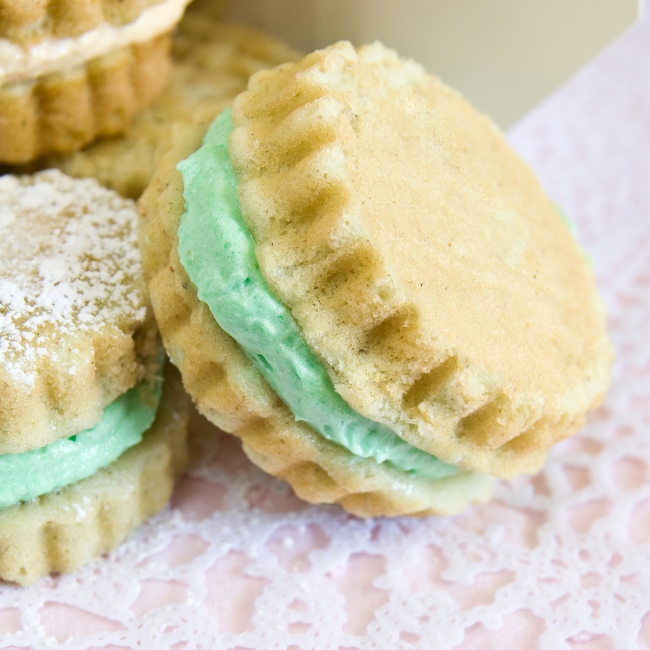
  9. A fresh Dutch Letter tastes like a defrosted Dutch Letter times ten. It is a tidy mother’s nightmare--so flaky and light that pastry shards cling to your mouth with every bite. The almond paste inside gives the pastry some heft and substance, the way De Ruijter transforms toast into dessert. The almonds are ground so finely that the only suggestion this dreamy paste was once made of crunchy nuts is its unmistakeable marzipan flavor. It reminds me of an almond croissant, but you don’t have to work so hard to find the almonds hidden inside. My aunt’s guess was almost right--Dutch Letters were originally baked as special treats for Sinterclaus Day (the Dutch Santa Claus Day) but at Jaarsma you can have a Dutch Letter any day of the year. Thanks to the internet, that goes for all you non-Iowan folks too. Order on Jaarsma’s website and they will ship them straight to you.
  10. I still don’t know why Iowans put almond extract in their peach pies. Could it really be just “a Dutch thing”? Gail says my grandmother uses almond extract, but we’re German. She puts pineapple in her peach pies too. God knows where that idea comes from. When I asked again why all things crispy and almondy are Dutch, Cassie brought a baker from the back out to help answer my question. She smiled at me over the glow of the pastry case, shrugged and said, “it’s tradition.”

To order from Jaarsma, visit their website; to see more of Kate's work, visit Pie-Scream.

Saturday
Jun252011

Double Trouble: Cheesecake-Stuffed Carrot Cake Recipe from Rice Kernel

CakeSpy Note: This is a guest post from The Rice Kernel. Named for a little boy who came along and transformed one family's kitchen experiences, Rice Kernel features wholesome, homemade recipes to help you achieve a "rainbow a day" of colorful and nutritious foods.  For the sweets lover, Rice Kernel's "rainbow" includes plenty of indulgences, often made over with healthful ingredients.  This triple strawberry cheesecake is the perfect collaboration of creamy, decadent cheese and fresh, tart summer berries. The recipe originally appeared as part of this post.

This two-in-one cake has a sweet secret: what appears to be a traditional carrot cake is actually stuffed with cheesecake! As Rice Kernel puts it,

While my humble looking cake doesn’t hold a candle to the professional ones, the combination of smooth cheese and flavorful carrot cake is undeniable.  Beneath the unpretentious appearance lies a creamy cheesecake sandwiched by layers of moist, mildly spiced cake flecked with carrots and pineapple.  As if the layers aren’t enough, the cakes are enveloped by a generous coating of marshmallow cream cheese frosting.  (Marshmallow optional, but this is an all-out recipe with granulated sugar and a generous amount of oil.  It is butter-free, if that counts.)  You could certainly interchange the carrot cake layers for flavors of your choosing; a red velvet cake would be a beautiful contrast.

Luscious Carrot Cake, from Whipped

3 cups all-purpose flour
3 cups granulated sugar
1 teaspoon salt
1 tbsp baking soda
1 tbsp ground cinnamon
1 1/2 cups canola oil
4 large eggs, lightly beaten
1 tbsp vanilla extract
1 1/2 cups shelled walnuts, chopped
1 cup shredded coconut
1 1/2 cups pureed cooked carrots
1 small 8 oz. can of crushed pineapple, drained
1/2 cup walnuts for the top (optional)

For the Cheesecake Layer

2 oz. white chocolate, chopped
16 oz. cream cheese, room temperature (2 packages)
1/2 cup + 2 tbsn. sugar
1 tablespoon flour
2 eggs, room temperature
1 teaspoon vanilla
1 tablespoon heavy cream

For the Frosting

8-oz cream cheese, room temperature
1 1/4 cups marshmallow creme (7-oz)
1 tsp vanilla extract

Procedure 

  1. Prepare the carrot cake layer. Preheat oven to 350 degrees F. Grease two 9 inch cake pans. Line the bottoms with parchment paper. Peel and cook carrots until a fork easily can be poked in to them. One small bag of full sized carrots should yield about the right amount of pureed, cooked carrots. Drain the carrots and purree while still warm in a blender or food processor until they are smooth. Measure out 1 1/2 cups of the carrot puree and set aside.
  2. Sift dry ingredients into a bowl. Stir dry ingredients together with a whisk to combine well. Add oil, eggs and vanilla. Beat well for about 2 minutes. Fold in walnuts, coconut, carrots and pineapple. Pour equal amounts of batter into each pan. Set in the middle of the oven and bake for about 50 minutes or until edges have pulled away from sides and toothpick inserted in middle comes out clean.
  3. Remove from oven and let sit in pans 10 minutes. Turn out onto a rack and cool completely.
  4. Prepare the cheesecake layer. Preheat the oven to 350 degrees F. 
  5. Melt the white chocolate, set aside to cool slightly.
  6. In a large bowl using an electronic mixer, mix the cream cheese on low speed until creamy. Add the sugar and mix slowly until smooth. On low speed, mix in the flour. Turn off the mixer and scrape down the bowl and beater with a rubber spatula. Add one egg at a time, mixing well after each addition, scraping the sides of the bowl. Mix in the vanilla and cream until the mixture is smooth. Using a large spoon, stir in the melted white chocolate until incorporated.
  7. Pour the batter into a parchment paper lined 9-inch spring form pan. Bake for about 30 minutes or until the center is set when you slightly shake the pan. Allow to cool before removing from the spring form pan. Allow to cool completely before assembling the cake.
  8. While you're waiting for the cakes to cool, go ahead and make the cream cheese frosting. Combine all ingredients in a medium bowl and beat with an electric mixer at medium-high speed until smooth and fluffy. Set to the side for once the cake is assembled.
  9. ASSEMBLE IT ALL. Place your bottom layer of cake on the dish/ plate you will be serving it on with the leveled side facing up.
  10. Spread a thin layer of cream cheese frosting on top – it doesn’t matter how messy it looks since it will be covered.
  11. Transfer the cheesecake to the top of the cake, then spread another thin layer of cream cheese frosting on top of the cheesecake.
  12. Top with the remaining layer of cake – leveled side down so that you have a clean surface. Use the rest of the cream cheese frosting to frost the entire cake.
  13. Top with optional nuts or shredded coconut.
Tuesday
Jun142011

Matcha Point: Matcha Tiramisu With Adzuki Red Bean and Mascarpone Recipe

CakeSpy Note: This is a guest post from The Rice Kernel. Named for a little boy who came along and transformed one family's kitchen experiences, Rice Kernel features wholesome, homemade recipes to help you achieve a "rainbow a day" of colorful and nutritious foods.  For the sweets lover, Rice Kernel's "rainbow" includes plenty of indulgences, often made over with healthful ingredients.  This triple strawberry cheesecake is the perfect collaboration of creamy, decadent cheese and fresh, tart summer berries. The recipe originally appeared as part of this post.

Growing up in the 1980s, tiramisu was ubiquitous at dinner parties and on restaurant menus.  And I consumed my share of them.  (With a Shirley Temple in my other hand, of course.  I wanted a “drink” like the adults.)  But in the intervening decades, my parents rarely ordered or prepared the Italian dessert – they were turned on to (and, hence, turned off by) the raw eggs and copious of heavy cream and mascarpone.  These days, I don’t come upon tiramisu often but when I do, I can’t deny a few bites of the Italian-American favorite.   

I can’t recall with certainty how or when I dreamt up this recipe.  I was thinking about tiramisu - and thinking that my husband doesn’t share my affinity for coffee and liquer-infused desserts.  Feeling (momentarily) indifferent about typical American dessert flavors, this idea was conceived.  Here, the ladyfingers are soaked in sweetened green tea and sandwiched between rich mascarpone cheese and nutty, sweet red bean paste.  Matcha powder is sifted between layers and atop the dessert as both a bitter counterpoint to the sweetened layers and as a garnish. 

How was it, you ask?  The texture of the dessert is much like a traditional tiramisu – creamy with a softened, moist cake layer.  There is a richness and creaminess from the mascarpone, a nutty sweetness from the adzuki bean paste, and a slightly bitter (but refreshing) contrast from the green tea.  Frankly, if you enjoy the flavors of green tea and red bean you’ll find this delightful – and addictive.  If the flavors aren’t your cup of tea, may I suggest lemonstrawberryvanilla, or chocolate for your sweet tooth? 

Matcha Tiramisu with Adzuki Red Bean and Mascarpone

Ingredients

1 cup boiling water + 1 tbsp macha powder + sugar (to taste).
16 Savoiardi biscuits (ladyfingers)
Matcha powder for dusting
1 cup (1/2 pound) mascarpone cheese (or cream cheese, or vegan cream cheese)
1/4 cup heavy cream
2 tbsp powdered sugar 
2 tbsp matcha powder for dusting
1/2 cup adzuki bean paste (thinned with a few tablespoons of water)

Procedure

  1. Beat cream and powdered sugar in a large bowl with an electric mixer until soft peaks form.  Fold in mascarpone.
  2. Pour 1 tbsp matcha and water mixture in a shallow bowl.  
  3. Dip both sides of half of the ladyfingers in the espresso and use them to line the bottom of a glass or ceramic baking dish.  Dust the ladyfingers with matcha powder.
  4. Spoon a third of the adzuki bean pasta atop the ladyfingers and spread in a smooth, even layer.  Follow with the mascarpone mixture.  Repeat with ladyfingers, adzuki, and mascarpone.  (End with the mascarpone.)
  5. Cover and refrigerate the tiramisu for at least 4 hours or overnight.
  6. Just before serving, sift the matcha powder over the top of the tiramisu.

Note:  Tiramisu can be refrigerated up to 2 days.

Thursday
Jun022011

Totally Sweet: Cherry Pie in a Chocolate Pie Crust Recipe from Domestic Fits

Photos: Domesticfits.comCakeSpy Note: This is a guest post from Cake Gumshoe Jackie, a Los Angeles resident (but we won't hold that against her) who cooks and bakes from a small kitchen surrounded by a husband, bulldog, 1 year old daughter and lots of sunshine. She is committed to cooking and baking with the abundance of local produce that her area offers, strawberries and avocados better watch out!

CHOCOLATE PIE CRUST! It’s pretty clear by my excessive use of capitalization what my favorite part of this pie is. I woke up in the middle of the night (I know, overly dramatic for a food blog post) with the idea of a chocolate pie dough crust. After a quick google search I wasn’t able to find a recipe for inspiration, leading my to wonder if my midnight dessert vision wasn’t even possible. By only modifying my go-to pie dough crust, It turns out that it is VERY possible, and super tasty.

Here are a few process shots and the recipe, which can also be found on Jackie's blog, Domestic Fits.

Cherry Pie in a Chocolate Pie Crust

 Ingredients

  • 1/3 cup unsweetened cocoa
  • 2 2/3 cup of all purpose flour
  • 1/2 tsp salt
  • 3 tbs sugar
  • 12 tbs butter, cut into cubes
  • 1/2 cup shortning
  • 1/4 cup vodka
  • 1/4 cup cold water

Pie Filling ingredients:

  • 1 1/4 cup sugar
  • 3 tbs cornstarch
  • 5 cups of fresh bing cherries
  • 3 tbs lemon juice from a real life lemon, none of that squeeze bottle crap (about 1 large lemon’s worth)
  • 1/2 tsp vanilla extract
  • 1 cup chocolate, broken up into chunks (I used 56%)
  • 3 tbs butter
  • 1 tbs light corn syrup
  • 2 tbs butter (for crust assembly)
  • plus 2 tbs white sugar to sprinkle on top before cooking 

 Procedure

  1. I did some pretty extensive research on pie dough over the past few years and I’ve learned a few things that I’ll pass on to you all. First, food processors are great at getting the job done as quickly as possible, and we all know that the more you mess with dough the tougher it becomes. So break out that food processor and add the cocoa, 2 cups of the flour, salt and sugar and give it a quick pulse until it’s combined.
  2. Add the cubes of butter and the shortening and pulse until combined, about 1 1/2 minutes. A mix of shortening and butter gives a good flavor and texture.
  3. Now, if you have a larger food processor that mine, then add the remaining flour and pulse until it gathers around the blade. MINE is tiny and I need a new one. So if you are in the same boat as I am, just transfer it to a bowl and add the remaining flour by hand. (if you have a nice big guy food processor, transfer to a bowl after you add the remaining flour)
  4. Then add the water and the vodka and squish it into the dough until its all combined. Vodka is another tip I picked up during my dough research. It cooks off completely (unlike water) creating a super flakey crust. Your dough will be very moist, but you can add a bit of flour if it is too moist to hold together. Then split into two evenly sized disks and wrap in plastic wrap, and chill for AT LEAST AN HOUR, super important, don’t skip this step.
  5. You can chill it for a few days if you need to, in that case, put the wrapped circles in a zip lock bag.
  6. Before you get to the cherries, combine the sugar, cornstarch, salt, lemon juice and vanilla in a large bowl and set aside.
  7. Now, get out those beautiful cherries. You’ll have to pit them, so I hope you have a pitter. You can buy them for about $8 and its totally worth it.
  8. To pit 5 cups, it should only take about 10 minutes. Unless, your daughter needs a nap and she won’t sleep and you can hear her jumping in her crib throwing bedtime bunny, sleepy time bug, and her sippy cup across the room and you have to go in and lay her down and tell her that she is a tired lady and she needs to go nigh night….in that case, it may take longer.
  9. Add the pitted cherries to the sugar mixture bowl and stir until the cherries are well coated. Allow to rest for about 30 minutes.
  10. Get your cold dough out of the fridge and place it on a well floured surface. I’m not gonna lie to you, this is not the easiest dough to work with. It’ll need a lot of flour on both sides, flour the top to make sure it doesn’t stick to your rolling pin. roll out into a circle large enough to fit into your pie pan with only a little over hang. If it breaks apart, just smoosh it back together with your fingers. Transfer to your pie pan, if it breaks, again, just push the cracks back together.
  11. in a microwave safe bowl, add your chocolate chunks, butter and corn syrup.
  12. Microwave for 20 seconds, stir and repeat until all melty. Pour the chocolate into the crust and smooth out to make an even layer. Then add your beautiful cherries. 
  13. OK, so by this point I was a little fed up with my crust, so the double crust plan was altered a bit. If you want to roll out circle #2 and make it a double crust, be my guest. I decided to roll out #2 and cut him up with two mini cookie cutters. You can also cut strips to do a lattice top.
  14. I then layered them on the top to create parallel lines, brushing each cutout with melted butter to help them adhere to each other. I then filed in a bit of the blank spaces with randomly placed cutouts and sprinkled the top with sugar.
  15. By this point you may be thinking, “Why didn’t she ask me to preheat the oven? Did she forget? should I just set it to my go-to 350?” Nope. This is one of those pearls of pie dough wisdom that I am passing on. Ice cold dough cooks better than room temp dough. SInce we have worked this pie dough over pretty good, it needs to rest and chill before going into the oven. SO now, turn the oven on and set it to 475 and place your pie in the fridge to chill. Wait about 20 minutes and then bake your pie at 475 for about 15 minutes. Then, turn your oven down to 375 and finish baking for about 45 minutes or until the filling is thick and bubbly. If your crust looks like it is browning too much, cover it in foil.


Thursday
May262011

Peachy Keen: Peach Cobbler Milkshake Recipe by Munchin With Munchkin

Photo: Munchin with MunchkinCakeSpy Note: This is a guest post from Cake Gumshoe Christine, who blogs at Munchin With Munchkin. Let the NOM begin:

I am not a vegan. I’m actually not even a vegetarian but I love a challenge.

So many desserts are off limits for those trying to avoid animal products or even attempting to live a healthy lifestyle. It truly doesn’t have to be this way as making a vegan dessert is just as simple as making one full of fat, sugar and dairy. All you need is a blender and a few simple ingredients such as fruit, coconut milk, and some common spices.

Peach cobbler is one of my favourite desserts and with fresh peaches popping up at my local farmers market I couldn’t resist the challenge of another classic dessert-inspired milkshake. When choosing peaches for this purpose, ensure they are quite ripe as they no longer ripen after they are picked. If you can find a few ripe peaches there is no need to add additional sweetener such as maple syrup as these juicy fruits are full of natural sugars.

You can also opt to make this recipe raw by omitting the peach preserves and substituting almond butter and a few pecans for the graham cracker crumbs and oats. Now go make your sweet tooth happy and enjoy some peach cobbler for breakfast! Happy Friday!

Peach Cobbler Milkshake

Ingredients

  • 4 ripe peaches, sliced
  • 1 Tbsp. lemon juice
  • 2 Tbsp. Peach preserves, preferably natural, no sugar added
  • 1 Tbsp. coconut oil
  • 1 cup light coconut milk
  • 1 ripe frozen banana
  • 1 Tsp. pure vanilla extract
  • ½ Tsp. cinnamon
  • dash nutmeg
  • 2 Tbsp. graham cracker crumbs (check label to ensure it is vegan)
  • 1 Tbsp. old fashioned oats
  • 2-3 pecans (optional)
  • maple syrup, sweeten to taste (optional)
  • ice cubes

Procedure

  1. Combine all ingredients in a blender and pulse until smooth
  2. Top with soy based whip cream, sprinkle with additional graham crackers and cinnamon. Garnish with a peach slice.

Serves 3-4

Tuesday
May242011

Berry Delicious: Triple Strawberry Cheesecake Recipe from The Rice Kernel

CakeSpy Note: This is a guest post from The Rice Kernel. Named for a little boy who came along and transformed one family's kitchen experiences, Rice Kernel features wholesome, homemade recipes to help you achieve a "rainbow a day" of colorful and nutritious foods.  For the sweets lover, Rice Kernel's "rainbow" includes plenty of indulgences, often made over with healthful ingredients.  This triple strawberry cheesecake is the perfect collaboration of creamy, decadent cheese and fresh, tart summer berries. The recipe originally appeared as part of this post.

This is a strawberry cheesecake.  Not a plain cheesecake topped with strawberries.  And not a plain cheesecake with a swirl of strawberry puree.  Fresh strawberries are infused throughout this cheesecake – in the base, with an extra swirl of fresh puree, and with sliced fruit perched atop the lovely pink cake.  (For serious strawberry afficionados, consider making extra puree or strawberry coulis to drizzle atop the cheesecake.)  I’m crazy about this cake.  So crazy Rice Kernel and I had to eat some warm from the oven.  (In case you’re curious, it’s warm and mousse-like.)  Tall, light, creamy, and full of freshness, it will make any strawberry lover swoon. 

Strawberry Cheesecake, adapted from Dorie Greenspan’s Tall and Creamy Cheesecake from Baking: From my Home to Yours (via The Way the Cookie Crumbles)

Crust
1½ cups graham crackers
2 tablespoons sugar
pinch of salt
3 tablespoons unsalted butter or Earth Balance, melted

Cheesecake
4 (8-ounce) packages reduced fat cream cheese or Neufchatel, at room temperature
1⅓ cups sugar
½ teaspoon salt
2 teaspoons pure vanilla extract
4 large eggs, at room temperature
1 cup strawberry puree, divided

Directions

  1. Place washed and hulled strawberries in a blender (about 1½ cups whole) and puree until smooth.  Place through a fine sieve to remove seeds.
  2. For the crust:  Spray the bottom of a springform pan with nonstick spray.  Either grind the graham crackers with a food processor or place them in a ziptop bag and crush with a rolling pin.  Add sugar, salt, and butter to the crumbs and stir until evenly mixed.  Press the crumbs into an even layer covering the bottom of the prepared pan.  Put the pan in the freezer for 30 minutes.
  3. Meanwhile, heat the oven to 350 degrees F. Bake the crust for 7-10 minutes, until fragrant.  Let cool on a wire rack, then wrap the bottom of the pan in foil.  Reduce the oven temperature to 325 degrees F.  Bring a pot of water to a boil.
  4. For the cheesecake:  With a mixer fitted with the paddle attachment (or with a hand mixer), beat the cream cheese at medium-low speed until smooth.  Add the sugar and salt; continue mixing for about 2 minutes, until the mixture is light and creamy. Add the vanilla, then the eggs one a time, mixing just until each one is incorporated. Mix in ½ cup of the strawberry puree.
  5. Pour the batter onto the cooled crust.  Spoon the remaining strawberry puree over the batter and use a butter knife to gently swirl it.  Place the wrapped springform pan into roasting pan; pour the hot water into the roasting pan.
  6. Bake the cheesecake for 1 hour and 30 minutes.  Turn off the oven’s heat and prop the oven door open with a wooden spoon; let the cheesecake set in the water bath for another hour.  Remove the cheesecake from the hot water and let it come to room temperature on a cooling rack.  When the cake is cool, cover the top lightly and chill the cake for at least 4 hours.

Strawberry Coulis

Ingredients

2 cups quartered hulled strawberries (about 12 ounces)
1/4 cup water
3 tbsp sugar
1 tbsp fresh lemon juice

Directions

  1. Combine strawberries, water, sugar and lemon juice in blender. Purée until very smooth. 
  2. Press through a fine mesh strainer to remove the seeds. 
  3. Cover and refrigerate until cold.
Friday
May202011

Cookie Time: Butterscotch Pecan Cookies Recipe by Big Girls, Small Kitchen

CakeSpy Note: I am so glad you have plenty of money, because there's another book you should buy this year in addition to my CakeSpy oeuvre. It's called In the Small Kitchen: 100 Recipes from Our Year of Cooking in the Real World and it's by Cara and Phoebe of Big Girls Small Kitchen. Here's a guest post from these talented sweeties:

There are about a million reasons to bake, most of which are enumerated right here on CakeSpy. Sweets bring such pleasure, and they’re the easiest treats to share.

But sometimes a batch of baked goods is not just about the chocolate (or the butter or the sugar or the maple syrup).  We send off treats when we want to express an emotion or make a gesture that we’re just not eloquent enough to put into words. We bake, box, and deliver, and poof!—we’ve conveyed how we feel. 

So whether it’s guilt, atonement, or pity you need to demonstrate, we’ve got the sweet for you in our book,  In the Small Kitchenwhich comes out on Tuesday, May 24th! A whole section, called “Tins of Treats” is organized by emotion and the treat that goes with it. (In case you can’t wait, the answer is: brownies assuage guilt, “lotus” blondies are for atonement, and classic chocolate chip cookies are best for ameliorating a pitiable situation.)

For now, something simple: cookies for gratitude. It’s possible this is what cookies were invented for.

These Butterscotch Pecan Cookies are something special, as is fitting when you’re thankful. Their toothsome texture makes each bite melt in your mouth, and the sweet taste of butterscotch is balanced every so slightly by espresso. But the best part is the sweet-and-savory coating: these babies get a roll in a sugar-salt mix before going into the oven to caramelize and bake. Gratitude, indeed!

--Cara and Phoebe, bloggers at Big Girls, Small Kitchen and authors of In the Small Kitchen.

Butterscotch Pecan Cookies

Makes 24-30 cookies

If you can’t find butterscotch extract, use 3/4 cup butterscotch chips and decrease the pecans to 1 ¼ cups.

  • 2 cups (8-ounces) raw pecans
  • 2 cups plus 2 tablespoons all-purpose flour
  • 1 teaspoon baking soda
  • 1/2 teaspoon salt
  • 1 cup (2 sticks) unsalted butter
  • 2/3 cup granulated sugar
  • 2/3 cup packed light brown sugar
  • 1 egg
  • 3/4 teaspoon butterscotch extract (see note)
  • 2 teaspoons vanilla extract
  • 1/8 teaspoon espresso powder (optional)

 for coating the cookies:

  • 1/3 cup granulated sugar
  • 1 1/4 teaspoons salt

Procedure

1. Preheat the oven to 375°F.  Line 2-3 baking sheets with parchment (or just bake in batches).

2. Spread the pecan halves on a baking sheet and toast for about 10 minutes, checking every minute or so after 5 minutes have passed. You want the nuts to be fragrant and sweet but not burnt. Set aside to cool. (You can do this step a while in advance.)

3. Put 3/4 cup cooled pecans in a food processor. Pulse on and off until the pecans are just ground--you don't want to turn them into a paste.

4. On a cutting board, chop the remaining 1 ¼ cups pecans into small pieces. Put the ground and chopped nuts in a small bowl and add the flour, baking soda, and teaspoon salt. Stir to combine and set aside.

5. In a large mixing bowl with a handheld mixture, cream the butter with the sugars until light and fluffy.

6. Add the egg, beat until combined, then mix in the extracts and espresso powder.

7. Pour the dry ingredients into the butter mixture and mix just until the flour is incorporated.

8. Prepare the coating: mix together the additional sugar and salt on a shallow plate. Form the dough into 2-inch balls, and roll the balls in the sugar-salt mixture until coated. Place the balls on a baking sheet 3 inches apart.

9. Bake the cookies for 8-10 minutes, until the bottoms are golden and the tops are just barely firm. Remove and let cool on the baking sheet for 10 minutes before gently removing to racks or plates to cool completely.

Thursday
May122011

Sweet Honey: Homemade Honeycomb Recipe from Cake Gumshoe Victoria

CakeSpy Note: This is a totally sweet guest post from Singapore-based Cake Gumshoe Victoria, who blogs here.

Honeycomb; noun: A wax structure made by bees featuring hexagonal cells where they store eggs and honey.
Sounds a little... gross.

Honeycomb; delicious: An amalgamation of honey, sugar and glucose lifted to bubbly heights with the addition of baking soda. Promises to melt into almost nothing when you crunch into it. Much better and made even better when coated in dark chocolate. It’s like a whole fleet of honeycomb pieces entering a diving competition.
 
My first encounter with the confection was when my sister introduced me to Violent Crumble; similar to Crunchie. It was strange, like cotton candy, it looked so large yet dwindled into sugar sweet nothing in your mouth with only an aftertaste of honey lingering. I’m not even sure it was real honey now that I think of it. Their ‘pores’ were uniform, definitely not hexagonal and much smaller than the ones found in homemade honeycomb. I wonder how they did it.
 
So today I decided I’d try my hand at making my own. It’s simple enough, starring only a few main characters; sugar, honey, glucose and baking soda. It starts with a big pot, a minor effort of stirring and a huge uproar of sugar-ness rising once the baking soda comes into contact with the hot caramel-like liquid. It’s pretty fun to watch, like a school volcano project, only this time, completely edible.
 
They’re great covered in dark chocolate, or if you’re feeling quite hardworking, bake a batch of cupcakes and use these babies as their crowning glory.

Honeycomb
(from Home Cooking by Rachel Allen)
  • 1 tsp sunflower oil
  • 325g caster sugar
  • 50g honey
  • 125g glucose
  • 1 tbsp baking soda
  1. Line a large baking tray with parchment paper and grease lightly with the oil.
  2. Place the sugar, honey and glucose in a large pot. Add 4 tablespoons of water and bring to a boil over high heat. Stir until the sugar dissolves and stay away once it does; just let it boil in peace. Simmer, without stirring, for 5-10 minutes or until it reaches 149°C (300°F).
  3. Immediately remove from heat and quickly whisk in the baking soda. The mixture will grow very quickly. Pour into the prepared baking tray, swirling to spread the mixture evenly. Leave to cool completely before breaking into chunks and shards. Store in an airtight container.
For chocolate coated honeycomb chunks, melt 150g of chocolate in the microwave and then after it’s cooled down, spread it evenly with a spatula over the honeycomb pieces or just let them plunge into chocolate heaven. Leave to set completely on baking paper.
 
For more great recipes, visit Victoria's blog!
Wednesday
May042011

Getting Loopy: Froot Loop Whoopie Pies Recipe from Munchin With Munchkin

Photo: Muchin With MunchkinCakeSpy Note: This is a guest post from Cake Gumshoe Christine, who blogs at Munchin With Munchkin. Let the NOM begin:

The first time I had a whoopie pie was 15 years ago and completely by accident. I had found a sandwich cookie recipe in one of my mother’s cook books and begged her to make it with me. I remember the chocolate cookies being moist like cake and the icing tasted like no other. We only made them once as the cookbook was lent to a friend and never seen again.

I would dream about those cookies and subconsciously was on the hunt for another fresh batch. Every recipe I tried after that became a horrid mess of typical vanilla icing and cookies that in no way resembled cake. Years later the whoopie pie trend emerged and I finally re-discovered that magical cookie of my childhood.

One evening, after being horribly nostalgic, I picked up a box of fruit loops as a late night snack. The first bite yielded memories of elementary school and early morning chaos. By the second bite I had a revelation! The mysterious taste of fruit loops was no longer a mystery!

I ran to my spice cabinet and searched through the endless glass bottles until I found one in particular; cardamon. The spice that only  saw the light of day during a curry cook-off was the secret ingredient in my childhood cereal!

Upon this discovery I began to imagine all the new baking possibilities. Cardamon rice pudding, cardamon lime pie, cardamon cake, and that’s when it hit me; Fruit Loop inspired whoopie pies. Combining cardamon cookies with a light and fluffy fruit flavoured icing would make everything wrong in the world right. So today I say farewell to my diet (at least for now) and hello to orange and green coloured carbs.

Froot Loop Whoopie Pies

Cookies

  • 1 cup granulated sugar
  • ½ cup vegetable shortening
  • 2 eggs
  • 2 cups all purpose flour
  • 1 ½ Tsp. baking soda
  • ½ Tsp. salt
  • 1 cup buttermilk
  • 1 Tsp. vanilla extract
  • 1 Tbsp. ground cardamom

Lime Filling

  • ½ cup vegetable shortening
  • ¾ cup powdered sugar
  • ½ cup marshmallow cream
  • ½ Tsp Vanilla
  • 1 Tsp. Lime zest
  • 1 Tbsp. fresh lime juice

Mandarin Filling

  • ½ cup vegetable shortening
  • ¾ cup powdered sugar
  • ½ cup marshmallow cream
  • ½ Tsp Vanilla
  • 1 Tsp. Mandarin zest
  • 1 Tbsp. fresh mandarin juice

Procedure 

  1. Preheat Oven to 350.
  2. Line a baking sheet with parchment paper and spray with cooking oil; set aside. (Or alternately use a whoopie pie pan)
  3. In a large bowl cream together the sugar with ½ cup shortening using an electric mixer. Add eggs and continue to mix until well combined.
  4. Add flour, baking soda, salt, buttermilk, vanilla and cardamon and blend on low speed for one minute. Increase speed to medium and continue to mix for an additional two minutes ensuring to scrape down the sides.
  5. Scoop one tablespoon of batter onto the prepared pan about an inch apart. Bake in the oven for 8-10 minutes until no indentation appears when the top is lightly touched.
  6. Let cool on cookie sheet or in whoopie pie pan for two minutes and then transfer to a cooling rack until cooled.
  7. While cookies are cooling prepare the filling. Combine all ingredients in a medium bowl. Using an electric mixer beat on low for one minute.
  8. Add desired amount of food colouring, increase speed to high and continue to beat for an additional two minutes. Refrigerate until ready to use.
  9. To assemble cookies place a dollop of icing on the centre of the flat side of one cookie. Top with another cookie and press gently together to evenly spread the icing. Repeat for all cookies.


Makes about 20 sandwich cookies

Wednesday
Apr062011

Cake that Rocks: Guitar Cake Guide from Cake Gumshoe Claire

CakeSpy Note: Read on to discover a totally sweet Cake Challenge, as documented by Cake Gumshoe Claire: A guitar cake—from scratch.

No pan, no guides, nearly life sized guitar cake plus an informally trained baker equals an enticing experiment.

I fancy myself an untrained specialty cake master. For my friend’s birthday I decided to play with fondant (a kind of thick icing that’s mouldable like clay) and I made an incredible British flag (yes we’re all anglophiles here) out of cake! Since then my friends and I have always baked and made cakes whenever they come over. So we’ve started a kind of cake challenge tradition. This past time they suggested a guitar cake. So I did a little research and saw that most people had to buy a guitar cake pan. To cut down on cost and make things a little more interesting I thought my guitar mastered friends could sketch the shape of a bass that I could then carve out of pound cake.

While they sketched I put two 9 x 11 pound caked together and dirty iced them. I set my other three friends (who can’t cook toast) to rolling out fondant between two sheets of wax paper. Because of our lack of a sheeter (which rolls fondant mechanically to the perfect density) and lack of muscles and formal culinary training it took us about half an hour to roll out fondant big enough to cover this massive cake!

Once the cake was carved and iced and the fondant was rolled, we covered the cake in the white fondant. Smoothing it out over the cake and cutting the edges with precision. We then outlined the inside colours (I’m not a guitar expert so I don’t know what the inside of a guitar with the teardrop shape is really called- sorry) and filled it with black icing. We decided to model this cake after a bass from one of our favourite bands—McFly. We got all the details right, the knobs on the side of the guitar (once again not a guitar expert here—just an amateur baker!) we coloured them silver with edible spray paint (thank you Michael’s!).

Also, because we ran out of cake and someone forgot to bring rice crispy treats (let’s not name names) for the neck of the guitar, we carved it out of poster board and covered it with frosting to pretend it was cake. We got the two different shades of brown from chocolate frosting and chocolate mixed with white frosting. A little bit of art training came in handy!

Once we had all the details down (even the right amount and colour of frets and fret markers! Look at me—I speak a little bit of guitar-ist!) We decided it needed a little something. So in order to pay even more homage to our absolute favourite band, one of our artist friends sketched the band’s logo on wax paper and we cut it out. We then took red edible spray paint and with varied techniques on each letter, sprayed the logo onto the cake. However, I discovered that when working with edible spray paint and detailed stencils, it is best to use short bursts instead of continuous sprays of paint. So some of the letters had too much paint and it ran a little. But the best part about being an informally trained baker is—improv! I like to think I’m the MacGyver of cakes (seriously, a pretend cake guitar neck made from foam core? That’s pretty good—you gotta admit). So I told my artist friend to outline the letters in thin black icing and then spray some paint into the crease of some wax paper. She then filled in the letters with care and the logo came out looking great! Granted using brushes to fill in the letters would have been easier but we had none so we improvised!

The cake came out looking so good that no one wanted to eat it! Although we had been snacking on our fair share of cake trimmings. So we wrapped it up and I’m taking it to our scary movie marathon tomorrow to be awed at by all of our friends.

The next challenge put forth by my fellow anglophile friends was… a Tardis cake. For those of you who don’t know: a Tardis is a British police telephone booth that travels in time on a British television show called Dr. Who. We’re going to wire it up with working lights and everything. Oh boy- here we go again!

For more of Claire's work, visit her website here.

© Cakespy, all rights reserved. Powered by Squarespace.