Home Home Home Home Home Home Home
CakeSpy

Featured: 

My adventure at Ben & Jerry's in Vermont!


Unicorn Love: the Eating Disorder Recovery Blog


 Buy my brilliant books!

Buy my new book!

Buy my first book, too! 

CakeSpy Online Retail!


Archives
Gallery

Fantastic appliance for cake making on DHgate.com

everyrecipe.co.nz

Craftsy Writer

Entries from April 1, 2014 - April 30, 2014

Wednesday
Apr302014

Pure Sin: Butter Ice Cream Recipe

Butter ice cream

Don't be fooled. As sweet as the scoops above might look, the fact is that they are stuffed with sin. You see, dear readers, I have a confession to make. I have done something so, so, SO naughty.

I've made butter ice cream.

BUTTER ICE CREAM! 

You may be wondering, "is this for real?". Well, the answer, my friends...

Butter ice cream

While you absorb the gravity and general amazing-ness of this statement, let me explain. Don't start panicking, because there is a homemade butter ice cream recipe at the end of the story.

I was writing about how to make ice cream without an ice cream maker for an upcoming post on Craftsy, when it hit me: what if I used butter instead of cream to make the ice cream? After all, isn't butter the condensed best part of cream, anyway? The more I thought about it, the better an idea I decided it was.

So using the same method I used for the Craftsy writeup, I whipped up a batch of vanilla ice cream. But instead of heavy cream, I substituted an equal amount of butter. From there, I basically followed the same steps.

So, now that you've had some time to digest the words "butter ice cream", you're probably wondering "was it gross? Or was it awesome?". Because let's be honest, when somebody says something like "butter ice cream" it's probably going to be one or the other: awful of awesome. Something like butter ice cream is never just "well, it was ok". 

Butter ice cream

Listen. I need to tell you that there is a reason why this kind of ice cream is not sold in stores. It is absolutely made of sin. It tastes like the unholy love child of a rich buttercream frosting and frozen custard, which is to say, it tastes amazing. 

Now, there were some differences between the butter ice cream and regular ice cream. For one, it was flakier in the pan once frozen; I had to let it sit at room temperature for about 2 minutes before it would scoop properly. It doesn't have the same exact texture as ice cream. Oddly, the texture is more like a coconut milk or vegan ice creams I've tried in the past. But the taste is nothing like those varieties. 

Butter ice cream

Listen, I am not going to advocate eating buckets of the stuff, because quite frankly, you'd probably have a heart attack. But I am going to say that as a garnish for a treat, a thinly spread filling in an ice cream sandwich, or enjoyed in a single sinful scoop, this is a treat which ends up tasting way better than it has any right to. 

OK. Maybe you're sold, maybe not. But if you are curious, here's the recipe. 

Butter ice cream

BUTTER ice cream

Makes about 12 cookie scoop sized servings

  • 1 egg, beaten
  • 1/2 cup sugar
  • 1/4 teaspoon salt
  • 3 sticks of unsalted butter
  • 1 cup half and half
  • 1 1/2 teaspoons pure vanilla extract

Procedure

  1. Cut the butter into small pieces. Place the first five ingredients (everything but the vanilla) in a heavy bottomed saucepan. Stir CONSTANTLY. I found that if I didn't, burned bits of butter would form very quickly.  If they do, don't stop: we'll strain the mixture in a little bit.
  2. Butter ice cream
  3. Continue to cook until the temperature has reached 145 F (a few degrees over is fine). Keep a close eye on this as the smoke point for butter is 150 degrees F. Remove from heat, and if needed, strain the mixture into a different bowl through a sieve to strain out burned bits. Stir in the vanilla and place the bowl or pan in an ice bath.
  4. Butter ice cream
  5. While the mixture is cooling in the ice bath, place a stainless steel bowl (fairly shallow) or baking pan in the freezer to chill.
  6. Once the mixture has cooled, gently pour it into the cold pan. Take care that no drops of water from the bottom of the pan get in the mixture.
  7. Place the pan in the freezer for about 20 minutes. Remove the pan. Chances are, it feels a bit gluey. It's OK. Stir it as vigorously as you can, using a combo of rubber spatula (to loosen the mixture from the sides and bottom) and a whisk (to mix). Stir vigorously (but not so hard as to make the mixture go flying) for 1 minute or so. Return the mixture to the freezer.
  8. Homemade vanilla ice cream
  9. Repeat this process every 20 minutes or so for 6 cycles. The mixture will be slightly thicker every time. If at any point it is too thick, place the mixture in the refrigerator to soften slightly before stirring, then do the step and return to the freezer.  Once the ice cream has completely frozen, your ice cream is ready. 
  10. Butter ice cream

Enjoy in moderation and good health. 

Butter ice cream

Tuesday
Apr292014

Bali Diary: Dosha Balancing Drink Inspired by Bali Buda

Bali

In case you've been living under a rock and didn't know I spent an extended time in Bali, well, let me tell you.

Bali was great. It was magical. I eat pray LOVED every minute of it. 

One thing that was especially eye opening to me was the fact that Health Food Can Be Delicious. For instance, one day I am at a cafe called Bali Buda (yes, that's how it's spelled). They have something on the menu called a "Dosha Balancing Drink". I had no idea what a dosha was, but I know that the items that were in it according to the menu, which included banana, dates, and almonds, all sounded quite to my liking.

Bali

I took one sip and said to my companion, "I have no idea what a doshi is but mine feel so balanced right now!". You see, I'd already forgotten what this beverage was balancing. But what I still don't forget is the taste. It was perfect. Very mellow and subtle, but so calming. Even though it was a chilled drink, it tasted like a comfort food, with the sweetness of the banana and dates working in sweet harmony with the almonds. You could not be in a bad mood while drinking this thing. 

I blinked out of my reverie as my companion spoke up.

"Dosha," she gently chided, and I received the reader's digest version of the dosha story. Basically, doshas (is it doshi, plural?), according to Ayurvedic medicine, are "each of three energies believed to circulate in the body and covern physiological activity."

Anyway, if you want to know more about the doshas in your particular life, there's a quiz on the Deepak Chopra site. I can't believe I just linked to Deepak Chopra on CakeSpy. 

Unicorn eating a banana

Anyhow, once you forgive me for linking to the Chops, do give this recipe a try. Even though it's health food, it's awfully good food. The sweetness of the bananas and dates work beautifully with the richness of the almonds; even though it has no dairy, it's amazingly creamy. I'm never going to tell you it could stand in for dessert, but it's very acceptable as a snack or breakfast. 

Dosha Balancing Drink (AKA banana date almond smoothie)

Inspired by Bali Budha; adapted from Deliciously Ella

Makes 2 delicate servings, or one very large one

  • 1/4 cup almonds
  • 2 large ripe bananas
  • 1 1/2 cups very cold almond milk
  • 8 medjool dates, pits removed
  • 2 teaspoons of cinnamon

Procedure

  1. If your blender is not incredibly strong, go ahead and coarsely chop the almonds to start. I don't really care if they have skins on or not.
  2. Undress the bananas and remove the pits from your dates.
  3. Now, combine all of the ingredients in your blender. Blend for, I don't know, 1 minute or so, until it has reached your desired consistency. I like mine a little chunky, so I can use a spoon toward the end to snack on the lumps of almond and date bits. 

Enjoy in good health and highly balanced doshas. 

Tuesday
Apr292014

TV Show Themed Cakes

See that American Idol-themed cake? It's by Whipped Bakeshop, and it's also part of a roundup I did of TV show themed cakes. Check them out here!

Monday
Apr282014

Sweet Art: Donut Dream, It's Over

Perhaps you've already seen this image via my instagram, twitter, or facebook (I shared it all over) but in the odd event that you missed it, I thought this image might make you smile and make your Monday a little brighter. It's on sale as a print in my online store, too!

Sunday
Apr272014

White Chocolate Cranberry Pie

Nope. Cranberries aren't in season. Luckily this pie uses the dried kind! It is pretty much my favorite dessert since I made it. A sinfully sweet white chocolate filling is beautifully paired with tart cranberries for a tantalizing treat--bet you can't eat just one slice.

Recipe here!

Friday
Apr252014

Baker's Dozen: A Batch of Sweet Links!

New Card!

I'm selling ALL of my old card styles! Buy them while they still last! I will have one more sale when I clean out my storage unit in July, but I can't guarantee how many cards I will have then. 

Curious about baking with spelt? Here's a very informative article.

Key lime cheesecake cookies? The lime makes it healthy.

How to make your own brown sugar!

I'm obsessed with the Whole Foods chocolate mousse recipe.

Tips for freezing whipped cream.

Helpful if you're a heathen at the table: dessert etiquette.

I would like to get to know Salzburger Nockerl better.

A historical look at Angel Food Cake.

Pear and honey custard tart. Yumsies.

Bittersweet to hear of DailyCandy closing their doors. They were the first company to hire me as a freelance writer. I consider my time writing for them very formative.

A review: La Boulange pastries at Starbucks.

Sweet memories: Velveeta Fudge!

A primer on gluten-free flours for baking.

It made me so happy to read that this "desserts in moderation" article tells you to run like hell from fat free stuff (I am paraphrasing, of course).

Book of the week: 

Repast: Dining Out at the Dawn of the New American Century, 1900-1910. I can't put down this book about dining out in the early 1900s. It's fascinating to read about the foodies from the age before Julia Child, Craig Claiborne, and Ruth Reichl. Of particular interest is reading about how restaurants prided themselves on being innovators, both with recipes and with technology. If you're interested in the history of food, this is a must-read.

Wednesday
Apr232014

Bake For Good: A Sweet Adventure with King Arthur Flour

King Arthur Flour Bake For Good

So.

A few months ago I get an email from King Arthur Flour asking if I'll join their "Bake For Good" event in Seattle. Now, without even knowing what that was, my initial impulse was to say "yes! YES!". You see, I am a big fan of King Arthur Flour. One of the benefits of being a blogger is that you're allowed to be a groupie for things like flour companies. 

Only there were two problems. One was that I don't live in Seattle any longer, and they weren't paying for airfare. Second (bigger issue) was that I would be in Bali on the days of the event. So with a heavy heart I had to say no. I realize that you probably feel terrible for me that I had to turn something down because I would be in Bali.

Happily, there was a solution which made everyone happy: an event a couple of weeks later, in LA. I said yes, bought a plane ticket, and proceeded to not look up anything about the event I was attending. 

A few days before, I acquinted myself with the event, and was very impressed with what I found. 

King Arthur Flour Bake For Good

What is Bake For Good? 

According to the King Arthur blog, "Bake for Good is the umbrella name we give to everything we do here at King Arthur Flour to make the world a better place – through baking."

Loved it already. Don't you?

So, as part of their do-gooding outreach, King Arthur Flour decided to do several events, tour-style in the midwest and on the west coast, where they are not as well known. This had a double benefit--people in these areas could learn about their fantastic products, and they could do some good while they were out and about. 

On this particular tour, they would meet up with bloggers for two days in each city. The first day they taught us how to make bread and pies, and then we immediately put our newfound knowledge to work and baked up a storm. 

The next day, we took our baked goods to a shelter, and rounded it out with a full dinner. Let me tell you, this was a fantastic treat for them as well as for us. There was nobody who didn't win in this equation. 

Now that I have given you the basics, I will tell you about my adventure. 

Day 1: Meet, greet, bake. 

Day 1 started out bright and early, at 7.30 AM. As I approached the group, one lady said "Hello, Jessie!". I returned the greeting, cautiously. How did she know my name? Turns out, Susan Reid, one of the King Arthur Flour bakers and editor of The Baking Sheet newsletter, had done her homework. She not only knew everyone's name and face, but details about us (that I was from NJ, for instance). This was very impressive and just a little creepy--but in an awesome, how can I be more like that? kind of way. 

King Arthur Flour Bake For Good

The group was composed of seven talented food writers and bloggers including myself. I was lucky enough to meet Julianne of Beyond Frosting, Nicole of Pinch My Salt, Jennie and Corelyn of Garlic My Soul, Farley of Over Over Under and LA Weekly, and Jessica of Beer and Baking. I already had a good opinion of these people going into the event, but it only became a better opinion once I got to know them better. Good people!

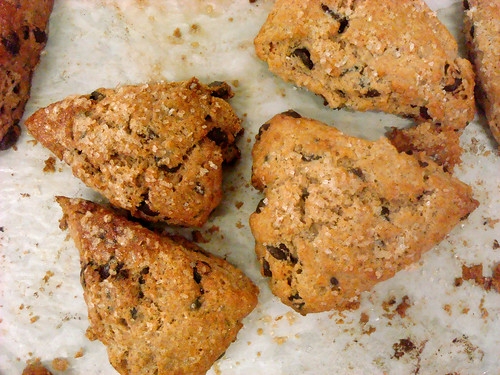
They warmed us up by letting us taste the still-warm chocolate chip scones you see above. Good. Good. Good.

We started out our baking with a bread tutorial from Robyn, another of the King Arthur Bakers. This woman was like a baking encyclopedia. She knew everything. She showed us the proper way to mix bread dough, knead, and shape it. Really, it was a great bonding experience. 

King Arthur Flour Bake For Good

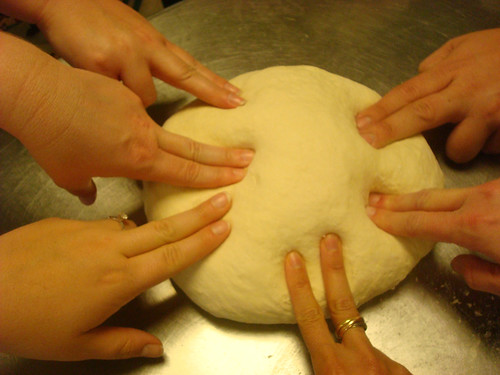
In spite of knowing everything, she was very inclusive of people who knew less. One thing I've always felt a deep shame about is my lack of proper training--I can get it done, baking-wise, but I don't always follow the proper procedure. When I asked things like "Is it OK that at this point I would normally just use my hands to mix the dough?" which were clearly NOT THE RIGHT ANSWER, she lovingly would assure me that I was doing fine without turning into a crazy pastry chef who yells "sacre bleu, you are doing eet all wrong!". 

BTW, I made copious notes. 

Under Robyn's tutelage, we quickly found ourselves making rolls...and then a braided loaf...and then a mega-braided (6 strands, baby!) loaf. Say what?
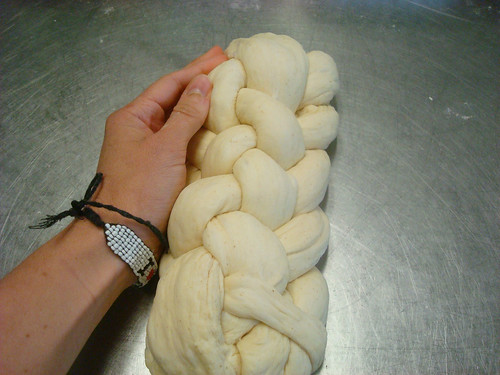
King Arthur Flour Bake For Good

Yup. We did good.

King Arthur Flour Bake For Good

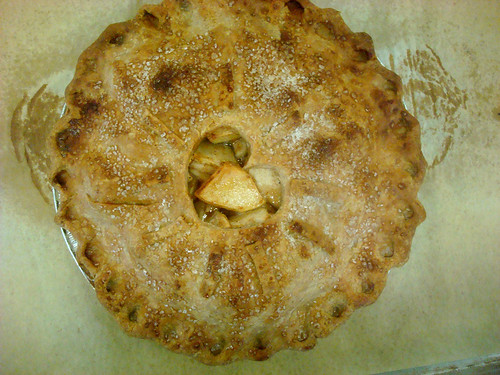
After a break, we were back to the dough and it was time for pie.
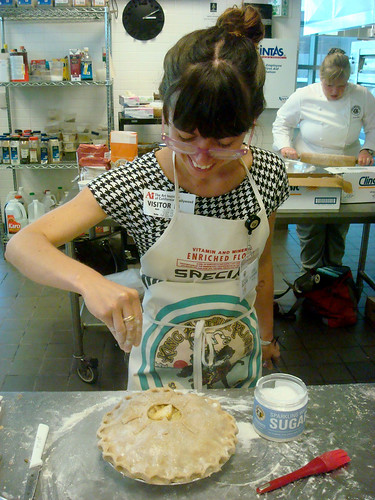
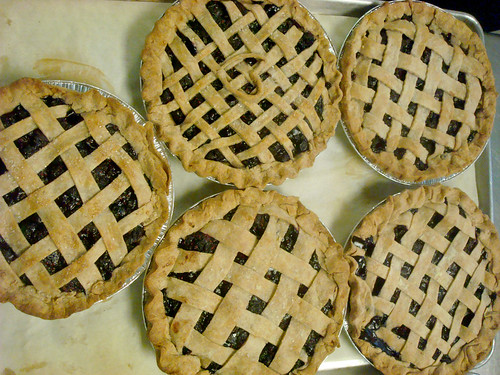
Pie Time


Now, unless you've been living under a rock, you probably know that People Are Scared Of Pie Crust. I don't see why--I'm not. But at the same time, while it's turned out fine, I've never been properly trained.

King Arthur Flour Bake For Good

Robyn showed us not one right way but two, and explained that there isn't one way. Before we knew it we were rolling and patting our crust into the pan with delightfully visible butter in the crust. 

But the coolest parts, to me, were these.

1. Robyn showed us how to peel an apple with high speed. First, peel the top, and don't lift the peeler. Drag it down and peel around the bottom. Now, bring the peeler in strokes along the sides, letting it lift between strokes. Seriously. So fast. 

King Arthur Flour Bake For Good

2. She showed us how to flute the crust. I never knew how to do this pointy style.

King Arthur Flour Bake For Good

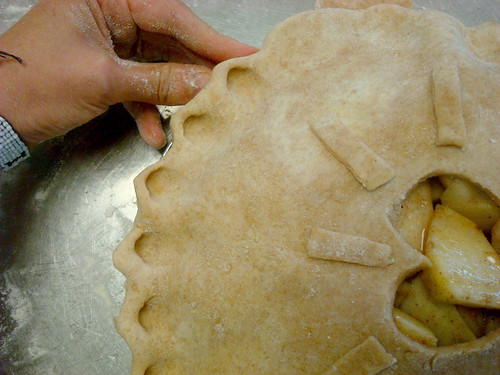
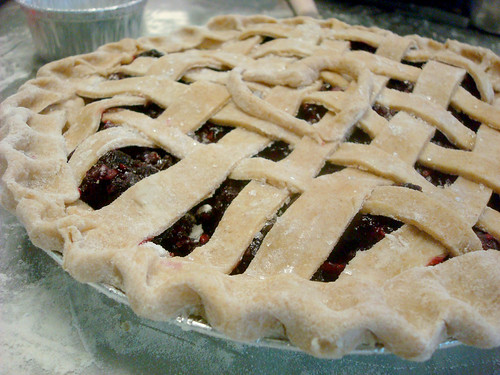
3. Susan stepped in and showed us how to do a lattice crust. She told us that the way I have always done it--right on the pie--is not necessarily incorrect, but that to keep things from getting messy, it's easier to do it on an upside down pie plate. How right she was! Plus, this has an amazing "voila" moment when you transfer it. It's exhilarating and fun.

King Arthur Flour Bake For Good

We baked up our treats and felt very satisfied. We packed them up for day two, and retired to dinner.

King Arthur Flour Bake For Good

We all went to a place called Little Beast for dinner. It was adorable - the amount of mason jars present in this restaurant was up through the stratosphere. Pinterest would love this place. But more importantly, it was freaking delicious. I had a really amazing chocolate mousse for dessert. It was served in a mason jar, natch.

I wore a sequined unicorn dress, if that matters.

There was a moment of stress when someone suggested the table share desserts. "I cannot tell a lie," I bravely confessed, "I do not share dessert." so I had this baby all to myself. I'm pretty sure everyone else was jealous. 

Photo via Beer and BakingDay 2: Sharing and caring

The next day was a bevy of doing good and meeting others who do good.

We started by visiting Homeboy Industries. Seriously, if you have never heard of this place, you need to. They do fantastic and inspiring things.

In a nutshell, Homeboy "serves high-risk, formerly gang-involved men and women with a continuum of free services and programs, and operates seven social enterprises that serve as job-training sites."

Former gang members--some previously jailed--are given a second chance by working at this world class bakery, working their way to recovery. As they gain experience and skill, they also gain entry back into the "real" world. We got to speak to several of the bakers and they were all amazingly inspiring, having come from the bottom to where they are today. Without a doubt every single person was a hard worker, and thankful for the opportunity. 

King arthur flour trip

And equally as important as their message...the cookies are great! 

After leaving Homeboy, we headed over to PATH to cook a dinner for the residents. We created a number of Susan's recipes, including mac n cheese, Spanish rice, lime-scented chicken, and veggies. We worked together in the tiny kitchen and made it happen, serving our wares along with the bread and the pies we'd made the day before. Talk about a good feeling, especially when we saw the smiles on the residents' faces. The shelter residents, I learned, rarely see food of this caliber, much less homemade desserts.

IMPORTANT: We all felt good at the end of the day. 

Photo via Beer and Baking

- - - - - -

RECIPES

King Arthur Flour Bake For Good

You didn't think I'd leave you hanging, did you? Here are the tasty recipes we made. Both are courtesy of King Arthur Flour.
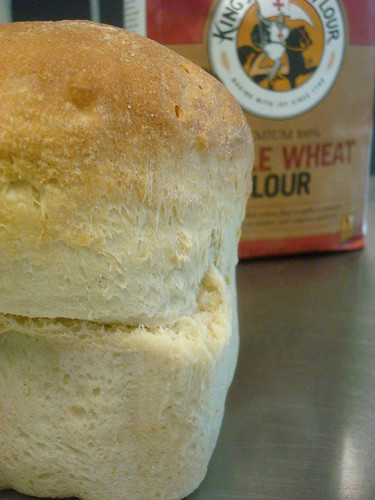
BREAD:

Yield: 1 large loaf, about 18 servings.

  • 1 1/3 to 1 1/2 cups lukewarm water*
  • 1 heaping tablespoon honey
  • 2 1/4 teaspoons instant yeast
  • 1 3/4 teaspoons salt
  • 2 tablespoons soft butter
  • 4 cups King Arthur Unbleached All-Purpose Flour
  • 1/3 cup Baker's Special Dry Milk or 1/2 cup nonfat dry milk granules

*Use the lesser amount in summer or humid climates; the greater amount in winter or drier climates.

  1. Mix all of the ingredients in the order listed, and mix and knead — by hand, or using a stand mixer — to make a smooth dough. It won't be particularly soft nor stiff; it should be smooth and feel bouncy and elastic under your hands.
  2. Place the dough in a lightly greased bowl or other container. Cover it, and let it rise at room temperature until it's very puffy, 1 to 2 hours.
  3. Gently deflate the dough, and shape it into a fat 9" log. Place it in a lightly greased 9" x 5" loaf pan.
  4. Cover the pan, and let the dough rise for 60 to 90 minutes, till it's crowned 1" to 1 1/2" over the rim of the pan. Towards the end of the rising time, preheat the oven to 350°F.
  5. Bake the bread for 20 minutes. Tent it lightly with aluminum foil, and bake for an additional 15 to 20 minutes, till it's golden brown. An instant-read thermometer inserted into the center will read 195°F to 200°F.
  6. Remove the bread from the oven, and turn it out onto a rack to cool. When completely cool, wrap in plastic, and store at room temperature.
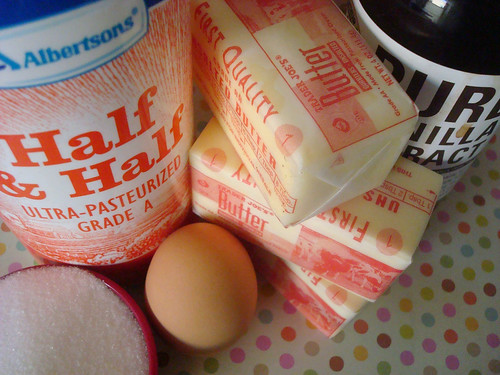
King Arthur Flour Bake For Good

PIE:

For the crust

  • 2 1/2 cups Perfect Pastry Blend or King Arthur Unbleached All-Purpose Flour
  • 3/4 teaspoon salt
  • 1/3 cup vegetable shortening
  • 1/2 cup (1 stick) cold unsalted butter
  • 7 to 10 tablespoons ice water

filling

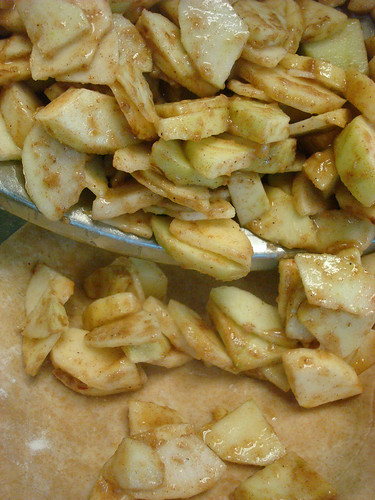
  • 8 cups sliced apples
  • 2 tablespoons lemon juice
  • 3/4 cup sugar
  • 2 tablespoons King Arthur Unbleached All-Purpose Flour
  • 2 tablespoons cornstarch
  • 1/4 teaspoon salt
  • 1 teaspoon cinnamon
  • 1/4 teaspoon nutmeg
  • 1/4 teaspoon allspice
  • 1/4 cup boiled cider or undiluted apple juice concentrate
  • 2 tablespoons butter, diced in small pieces
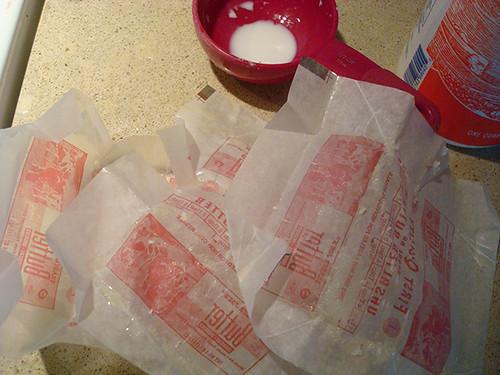
Procedure

  1. In a medium bowl, whisk together the flour and salt.
  2. Cut in the shortening until it's in lumps the size of small peas.
  3. Dice the butter into 1/2" pieces, and cut into the mixture until you have flakes of butter the size of your fingernail.
  4. Add the water, two tablespoons at a time, mixing with a fork as you sprinkle the water into the dough
  5. When the dough is moist enough to hold together when you squeeze it, transfer it to a piece of wax or parchment paper. It's OK if there are some dry spots in the pile. Use a spray bottle of water to lightly spritz these places; that way you'll add just enough water to bring the dough together without creating a wet spot.
  6. Fold the dough over on itself three or four times to bring it together, then divide it in half and pat it into two disks 3/4" thick.  
  7. Roll the disk on its edge, like a wheel, to smooth out the edges. This step will ensure your dough will roll out evenly, without a lot of cracks and splits at the edges later. Wrap in plastic and refrigerate for 30 minutes before rolling.  
  8. Lightly grease a 9-inch pie pan that's at least 2 inches deep. This will make serving the pie easier after it's baked. 
  9. Combine the sliced apples and lemon juice in a large mixing bowl.  
  10. In a small bowl, whisk together the sugar, flour, cornstarch, salt, and spices. Sprinkle the mixture over the apples, and stir to coat them. Stir in the boiled cider or apple juice concentrate.
  11. Roll out half of the pastry to a 13" circle. Transfer it to the prepared pan, and trim the edges so they overlap the rim of the pan by an inch all the way around.
  12. Spoon the apple filling into the pan. Dot the top with the diced butter.
  13. Roll out the remaining pastry to an 11" circle. Cut decorative vent holes, if desired. Carefully place the pastry over the apples.
  14. Time to preheat the oven to 425°F.
  15. Roll the overhanging bottom crust up and over the top crust, pinching to seal the two.
  16. Flute the edges of the pie, then place it in the refrigerator for 10 minutes to firm up the crust while the oven finishes heating.
  17. Place the pie on a parchment-lined baking sheet. Bake the pie for 20 minutes at 425°F, then reduce the oven temperature to 375°F and bake for 40 minutes more, until you see the filling bubbling inside the pie. Check the pie after half an hour of baking time, and cover the edges with foil or a pie shield to keep them from browning too quickly.
  18. When the pie is done, remove it from the oven and cool it completely before slicing.

To learn more about Homeboy Industries and PATH, click on the respective hyperlinks. 

To learn more about the Bake for Good program, visit the King Arthur site.  

Tuesday
Apr222014

5 Things I Learned from Craftsy Course French Pastry Classics

Photos via Craftsy course French Pastry Shop Classics

As youse-all know, I am a frequent contributor to Craftsy, a fantastic website which offers all sorts of crafty content.

And (get jealous) as a perk, I occasionally get a screener of one of their classes. 

Actually, their classes are amazingly cheap for all that they offer--I have taken a few and they're all insanely informative. 

After having taken the new-ish course French Pastry Classics, I feel more confident and better versed in baking French sweets after watching instructor Colette Christian go over the ins and outs of making pastry cream, ganache, cream puff pastry, gougeres, and a sweet fruit tart. 

I can't tell you everything I learned, because I am trying to tell you that the class is worthwhile to buy, but I can tell you some interesting things I learned while taking the course. These were just a few things I jotted down during the course that I thought were interesting little tidbits - there are many more in the course. Let's go:

I choux you:

Pâté à choux is the only pastry dough that you make on the stove. It's a stovetop wonder! Also, because of how the dough is created, you don't have to sift the flour first. Bonus for people who get lazy about sifting!

Chantilly, but not lace

When making chantilly cream (a sweet whipped cream), you need to attain some structure in the cream before adding the yummy stuff that gives it flavor. The reason is that if you add sugar or vanilla too soon, it will be weighed down. For best results, mix the cream until it has a yogurt-like consistency but not quite whipped cream-y, and then add in the vanilla and sugar. Mix until you attain the peaks you're seeking. 

Ganache and yum

Ganache is a simple thing: it has only two ingredients, chocolate and cream. This means that you can taste each ingredient really clearly, and it's worth investing in good quality stuff. In the course, you get specific suggestions. Seek out a cream with 38-40% butterfat for the perfect rich creamy flavor and texture; as for the chocolate, go for one that has 32 percent cacao or higher. This will ensure that it attains a perfectly fluid texture. 

What a tangled web..

You know those weird bits inside of a cream puff when you cut it in half? There's a word for it: WEBBING. It doesn't mean you've done anything wrong; it is caused because the egg can't help but create a bit of leftover structure while it's chemically weaving the awesome cream puff exterior. It's no big: simply spoon it out to make room for the pastry cream.

Bonus: Par-baking versus blind baking

In the course, I got a fantastic explanation of the difference between par-baking and blind baking. Finally! I have been using the terms (incorrectly) interchangeably for years. No more. Thank you, Colette Christian!

Check out the course here.

Have you ever taken a Craftsy course? If so, how did you feel about doing a cooking course online?

Tuesday
Apr222014

Recipe for Unicorns: Rainbow Gelatin Squares

Unicorn food

Good news for me: I got a review copy of a book in the mail. My bookshelf is happy!

Good news for you: in this book, entitled The 250 Best Brownies, Bars and Squares, there is a recipe for UNICORN FOOD! 

Now, in the book they call it Rainbow Gelatin Squares, but I'm not fooled. And happily, I'm allowed to share the recipe! Here it is, courtesy The 250 Best Brownies, Bars and Squares. So here it is for you, so you can create this magic at home!

Unicorn food

Makes 30 or so

For the clear / translucent layers

  • 4 packages (4 servings each) gelatin mix, assorted flavors
  • 3 cups boiling water, divided
  • 3 cups cold water, divided

for the creamy layers

  • 3 packages (4 servings each) gelatin mix, assorted flavors
  • 2 1/4 cups boiling water, divided
  • 3/4 cup cold water, divided
  • 1 1/2 cups evaporated milk, divided

whipped topping and fruit to top, if desired.

You need: 13x9-inch cake pan, greased

  1. Prepare the clear/translucent layers. In a bowl, combine gelatin dessert mix with 3/4 cup boiling water, stirring until completely dissolved. Add 3/4 cup cold water and mix thoroughly. Pour into a prepared baking pan and refrigerate for 35 to 40 minutes, or until almost set. 
  2. Prepare the creamy layers. In another bowl, combine gelatin dessert mix with 3/4 cup boiling water, stirring until completely dissolved. Add 1/4 cup cold water and 1/2 cup evaporated milk. Mix thoroughly. Spoon over chilled translucent layer and refrigerate until almost set.
  3. Repeat the translucent and creamy layers, making 7 in all, chilling each layer before adding another. You can stack colors in whatever way you'd like. 
  4. When all of the layers are completed and the gelatin is set, cut into squares. Decorate squares with topping and garnish of your choice.
Monday
Apr212014

Spring Cleaning: Amazing Savings on CakeSpy Products

I've been at the artwork game for a while, and I feel like it's time for a change. I've decided to debut some awesome new designs, but first, I need to clear out the old to make room for the new!

This is great news for you, because I am selling onesies, cards, and other products at AMAZING savings.

A sampling of what you could get in the online store:

Onesies or toddler tee shirts for just $2 each! 

50 (yes, 50!) assorted CakeSpy cards for just $10. When's the last time you bought a greeting card? You're lucky to buy 2 cards for $10 these days. You'll be stocked up for quite some time!


Mugs for just $3. 


Seriously--great values! I will be having this sale until the items are gone; I'll have another sale in July when I empty out my storage unit. But don't delay, because when they are gone, they're GONE.

Give it a shop at cakespyshop.com.

© Cakespy, all rights reserved. Powered by Squarespace.