Home Home Home Home Home Home Home
CakeSpy

Featured: 

My adventure at Ben & Jerry's in Vermont!


Unicorn Love: the Eating Disorder Recovery Blog


 Buy my brilliant books!

Buy my new book!

Buy my first book, too! 

CakeSpy Online Retail!


Archives
Gallery

Fantastic appliance for cake making on DHgate.com

everyrecipe.co.nz

Craftsy Writer

Entries in guest blog (62)

Tuesday
Oct282014

Rainbow Japanese (Onigiri) Rice Ball and Unicorn Cookie Bento Boxes

CakeSpy Note: You guys. I am so, so excited to feature a rainbow-rich guest post from Kim of Ninja Baking! I'll let her take it from here. Enjoy!

Rainbow Japanese (Onigiri) Rice Ball and Unicorn Cookie Bento Boxes

by Kim Watkinson, The Ninja Baker, NinjaBaking.com
 
Do you ever get dizzy whirling around on a planet where the bad news du jour is served 24/7? Isn’t it comforting that a tap or two of computer keys transports you to a realm where rainbows, unicorns, hearts roam freely? Plus a place where recipes for goodies we all secretly crave reign supreme!  Of course, I’m talking about the virtual home of the CakeSpy aka author/artist Jessie Oleson Moore.  
 
Perhaps I find particular comfort in the CakeSpy site because of my history. Although I’m an American of European descent, Japanese food and language were all I knew until age 5. Tokyo was my hometown until I entered UCLA’s Theatre Arts program at 18. The Japan I grew up in was akin to what I imagine the ‘50s were in the US. Innocence prevailed. (Yes, ignorance about important issues were also prevalent.) There was a sweetness and a modesty in 1970s Japan. It’s still there but diluted. The younger generation is bolder. For better or for worse, the influence of pop culture from abroad is evident in Japan.
 
A few Japanese characteristics and traditions, however, remain steadfast. Young girls still clamor over all things “kawaii” cute and pretty. Blinged out cell phones are adorned with Hello Kitty and other cuddly characters. Adults continue to tastefully display exquisite works of art and flower arrangements in their homes. Bento lunch boxes have also never gone out of style.
 
So as a thank you to the CakeSpy for her insistence on focusing on the whimsical and wonderful, I’ve created Rainbow Japanese (Onigiri) Rice Ball and Unicorn Cookie Bento Boxes.
 
Ninja Note: Before any sort of cooking or baking, mise en place, set up of needed ingredients and tools makes for a peaceful kitchen. 


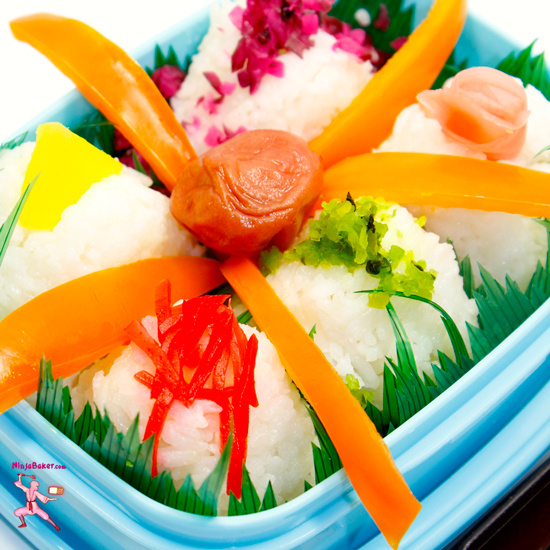
For the Rainbow Japanese Onigiri Rice Ball Bento, here’s what you’ll need:
 
*Freshly cooked rice

*A small bowl of water for sticky fingers from shaping rice into triangles

Ninja Note: Japanese pickles will probably appeal to sushi lovers familiar with pink ginger shoga. The most kid-friendly of all the listed pickles is the slightly sweeter red beni shoga.

*A rainbow assortment of Japanese pickles:
Pink Sushi Ginger Shoga
Green ao-jiso no mi  (radishes, soy sauce, salt, sugar, vinegar)
Purple pickled perilla, ginger and egg plant
Red pickled ginger
Yellow daikon radish slices
Red pickled plums
 
Shape the rice into triangles and garnish with the desired Japanese pickles. Pack them into your bento lunch box. Include bell pepper slices or other veggies.


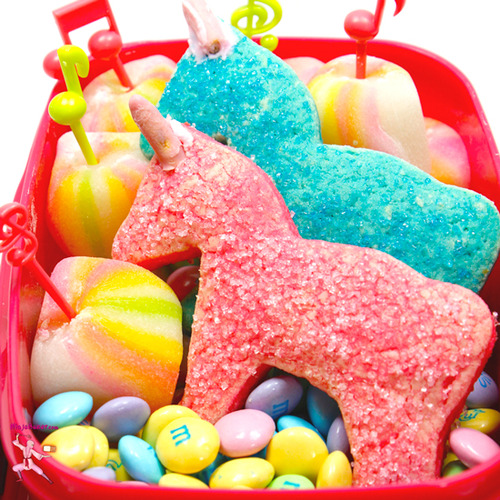
For the Unicorn Cookie Bento Box, here’s what you’ll need:

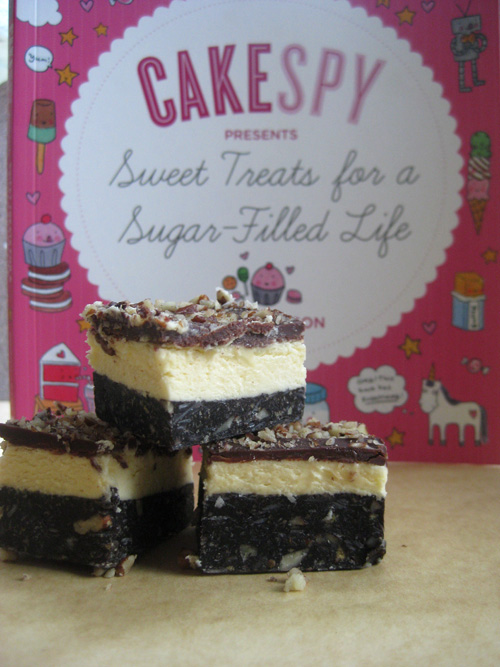
*Jessie Oleson Moore’s The Secret Lives of Baked Goods: Sweet Stories & Recipes for America's Favorite Desserts
*OR a pair of good eyes to see the modified Scout Butter Cookies recipe from the cookbook. (Courtesy of the CakeSpy.)

*M & Ms
*Rainbow mochi (Japanese pounded rice) candies or anything else delicious and multi-colored
*Unicorn Cookies: 
Adapted from Scout Butter Cookies in The Secret Lives of Baked Goods
 
Ninja Note: The sanding sugar crusted cookie gives way to a softer cookie inside a scrumptious unicorn-shaped delight!
 

*Unicorn Cookie Ingredients:

  • 2 cups all-purpose flour (plus extra for rolling out cookie dough)
  • ½ cup coconut flour
  • 2 pinches of salt
  • 1 cup unsalted butter, softened
  • 1 cup sugar
  • 2 large eggs
  • 2 tablespoons milk
  • ½ teaspoon vanilla extract
  • Pink and blue sanding sugar
  • Horse cookie cutter
  • A rolling pin
  • A large cutting board
  • Wax paper 
  • Japanese Pocky biscuits for unicorn horns
  • Vanilla frosting (to act as glue)


*Unicorn Cookie Directions:

  1. Cream the softened butter and sugar in the bowl of a kitchen stand mixer for 6 minutes or until light, fluffy and pale in color.
  2. Add the eggs one at a time. Scrape the bowl after each addition.
  3. Pour in the milk and vanilla extract. Incorporate into the mix.
  4. Sift together the flours, baking powder and salt. 
  5. Gradually stir in the flours, baking powder and salt.
  6. Divide the dough into two medallion balls.
  7. Cover the dough balls with plastic wrap.
  8. Refrigerate for 2 hours or overnight.
  9. Take the dough out of the refrigerator 15 minutes before you are ready to roll out the dough into unicorns.
  10. On a hard surface such as a large cutting board, roll out the dough between 2 pieces of floured wax paper to a ¼ inch to ½ inch thickness.
  11. Cut out (horse) unicorn cookies. Sprinkle with sanding sugar.
  12. Place the cookies on a parchment lined cookie sheet.
  13. Freeze for 2 hours or overnight.
  14. Bake in a 375 degrees oven for 10 minutes or until the edges are golden brown.
  15. Once cooled, attach Pocky tips onto the horses with vanilla frosting for unicorn horns.
  16. Place the unicorn cookies into the bento boxes with the M & Ms and rainbow mochi.

*For more info about Kim Watkinson, The Ninja Baker 


Wednesday
Jul092014

Waste Not Want Not: Compost Cookies Recipe

CakeSpy note: this is a guest post from Stefanie Ellis. When she's not busy masquerading as a giant Thin Mint, Stefanie writes about food and relationships. She is a former restaurant critic and food writer for the St. Louis Post-Dispatch and St. Louis magazine, and is the PR director for Girl Scouts of Western Washington. You can reach her via email here.

I have a confession to make: I don’t really like cookies. I’ve tried really hard to like them. I was even sprawled out on a settee while some handsome man fed some to me, and that STILL didn’t work. Crazy? Maybe. But I’m more of a cake kind of girl. I would ditch a handsome man if it meant I could spend an evening on my settee with a devil’s food cake slathered in bittersweet chocolate ganache. For me, cake takes the cake.

However, there have been a handful of experiences in my life where cookies have actually competed with my love for cake, and left a rather remarkable impression.

Like when I was little, and my mom would serve me chocolate chip cookies warm from the oven when I came home from school. I never knew when these magical, melty kitchen table sessions would happen, so it made it even more exciting. The chocolate would get all over my face, and we’d laugh and talk about our days. I can’t imagine anything more wonderful than that feeling, or that perfect marriage of sugar, butter and chocolate. My local grocery, Metropolitan Market, started making giant chocolate chip cookies with several types of chocolate. They make them every five minutes, so when you walk into the store, there’s always a fat, gooey cookie waiting for you. Instantly, I am catapulted back to my kitchen table, laughing with mom. Sometimes I eat one while I walk through the store, only to realize I had chocolate all over my face the whole time.


When I went to college, my grandmother would send me care packages filled with oatmeal cookies with apricots and pecans. I don’t like oatmeal cookies, but hers were saucer-sized orbs of the softest, silkiest, cinnamon-kissed dough I’ve ever tasted. The apricots paired beautifully with the cinnamon, and she ground the oatmeal so fine you didn’t even know it was in the recipe. These are the only oatmeal cookies I could ever imagine eating every day for the rest of my life.


When I went to pastry school, I made my first macarons. They were pink. But more than that, they were so crisp and delicate, it seemed as though they might shatter if you laughed within close proximity. The insides were tender and ethereal, like a pillow made of cotton candy. When I melded the fragile shells together with homemade raspberry jam, it felt like I was painting the inside of a princess castle.

And let’s not forget Girl Scout Cookies. I’m not just saying this because I work for Girl Scouts. I couldn’t, even if I wanted. Girl Scout honor. I’ve had a love affair with Girl Scout Cookies ever since I can remember. To me, Samoas and Thin Mints are right up there with Nutella eaten straight out of the jar. They’re a luxury, and I don’t eat them year-round, as many people believe (people also think our office has stairs made of Do-Si-Dos). When I do eat them, I’m transported back to the sweetest moments in my childhood, when my biggest stressor was whether or not to play freeze tag, jump rope or eat the blackberries from my neighbor’s yard.

Each one of these cookie memories has been completely different – sort of like a bunch of different experiences were dumped into my brain and mixed around, creating a sweet feeling of joy in my heart.

I realize they’ve created the perfect base for these Crazy-Sexy Compost Cookies, my new favorite. Yes, that means I kind of like cookies now. I guess I can thank Christina Tosi for that. I’ve been hearing of her compost cookies from Momofuku Milk Bar for years, and love that her recipe uses coffee grounds. I’m a big compost geek. I have my master composter’s certification, and have even been known to take my compostables on planes from time to time.

I always have random bits of ingredients in my pantry that can never really be used for a single recipe, and that’s why I love these cookies so much. Have just a few ingredients that don’t go together at all? No problem! You might even find, as I have, that cookies are even better when you start adding in wacky ingredients. Goldfish crackers or Almond Roca, anyone?


Tosi’s recipe calls for butterscotch, pretzels, graham cracker crust and oats, and I have eliminated those ingredients, replacing the oats with maple pecan granola, and adding in banana chips and crystallized ginger. I also use almond flour in place of some of the regular flour, which makes for a wonderful texture. All in all, this cookie has really challenged my perception of what a cookie can or should be. Not to mention it has done a nice job in helping me remember that cookies, like memories, are much better when you throw a bunch of different things together and mix them around to create a sweet feeling of joy in your heart – and in your stomach.

Crazy-Sexy Compost Cookies

Note: Compost cookies are trademarked by Momofuku. These cookies were not made for resale.

YIELD: Approximately 25 cookies

INGREDIENTS

1½ sticks butter, room temperature (12 T)

3/4 cup raw sugar

¼ cup coconut sugar

1 egg

1 teaspoon vanilla bean paste

1 cup unbleached flour

1/4 cup ground almonds

1/2 teaspoon baking powder

1/4 teaspoon baking soda

1 teaspoon salt

1 T maple agave syrup or maple syrup

1 cup dark chocolate chips

1/2 cup banana chips, crushed

2T candied ginger, finely chopped

1/2 cup granola, such as Trader Joe’s Maple Pecan

1 cup potato chips, crushed

Procedure


  1. Heat oven to 375 degrees.
  2. Combine the butter and sugars in the bowl of a stand mixer fitted with the paddle attachment and cream together on medium-high for 2 to 3 minutes. Scrape down the sides of the bowl, add the egg and vanilla, and beat until well blended. Reduce the speed to low and add the flour, almond meal, baking powder, baking soda, and salt. Mix just until dough comes together, about 30 seconds. Do not over mix. Scrape down the sides of the bowl with a spatula.
  3. With a spatula, add the chocolate chips, banana chips, granola, maple agave syrup, ginger and potato chips. You’ll want to crush the ingredients a bit to make sure there aren’t large chunks, but do so judiciously, not incessantly.
  4. Refrigerate dough for 30 minutes to 1 hour.
  5. Arrange the chilled dough 4 inches apart on parchment or silicone baking mat-lined sheet pans. Bake for 15 minutes, or until the cookies are golden brown.


Cool the cookies completely before transferring to a plate or container for storage. At room temperature, cookies will keep fresh for 5 days; in the freezer, they will keep for 1 month.

Saturday
Feb182012

Dough You Love Me: Batter Belly Dough Cake Recipe by The Miss Cupcake

Finalist 4: Batter Belly Dough Cake

CakeSpy Note: This is a guest post from The Miss Cupcake, who was a finalist in the "So You Wanna Be a CakeSpy?" Contest.

Batters’ Up! This mile high mini cake is sure to please any batter-licking soul. The hip hugging delight starts with a chocolate chip cookie layer, and then is topped with cookie dough filling. Bring on the brownie with a chocolate fudge variety which is blanketed under a plump layer of brownie batter filling. Lastly, a moist funfetti layer sends this cake into doughy harmony. Laced with a cake batter frosting and topped with mini baked treats, this dessert is no dream, it’s an unbaked ecstasy. Dough you want to try it?

Batter Belly Dough Cake

(Makes 2 mini cakes)

Items Needed:

Cake:

  • 1 roll refrigerated chocolate chip cookie dough
  • 1 box brownie mix, reserve ¼ cup for filling
  • Water, oil, and eggs called for on the back of the brownie box
  • 2 box Funfetti cake mix, one for baking and one for filling
  • Water, oil, and eggs called for on the back of the cake box

Directions:

  1. Preheat oven to 350*F. Grease and lay parchment paper into 3 pans. (1 Square 8x8 and 2 9x13 pans)
  2. Press cookie dough into a greased 8x8 pan. Bake for 20-25 minutes or until golden brown. Let cool.
  3. Prepare brownie mix according to package, making sure to reserve ¼ cup for filling. Pour into greased 9x13 inch pan. Bake according to package. Let cool.
  4. Prepare cake mix according to package. Pour cake batter into prepared pan. Bake according to package. Let cool.
  5. Using a 6 inch round cookie cutter or the end of and large circular object, cut two circles of each of the following: chocolate chip cookie, brownie, and cake. Set in the freezer for 20 minutes to harden. (If desired, using a small round cookie cutter. cut out circles of cookie, brownie, and cake. This will be used as a garnish)
  6. Meanwhile, prepare the frostings: recipes follow.
  7. To assemble each mini cake, start with a small dollop of cookie dough filling on the bottom of a small cake plate. Place cookie layer first, top with cookie dough filling, then the brownie layer, brownie filling, cake layer, and frost entire cake with cake batter icing. Pipe round dots of each icing flavor around the entire cake. Frost the mini cake circles, and place several small cutouts on top of the cake.

  8. Cookie Dough Filling
  • 1 stick softened salted butter
  • ¼ cup packed light brown sugar
  • 1 1/4 cups powdered sugar
  • 1/3 cup all-purpose flour
  • 2 TBS. milk
  • 1 tsp. vanilla
  • 1/4 cup mini semi-sweet chocolate chips

Beat butter and brown sugar until light and fluffy. Slowly add the powdered sugar. Add flour, milk, and vanilla. Beat on medium high for 3-4 minutes. Stir in chocolate chips.

Brownie Batter Filling

  • 2 sticks unsalted butter, softened
  • 3 cups powdered sugar
  • 1/4 cup brownie boxed mix
  • 1/8 cup cocoa powder
  • 1 teaspoon vanilla
  • Milk, as needed

Beat butter until light and fluffy. Add powdered sugar a 1/2 cup at a time, then brownie and vanilla. Beat on medium high for 3-4 minutes. Add milk if too stiff.

Cake Batter Buttercream

  •  2 sticks unsalted butter, softened
  • 3 cups powdered sugar
  • 2/3 cup Funfetti cake mix (You will have leftover!)
  • 1 teaspoon vanilla
  • Milk, as needed

Beat butter until light and fluffy. Add powdered sugar a 1/2 cup at a time, then cake mix and vanilla. Beat on medium high for 3-4 minutes. Add milk if too stiff. 

Tuesday
Nov292011

Natty Boh Cupcakes Recipe from Cake Gumshoe Jen

CakeSpy Note: This is a guest post from Cake Gumshoe Jen, who lives in Annapolis, Md., just down the road from Baltimore, the home of National Bohemian beer -- or Natty Boh. She was inspired by the adorable man with the mustache to bake these Natty Boh cupcakes for her blog, Eat. Swim. Shop. 

If you’re not from the mid-Atlantic, you may not be familiar with National Bohemian beer — or Natty Boh.

Natty Boh has a long history in Baltimore, and while it’s not brewed in the Charm City anymore, many people consider it Baltimore’s beer. And the super cute one-eyed mascot, Mr. Boh, still winks at everyone from the top of Brewers Hill. So when I decided to bake some beer cupcakes in honor of Baltimore Beer Week, I had to use Natty Boh.

I am not a beer person, but Natty Boh tastes a little like Corona to me. So I thought lime zest would work well with the beer in the batter.

I didn’t whip the egg yolks long enough because I’m impatient. But the cupcakes will be even spongier if you do. So you should.

Don’t be scared by the beer in the batter. The cupcakes just have a slight hint of Natty Boh flavor (and scent), but it’s really nice. I put a little bit of beer in the frosting, too, but you don’t have to.

FYI, it’s probably a good idea to make sure you have enough powdered sugar to make frosting before you start making the frosting… especially if it’s 11 p.m. and your neighbors are asleep.

Since these are Baltimore cupcakes, I used Duff/Charm City Cakes black fondant to make little Mr. Boh-esque mustaches. I just used a small sharp knife to cut the mustaches out, but you could make a stencil from parchment paper if you’d like. I also tried to do an eye, but it looked weird. Alas.

Of course, don't let the extra beer go to waste...

Here's the recipe.

Beer-lime cupcakes (Recipe adapted from a really old edition of the Joy of Cooking. Makes about 15 cupcakes)

  • 1 teaspoon lime zest
  • 1 cup granulated sugar (sift if there are a bunch of chunks in it)
  • 3 large eggs, separated and at room temperature
  • 1/3 cup beer
  • 1 cup cake flour
  • 1 1/2 teaspoons baking powder
  • 1/4 teaspoon salt

Procedure

  1. Preheat oven to 350 F. Stir the sugar and lime zest together in a small bowl or measuring cup.
  2. Beat the egg yolks in a medium bowl until thick and lemon-colored — this may take a few minutes. Gradually add the sugar and beat until well combined. Stir in the beer. (And wash the beaters)
  3. In a small bowl or measuring cup (you can use the one you used for the sugar), stir together the cake flour, baking powder and salt. Gradually add to the yolk mixture and stir until combined.
  4. Using clean, dry beaters (and a clean, dry small bowl), beat the egg whites until they hold peaks, but are still glossy. Fold the beaten egg whites into the cake batter.
  5. Pour or spoon the batter into lined cake pans, filling each cup about 3/4 full. Bake for 15 minutes, or until cupcakes start to brown and a toothpick inserted in the center of one comes out clean. Allow to cool before frosting.

Beer-lime buttercream (makes just enough to frost 15-16 cupcakes, double recipe if you want to use a lot of frosting on each cupcake)

  • 1 stick (1/4 cup) butter, at room temperature
  • 1 1/2-2 cups powdered/confectioners’ sugar
  • 1/2 to 1 tablespoon beer
  • 1/2 tablespoon lime juice
  • 1 teaspoon lime zest (optional)

Procedure

Beat butter and 1 cup powdered sugar together until fluffy. Add beer, lime juice and lime zest and beat to combine. Add additional powdered sugar until frosting reaches desired consistency (or until you run out, like me).

Saturday
Nov262011

Sweet Excess: Cake Gumshoe Jenny Visits the State Fair of Texas

Photos: Purple House DirtCakeSpy Note: Cake Gumshoe Jenny, who blogs at Purple House Dirt, is an invaluable source of sweet knowledge. She's visited sweet-shops in Ireland and was a recipe tester for my lovely and amazing book. And now, she's reporting on treats, mostly sweet, but some savory, of the deep-fried variety from the Texas State Fair! Read on:

At the State Fair of Texas, we put our stomachs to the test as we ate as many of the fried goodies that we could. As we nibbled, we sat with the recorder and captured our thoughts. 
******
At the fair this year we tried to hit booths that had some unusual options - not just the standard funnel cakes and elephant ears. The only exception I made to this was the corn dog - because of what I heard eavesdropping. I was standing in line to buy a cold Big Red when a crusty old cowboy-lady told her fair-going friends that the only thing she wanted to eat was a Fletcher's and then she could go home and wait until the fair came back next year. Having had a particularly bad corn dog at the Puyallup Fair back home, I was determined to have a better one, and my friend Jessica assured me Fletcher's was the genuine article. Only problems were the lines - all of the Fletcher's booths were at least an hour deep from the time the fair opened that morning. We'd have to hit it in the afternoon. 

The first thing we tried was this year's award winner for creative fair food (really!), fried bubblegum (pictured top). It came 3 to a stick, and was covered in teal-blue frosting and was sprinkled with Chiclets. This was perhaps not the right thing to start the day with - a sugar-soaked fried contraption - but sacrifices were required and we each took one in the name of pseudo-science. The laughter of the surrounding families proved what we knew from the mess in our mouths. This thing was nasty. Imagine a bubblegum-flavored marshmallow melted to the magma stage, then topped with grainy blue frosting that stains your teeth. That, my friends, is fried bubblegum. Out of 10 stars, this didn't even make the charts. 

Dying to get the flavor out of our mouths, we went for fried beer. Not just any fried beer, but Shiner Bock, a little local from Shiner, Texas. I'd expected this to be a beer-flavored pillow, and was surprised to find hot liquid beer dribbling out of the fried ravioli case. Dipped in cheese sauce, this was a 5 out of 10. Needed more salt, but it was good at wiping the fried bubblegum slate clean. 

Frito pie is a ballpark tradition and must be something of a Texas thing because we ate these in elementary school. Open a bag of Fritos, ladle all-beef chili into the bag, and then top liberally with cheese. So when I saw the fried Frito pie, I knew I had to try it. Besides, a friend of a friend invented it and I knew I wasn't leaving the park without some in my belly. It was a plate of fried dough balls made of Fritos, chili and cheese, and was topped with sour cream and salsa. When all of the components came together, it was magic and took me right back to the school cafeteria. Easily a 7 out of 10. 

The only thing I'll say about the Fletcher's is that it was the real deal. And I bought a shirt to commemorate the awesomeness of this corny dog. 9 of 10. 

Deep-fried MargaritaThe most surprising treat at the fair was the fried frozen margarita. We declared this one the winner before we even took our last bite of fair food, we were that confident in it. As the two of us sat on a crowded picnic bench, Texas neighbors watched and laughed as we first nibbled, and then chugged our way through the margarita. It was served in a classic margarita glass, salt-rimmed and all. Fried funnel cake bits were scooped into the glass, then a generous pour of ice-cold tequila and lime syrup soaked it all (in fact, there was more liquid than fried nuggets). Topped with a little whipped cream and a thin slice of Persian lime, the fried frozen margarita was refreshing, surprising, and highly alcoholic. Tequila giggles ensued, and this winner clocked in at a 9 of 10.

Deep-fried PB SandwichThe last booth we visited boasted the Elvis - a fried peanut butter, jelly, and banana sandwich. It was served quartered, dusted with powdered sugar and a drizzle of grape jelly, and was very very hot. The sandwich insides oozed out when we took bites, and we decided that the banana really made the treat work. Alone, the PB&J was average. Add a hot fried banana to the mess and you have a contrasting flavor and texture, along with a little moisture. Definitely an 8 of 10. 

Perhaps the happiest moment of the fair was as we were walking out. The day had been filled with sugary sweets and fatty snacks, and rather than drinking water in the heat I kept chugging a warm Big Red. Just after I tossed my soda bottle we encountered a tooth brushing station - sponsored by a big-name toothpaste company. Even though we felt like idiots brushing and spitting in a community trough, the sensation of getting the day's sugar off my teeth was welcome. I could almost have gone back for more.

For more of Jenny's adventures, visit Purple House Dirt.

Thursday
Nov032011

Pizzelle Recipe: Breakfast of Champions, from Cake Gumshoe Rachel

Photo: Not Just SweetsCakeSpy Note: This delicious recipe comes from Cake Gumshoe Rachel, who writes the website Not Just Sweets.

My grandpa, whose family was from the Abruzzi region of Italy,  believed in starting the day with his favorite breakfast: pizzelle cookies dunked in his morning coffee.  He always kept an empty coffee tin filled with pizzelles by the front door so when friends or family walked in they could help themselves to a cookie.  At least once a week we would make pizzelles using his recipe:

Pizzelles

  • 3 eggs
  • 3/4 cup sugar
  • 1 1/2 sticks butter, melted
  • 1 3/4 cups flour
  • 1 teaspoon baking powder
  • 1 1/2 teaspoon vanilla extract
  • 1 1/2 teaspoon anise extract*

Procedure

  1. Add in the order listed. Drop by spoonful onto center of pre-heated pizzelle iron.
  2. Close lid and cook until steaming stops, about 45 seconds.
  3. Place a towel on the side of the iron and place pizzelles on towel and allow to cool.

*If you prefer a more mild anise flavor, use 2 teaspoons of vanilla extract and 1 teaspoon of anise extract. These cookies are easy to make and will stay fresh for 3 days in an airtight container. You can serve plain or sprinkle with powdered sugar or shape into ice cream cones and cups. Pizzelle irons are available online or at your local Williams-Sonoma store.

Tuesday
Oct112011

Virtual Tour de Sweet, Stop 2: Nanaimo Bar Awakening by Bake it in a Cake

Photo: Bake it in a CakeCakeSpy Note: My book tour has already begun--online, that is! Bake it in a Cake marks stop 2 for the virtual Tour de Sweet blog tour. And this one's a true victory: I have made Megan Seling a True Believer in the mighty Nanaimo Bar! Here's what she has to say:

I had the perfect plan. To celebrate the release of CakeSpy’s new book, CakeSpy: Sweet Treats for a Sugar-Filled Life, I was going to bake Nanaimo Bars into a cupcake! They’re one of CakeSpy’s favorite treats, after all, and I wouldn’t know about their magical existence without her introducing me to them.

But last night, when I made Nanaimo bars for the first time (can you believe I’ve never had one until yesterday??), I realized the bars, as dense as they are, are about 80% butter (no wonder CakeSpy loves them so much). I can’t bake these into a cupcake! The fluffy, custardy, buttery center would just melt away into nothing. What kind of Nanaimo bar has no fluffy middle layer? So instead of baking these treats into a cupcake, I simply made them and enjoyed them the way CakeSpy meant for them to be enjoyed. They’re every bit as delectable as she says they are—a co-worker even declared that they were “The best treat ever brought into the office.”

CakeSpy’s adorable new book also has some suggestions for variations—eggnog Nanaimo bars, peppermint Nanaimo bars, even boozy Nanaimo bars! Click here to buy the new CakeSpy book—you Bake It in a Cake fans will be happy to know, contains a recipe for cupcakes baked into cupcakes

Read the full entry on Bake it in a Cake. 

Monday
Oct102011

Virtual Tour de Sweet, Stop 1: Everything Fall Cupcakes by Cupcake Project

Photo: Cupcake ProjectCakeSpy Note: My book tour has already begun--online, that is! Kicking off the Tour de Sweet blog tour for my book is Stef at Cupcake Project, who was inspired by my cupcakes baked in cupcakes--and she created her own fall version, which include all of the best fall flavors in one sweet treat! Here's a sneak peek at her post; read the entire post and find her recipe here.

When perusing Sweet Treats for a Sugar-Filled Life to decide what to bake for you for on the tour stop (what would a baking book tour be without sweet treats?), my choice was clear.  In her book, Jessie creates the cupcake in a cupcake - genius!!  The Everything Fall Cupcake is my own take on her creation (which, by the way, is her take on the work of her friend Megan Seling from Bake It In a Cake)...

...When you bake a cupcake inside of a cupcake, you end up with a little cupcake nipple poking out of the top of the original cupcake.  This is normal, and as you can see in the photo at the top of this post, once you frost the cupcakes, no one will ever know it was there.

Cupcakes inside of cupcakes open up a whole new realm of cupcake possibilities.  Take any two cupcake and frosting flavors you love and you might love them even more in the same cupcake!  Not only do you achieve different but complementary flavors in one bite, but you also end up with varied textures, a super moist center from the twice-baked cupcake, a typical cupcake texture from the normal-sized cupcake, and a top that has flaky crunchy bits from the mini-cupcake's frosting spreading and caramelizing.

Photo: Cupcake ProjectFor Stef's recipe for "Everything Fall" Cupcakes as well as the rest of her sweet thoughts on the book, visit her site!

Wednesday
Oct052011

Cake That Looks Like Pie: Blueberry Chocolate PiCake Tutorial

Photos: Cake Gumshoe SetiaCakeSpy Note: This is a guest post from Cake Gumshoe Setia, who just started blogging at cakesbysetia.blogspot.com.

I love cake. I bake cakes for many people and many occassions, and am constantly brainstorming my next cake project and an occassion to make it for. So, imagine my surprise when I happily tell my husband that I have a wonderful cake idea in store for his birthday, and he responds "I was actually thinking I might want pie". (Insert gasp of horror here). Pie? Seriously? You are asking a lover of cakes - a cake-artist-in-the-making, if I may be so bold, to make you a PIE?

Don't get me wrong, I have nothing against pie. In fact, on occassion, I quiet fancy a slice; heated, served with a side of vanilla ice cream. I can even make a decent pie when I put my mind to it. Yet that is not the point, is it? The point, if not already apparent, was that I was desperately excited to come up with some wonderful cake creation for my husband's birthday. Sure, I knew he was probably teasing about the whole pie thing...right? However, I was now bound and determined to make something a bit tongue-in-cheek that would teach him a lesson, and yet give him what he wanted at the same time.

A cake that looks like a pie seemed like a pretty obvious solution! Why not? I'd never made one - it sounded like good fun! He'd get a good laugh! Perfect. Hmmm...yet it didn't seem quite perfect enough. More brainstorming required... Then I remember hearing of a place in Philidelphia that serves a dessert called "Pumpple Cake". It looks like a regular cake from the outside, but has an entire pie - two in fact - (apple inside vanilla cake, pumpkin inside chocolate cake, double stacked) on the inside. Now this got me thinking...What if I took that a step further? A cake disguised as a pie is great fun. But a PIE, disguised as a CAKE, further disguised as a PIE...well that is just genius!! (At least in my muddled little mind!)

My husband loves blueberries; fresh blueberries, blueberry pancakes, blueberries on cereal, and yes, of course, blueberry pie. And what goes swimmingly with blueberries - or any kind of berry for that matter, I asked myself? Why, chocolate of course! And so, I went forth and baked...And the results, in my opinion, were both pleasing to the eye and to the palate! Voila! A deep-dish blueberry-looking pie!

Here's how you make it happen.

Blueberry Chocolate PiCake Instructions


  1. Make favorite never-fail chocolate cake recipe.
  2. Pour enough batter into the cake pan to just cover the bottom.
  3. Insert pie onto batter.
  4. Pour remaining batter on top and around sides of pie.
  5. Bake the cake/pie as directed- takes considerably longer than regular cake-baking time. It seems like the top will never cook, but be patient, it will! Just keep watching it!
  6. Turn pie over onto work surface so it is upside down.
  7. Smother with a delicious chocolate ganache. Smooth ganache with hot knife to ready it for the fondant.
  8. Decorate to look like a deep-dish pie, using fondant. (I decided to do a lattice "crust" on the top).
  9. Use a little brown food colouring and vodka mixed together to 'paint' more colour onto the fondant, giving it a more "baked" look.
  10. Add fresh blueberries as desired.


Tuesday
Sep202011

Guest Blog Post: Cake Gumshoe Molly Visits Dooher's Bakery, Ontario

Images: Molly AllenCakeSpy Note: This is a guest post from Cake Gumshoe Molly. Read her full post here!

Dooher’s Bakery of Campbellford, Ontario, Canada has always been a favorite of mine. Dooher’s opened in 1949 and has flourished with popularity ever since. Everything about Dooher’s is kept within the family and all recipes are made from scratch.

I’ve never stepped foot in a bakery with so many delicious choices. Dooher’s is stock full of breads, buns, biscuits, muffins, cookies, donuts, pies, and sweet pastries. The choices are ridiculous, as you will want to eat one of every single item available.

I had one of their cream puffs, mainly because it has been a must-have for every Dooher’s trip I’ve had since I was little. Those things are incredible. Most cream puffs are made with a puff pastry base, but Dooher’s makes theirs with donuts! Two incredibly fluffy, sweet donuts with a big spoonful of cream in the middle? Aren’t you convinced yet?

For years, my family has come to Dooher’s for their tarts and pies. Their pastry crust is unsurpassed, and their fruit fillings are made from locally grown produce. We picked up a few lemon tarts, which are, by my standards, incredible. Creamy, lemony, tart filling plopped on a flaky crust; no wonder they do such wonderful business.

This time during my visit, Dooher’s had a new treat I had never seen before. The friendly clerk at the counter described it as “a French pastry crust with a custard and raspberry filling, topped with whipped cream.” Whoa. Sure, I had already chosen a large number of treats…but I think that can be considered a necessity. It was flaky, it was creamy, it was sweet, it was tart; all of the best baking adjectives combined into one incredible treat.

Lastly, we took home a bag of Dooher’s Oatmeal Jam cookies. Such a simple treat, but an incredible one at that. These cookies consist of two vanilla-oatmeal cookies with a sweet layer of raspberry jam in the middle. It is really easy to eat the whole bag in one day; a love/hate relationship.

The Dooher family has spread their love of baking throughout Ontario for years. My family have been avid customers for a number of years. Their baked goods are of the best quality. There is no other bakery I have found that can compare to this favorite of mine.

Dooher’s Bakery, 61 Bridge Street, Campbellford, Ontario, Canada

© Cakespy, all rights reserved. Powered by Squarespace.