Home Home Home Home Home Home Home
CakeSpy

Featured: 

My adventure at Ben & Jerry's in Vermont!


Unicorn Love: the Eating Disorder Recovery Blog


 Buy my brilliant books!

Buy my new book!

Buy my first book, too! 

CakeSpy Online Retail!


Archives
Gallery

Fantastic appliance for cake making on DHgate.com

everyrecipe.co.nz

Craftsy Writer

Entries in recipes (704)

Tuesday
Oct252011

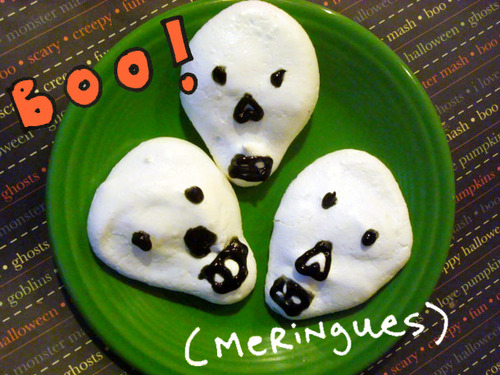
Boo-Meringues: Meringue Skulls Recipe for Serious Eats

What do you get when you combine spooky skulls and sweet meringues?

Boo-meringues, of course!

If you need a moment to groan at that joke, I completely understand. But what's no joke is that these ghoulish meringues are simple to make, but even more fun to serve: personalize your skulls with funny faces to add some sweet charm to your Halloween fete.

For the full entry and recipe, visit Serious Eats!

Sunday
Oct232011

Chocolate Peanut Butter HalfPops Clusters Recipe

When I recently received a sample package of HalfPops ("the crunchy heart of popcorn"), I knew what I had to do.

I had to dessert-ify them by coating them in chocolate and peanut butter, naturally.

I went about this experiment not necessarily knowing if it would work, but happily, it did, and what I ended up with were unattractive but extremely tasty haystacks of sweet-and-salty deliciousness. Want to make this magic happen at home? It's beyond easy. Here's how you do it.Chocolate Peanut Butter HalfPops Clusters

  • 1 1/2 cups chocolate chips
  • 2 tablespoons butter
  • 1 heaping spoonful peanut butter
  • 1 package (7 ounces) HalfPops in the Sea Salt flavor

Procedure

  1. Get ready: Line a muffin tin with 12 cupcake liners.
  2. In a medium saucepan, melt the butter and chocolate chips over medium heat, stirring frequently to keep from scorching, until the mixture is creamy and melty. Add the peanut butter and stir until incorporated.
  3. Remove from heat and stir in the Halfpops, stirring until completely coated. Place a heaping spoonful into your prepared cupcake liners. Makes about 12.
Thursday
Oct202011

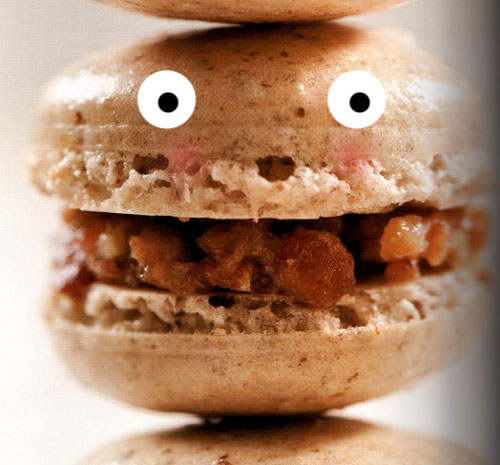
Walnut Macarons with Maple Bacon Bourbon Filling Recipe

Image: Les Petits MacaronsLet's talk about macarons, those fancy little French sandwich cookies.

In general, my thoughts are that they taste so much better when someone else makes them (especially if that someone is Pierre Herme, for instance); however, the newly-released book Les Petits Macarons: Colorful French Confections to Make at Home might just be the book to change my mind. The recipes at first glance seem long and daunting, but really, they're just full of informative tips and are ultimately quite user-friendly. The book covers various methods of macaron-making in great detail, so you can choose your own adventure--sweet! Plus, they have all sorts of fun flavor combinations in their recipes--here follows a recipe, which is very international as it employs the Italian Meringue method of macaron-making and contains all-American bacon in the filling: Walnut Macarons with Maple Bacon Bourbon filling. As the French would say, "Le nom".

Walnut Macarons with Maple Bacon Bourbon Filling

Makes 40 macaron sandwiches

For the macarons

  • 1 1/4 cups walnut flour
  • 3/4 cup confectioners' sugar
  • 1/2 cup aged egg whites from 4 eggs
  • 1/2 teaspoon cream of tartar
  • 3/4 cup granulated sugar

For the filling

  • 12 ounces bacon, sliced thinly
  • 2 tablespoons freshly squeezed and strained orange juice
  • 2 tablespoons maple syrup
  • 1 tablespoon bourbon
  • pinch freshly ground pepper

Procedure

  1. Place the flour, confectioners' sugar, and salt in the bowl of a food processor; pulse 4 times for 3 seconds each to combine. Scrape the bowl in between pulses with a spatula. Sift with a fine-mesh strainer onto a sheet of waxed paper.
  2. In the bowl of an electric mixer fitted with the whisk attachment, whisk the egg whites and cream of tartar on medium speed until soft peaks form, about 2 minutes.
  3. While the egg whites are whipping, heat the granulated sugar and 1/4 cup water in a small saucepan over medium-high heat. Stir to dissolve sugar. If sugar crystals stick to the edges of the pan, use a small pastry brush dipped in water to remove them. Cook until the sugar reaches 235 F (use a candy thermometer). 
  4. When the candy reaches 235 degrees F, quickly and steadily pour the syrup down the side of the mixer bowl, with the mixer running on medium speed. Rest the lip of the saucepan on the side of the bowl so the sugar does not hit the whisk attachment and splatter all over. Continue whisking until stiff peaks form and the meringue is lukewarm and glossy, about 4 minutes. Do not overwhip the meringue or the "feet" won't form correctly (although they will still taste good, so don't fuss too much!). Turn the bowl upside down to check that you have reached the right stage: the meringue should not slip in the bowl.
  5. Place the sifted dry ingredients into the bowl and push them toward the sides to form a well in the center of the bowl. Spoon the lukewarm meringue into the center. With a rubber spatula, stir the meringue from the center out in a circular motion, as if you were making a pasta dough. The meringue will pick up the dry ingredients from the inside to the outside of the bowl; this process should take about 1 minute.
  6. Spoon the batter in a pastry bag fitted with a 1/2 inch round tip (or, simply cut a 1/2 inch opening in the bag). Fill the bag halfway, leaving the rest of the meringue in the bowl while piping; cover it with plastic wrap while a batch is in the oven. If you overfill the bag, you'll not be able to squeeze it hard enough to pipe even shells. Twist the top of the bag to close.
  7. Pipe into quarter-sized mounds, about 1/4 inch high, on a silicone or parchment-lined sheet, with 1 1/2 inches around each. Bake at 200 degrees F for about 15 minutes; increase temperature to 350 degrees F and bake for 9 more minutes, or until the shells feel firm and just come off of the paper or silicone. repeat until all of the batter is used.
  8. Once all of the macarons are baked and cooling, prepare your filling. Line a large plate with paper towels. Cook the bacon in batches in a saute pan over medium-high heat until it is crispy, 8-10 minutes. Remove the strips to the lined plate and let cool enough to handle, then chop finely.
  9. Cook the orange juice, maple syrup, bourbon, and bacon in a wide saute pan over medium heat until warm, about 2 minutes, stirring frequently to ensure that nothing sticks to the pan. Remove from heat, and immediately spoon the filing onto 40 macaron shells, evenly dividing it. Top with another shell, twisting slightly to secure the filling, and serve warm or at room temperature.


Monday
Oct102011

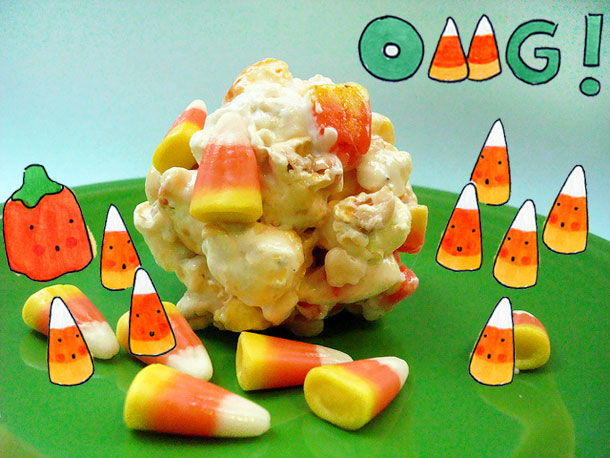
Pop and Corn: Candy Corn Popcorn Balls Recipe for Serious Eats

Legend has it that Candy Corn is named for its coloring, which is inspired by the gradient of a kernel of corn. Sweet as this story may be, I've got to squint really hard to see the resemblance.

Nonetheless, I'm happy to bring the iconic tricolor treat together with popped kernels of its namesake, in the form of Candy Corn Popcorn Balls. These sweet marshmallow-based popcorn balls work beautifully when studded with candy corn; adding an extra shake of salt makes for a sweet, salty, crunchy, crispy, sticky, and overall pretty irresistible fall treat.

For the full entry and recipe, visit Serious Eats!

Saturday
Oct082011

Macrina Sweets: Molasses Ginger Ice Cream Cookie Sandwiches Recipe

Image: Macrina BakeryThere's no doubt that Ice Cream Cookie Sandwiches rule. But when they're made of Macrina Bakery's Molasses Ginger cookies, they reach new heights in the sphere of awesomeness. Here's the intro for Macrina's recipe of the month:

I think it's the fresh ginger that makes these cookies so special. They also have the perfect balance of chewy and crisp. Sandwiching two of them with ice cream makes an exceptional treat.

And here's the recipe:

Molasses Ginger Ice Cream Cookie Sandwiches

Makes about 16

Ingredients

  • 2-1/4 cups unbleached all-purpose flour 
  • 1-1/2 teaspoons baking soda
  • 2 teaspoons cinnamon 
  • 1-1/2 teaspoons ground cloves 
  • 1 teaspoon salt
  • 1/2 cup vegetable shortening, at room temperature
  • 6 tablespoons unsalted butter, at room temperature
  • 1-1/2 cups light brown sugar
  • 2 eggs
  • 2 teaspoons peeled and grated ginger
  • 1/3 cup dark molasses
  • 1 cup granulated sugar

Procedure

  1. Combine flour, baking soda, cinnamon, ground cloves and salt in a medium bowl. Mix with a whisk until evenly distributed and set aside.
  2. Combine shortening, butter and brown sugar in the bowl of your stand mixer. Using the paddle attachment, mix on medium speed for about 5 minutes until the mixture is smooth and pale in color. Add 1 egg and mix until incorporated. Scrape down the sides of the bowl. Add remaining egg and scrape down the sides of the bowl again. Add ginger and molasses and mix on low speed for 1 minute. The mixture may look as if it's separating, but have no fear. It will come together once the dry ingredients are added. Remove the bowl from the mixer and scrape down the sides of the bowl again.
  3. Preheat oven to 350°F. Line 2 rimmed baking sheets with parchment paper and pour granulated sugar into a pie pan or shallow bowl.
  4. Scoop dough out of the bowl (I like to use a medium ice cream scoop) and roll the dough into 2-inch balls. Toss each of the balls in granulated sugar until evenly coated, then place 8 on each baking sheet, leaving 3 inches between each ball. Slightly flatten each ball of dough with the palm of your hand to keep the balls from rolling around. 
  5. Place 1 sheet of cookies in the refrigerator while baking the other sheet.
  6. Bake cookies, 1 sheet at a time, on center rack of oven for 15 to 18 minutes each. To help the cookies bake evenly, rotate the baking sheet every 4 minutes or so. The finished cookies will be golden brown and slightly puffed up but will collapse while they cool. Let cool on the baking sheet for 15 minutes. The cooled cookies can be stored in an airtight container for up to three days.
  7. Choose your favorite vanilla ice cream and  scoop a generous portion onto one cookie, place the other on top and voilá! A delicious treat to usher in fall.
Wednesday
Oct052011

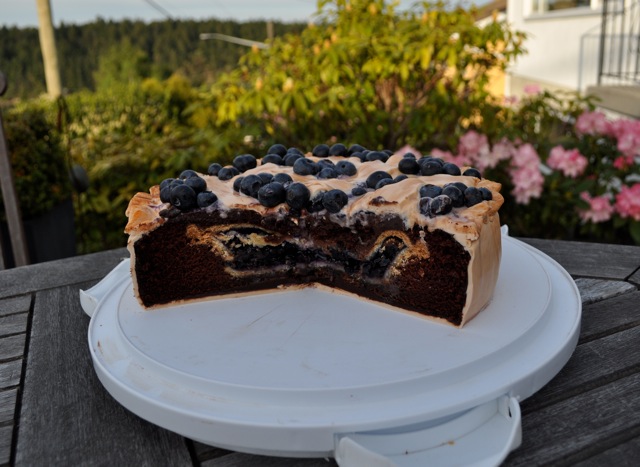
Cake That Looks Like Pie: Blueberry Chocolate PiCake Tutorial

Photos: Cake Gumshoe SetiaCakeSpy Note: This is a guest post from Cake Gumshoe Setia, who just started blogging at cakesbysetia.blogspot.com.

I love cake. I bake cakes for many people and many occassions, and am constantly brainstorming my next cake project and an occassion to make it for. So, imagine my surprise when I happily tell my husband that I have a wonderful cake idea in store for his birthday, and he responds "I was actually thinking I might want pie". (Insert gasp of horror here). Pie? Seriously? You are asking a lover of cakes - a cake-artist-in-the-making, if I may be so bold, to make you a PIE?
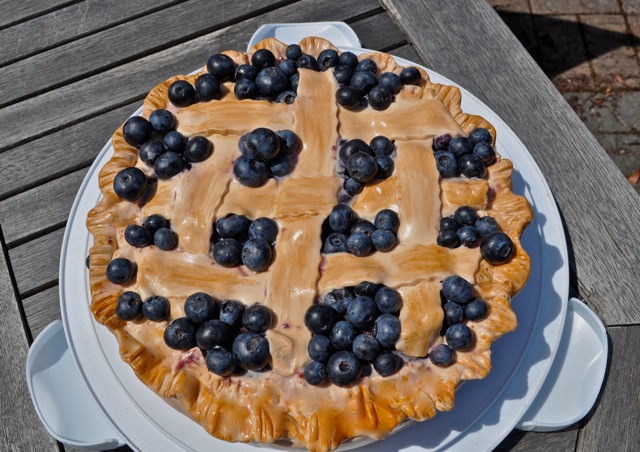
Don't get me wrong, I have nothing against pie. In fact, on occassion, I quiet fancy a slice; heated, served with a side of vanilla ice cream. I can even make a decent pie when I put my mind to it. Yet that is not the point, is it? The point, if not already apparent, was that I was desperately excited to come up with some wonderful cake creation for my husband's birthday. Sure, I knew he was probably teasing about the whole pie thing...right? However, I was now bound and determined to make something a bit tongue-in-cheek that would teach him a lesson, and yet give him what he wanted at the same time.
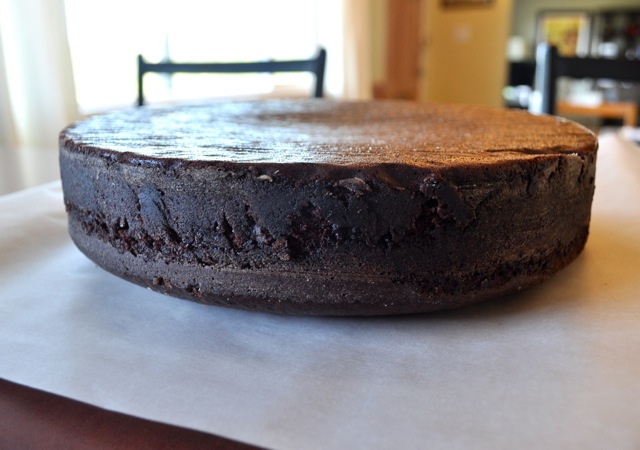
A cake that looks like a pie seemed like a pretty obvious solution! Why not? I'd never made one - it sounded like good fun! He'd get a good laugh! Perfect. Hmmm...yet it didn't seem quite perfect enough. More brainstorming required... Then I remember hearing of a place in Philidelphia that serves a dessert called "Pumpple Cake". It looks like a regular cake from the outside, but has an entire pie - two in fact - (apple inside vanilla cake, pumpkin inside chocolate cake, double stacked) on the inside. Now this got me thinking...What if I took that a step further? A cake disguised as a pie is great fun. But a PIE, disguised as a CAKE, further disguised as a PIE...well that is just genius!! (At least in my muddled little mind!)
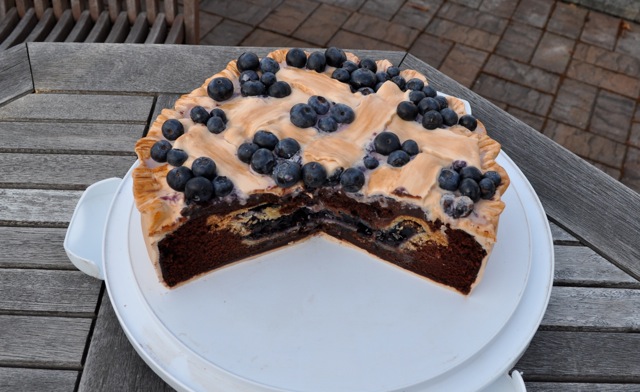
My husband loves blueberries; fresh blueberries, blueberry pancakes, blueberries on cereal, and yes, of course, blueberry pie. And what goes swimmingly with blueberries - or any kind of berry for that matter, I asked myself? Why, chocolate of course! And so, I went forth and baked...And the results, in my opinion, were both pleasing to the eye and to the palate! Voila! A deep-dish blueberry-looking pie!
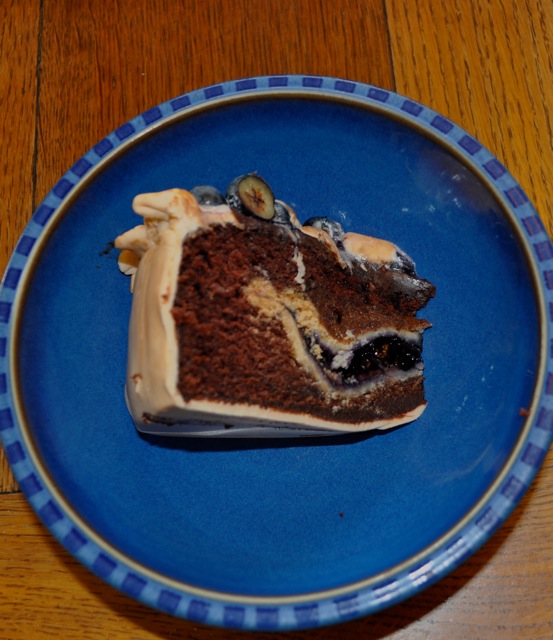
Here's how you make it happen.

Blueberry Chocolate PiCake Instructions


  1. Make favorite never-fail chocolate cake recipe.
  2. Pour enough batter into the cake pan to just cover the bottom.
  3. Insert pie onto batter.
  4. Pour remaining batter on top and around sides of pie.
  5. Bake the cake/pie as directed- takes considerably longer than regular cake-baking time. It seems like the top will never cook, but be patient, it will! Just keep watching it!
  6. Turn pie over onto work surface so it is upside down.
  7. Smother with a delicious chocolate ganache. Smooth ganache with hot knife to ready it for the fondant.
  8. Decorate to look like a deep-dish pie, using fondant. (I decided to do a lattice "crust" on the top).
  9. Use a little brown food colouring and vodka mixed together to 'paint' more colour onto the fondant, giving it a more "baked" look.
  10. Add fresh blueberries as desired.


Saturday
Oct012011

An Extremely Moist Chocolate Beet Cake with Creme Fraiche and Poppyseeds

Recently, I received a screener copy of the film "Toast", based on the book by the same name by Nigel Slater.

And I have to do the cliche thing and say...well, the book was better than the movie. Not that it doesn't have its moments--most of them, for me, memorable visually: a perfect lemon meringue pie, montages featuring baking. Le nom. 

But the film did remind me of something important: I've been wanting to try the chocolate beet cake recipe from Slater's even bigger book, Tender: A Cook and His Vegetable Patch. As you might imagine, there aren't many dessert recipes in this book, but there are a few. And this description was very alluring to me:

"It is true I am rarely happier than when making chocolate cake. I especially like baking those that manage to be cakelike on the outside and almost molten within. Keeping a cake's heart on the verge of oozing is down partly to timing and partly to the ingredients--ground almonds and very good-quality chocolate will help enormously. But there are other ways to moisten a cake, such as introducing grated carrots or, in this case, crushed beets."

of course, he continues, "...this is a seductive cake, deeply moist and tempting. the serving suggesting of creme fraiche is not just a nod to the sour cream so close to beets' Eastern european heart, it is an important part of the cake."

This is a compelling cake, chocolate with a something-something, and I loved the tartness of the "frosting" -- it made it seem perfectly appropriate for a healthy snack, but it didn't smack of dessert.

Chocolate Beet Cake

Ingredients

  • 8 ounces beets
  • 7 ounces fine dark chocolate
  • 4 tablespoons hot espresso
  • 3/4 plus 2 tablespoons butter
  • 2 cup plus 2 tablespoons all purpose flour
  • a heaping teaspoon of baking powder
  • 3 tablespoons good quality cocoa powder
  • 5 eggs
  • scant 1 cup superfine sugar
  • creme fraiche and poppyseeds, to serve

Procedure

  1. Lightly butter an 8-inch springform cake pan (I used a small bundt pan, greased and sprinkled with flour); line the bottom with a round of parchment paper. Preheat the oven to 350 F.
  2. Cook the beets, whole and unpeeled, in boiling unsalted water.  Depending on their size, they will be tender when pierced with the tip of a knife within thirty to forty minutes. Young ones may take slightly less. Drain them, let them cool under running water, then peel them, slice off their stem and root, and process in a blender or food processor until a coarse puree is formed.
  3. Melt the chocolate, broken into small pieces, in a small bowl set over a pot of simmering water. Don't stir. 
  4. When the chocolate looks almost melted, pour the hot espresso over it and stir just once. Cut the butter into small pieces--the smaller the better--and add to the melted chocolate. Push the melted butter down under the surface of the chocolate with a spoon as best you can, and let soften.
  5. Sift together the dry ingredients. Separate the eggs, putting the whites in a large mixing bowl. Sir the yolks together.
  6. Now, working quickly but gently, remove the bowl of chocolate from the heat and stir until the butter has melted into the chocolate. Let sit for a few minutes, then add the egg yolks. Do this quickly, mixing firmly and evenly so the eggs blend into the mixture. Fold in the beet mixture. Whisk the egg whites until stiff, then fold in the sugar. Firmly but gently, fold the beaten egg whites and sugar into the chocolate mixture. A large metal spoon is what you want here; work in a deep, figure-eight movement but take care not to overmix. Lastly, fold in the flour and cocoa mixture.
  7. Transfer to the prepared cake pan and put in the oven, decreasing the heat immediately to 325 F. Bake for 40 minutes. The rim of the cake will feel spongy; the inner part should still wobble a little when the pan is gently shaken.
  8. Set the cake aside to cool. It will sink a little in the center. Loosen it around the edges with a thin icing spatula after half an hour or so. It is not a good idea to remove the cake from the pan until it is completely cooled. Serve in thick slices, with creme fraiche and poppyseeds.
Monday
Sep262011

Teatime Treats: Sprinkle Cakewiches Recipe for Serious Eats

Time for High Tea? More like high time to give tea sandwiches a totally sweet makeover, with these slim and dainty but devilishly decadent frosting-filled Sprinkle Cakewiches.

I got this idea from the newly-published Scanwiches by Jon Chonko, wherein all manner of sandwiches are chronicled in a sort of art-meets-sandwich anthropology sort of way. Under the Tea Sandwich listing, there is a fascinating sprinkle-and-frosting-filled variation; naturally, I knew I had to try out my own version. I decided to take it one step further into dessert territory by swapping out the crustless white bread with thin slices of poundcake--and, because why not, I used chocolate poundcake paired with pink frosting and pastel sprinkles. The whimsical nature of the sandwiches would be charming for a child's tea party, but the tastiness is appropriate for all ages.

For the full entry and recipe, visit Serious Eats!

Saturday
Sep242011

Fair and Sweet: Prizewinning Maui Banana Bread Coffee Cake Recipe

I just received the sweetest note from the PR department at the Puyallup Fair.

Apparently, at the baking contest, Coffee cake was taken to the next level by the winning entries of the Dillanos Best Quick Bread Coffee Cake Contest. The creative coffee cake creations left judges wanting more.

Marina Cervantes of Lakewood gave the judges a taste of vacation with her “Maui Banana Bread Coffee Cake” that won her first place and $100 cash.  And guess what? She was willing to share the recipe. Here it is:

Maui Banana Bread Coffee Cake

Marina Cervantes - recipe courtesy Puyallup Fair (running through Sept. 25)

Cake:

  • 4 eggs
  • 1 cup vegetable oil
  • 2½ cups flour
  • 2 tsp baking powder
  • 2 tsp baking soda
  • 1 tsp salt
  • 1½ cups sugar
  • 3 cups mashed banana (ripe bananas preferred)
  • 1 tbsp banana liqueur (maybe rum could work too?)
  • ½ tsp vanilla extract
  • ½ cup coconut flakes

Strudel Filling:

Mix together- 

  • 2/3 cup brown sugar
  • ½ cup macadamia nuts, chopped
  • 2 tbsp butter, soften
  • 2 tsp. cinnamon

Directions:

  1. Beat eggs and oil.
  2. Sift all dry ingredients and add to egg mixture, mixing well.
  3. Add sugar, bananas, liqueur, extract, and mix well.
  4. Fold in coconut flakes.
  5. Pour half of the batter into a bundt pan that has been sprayed with non-stick spray.
  6. Sprinkle half the strudel mixture over batter, and then cover with rest of batter and sprinkle top with rest of strudel mixture.
  7. Bake at 350 degrees for 60-70 minutes.
Friday
Sep232011

Just Doughnut: Prize-winning Maple Spam Doughnuts Recipe

Like, OMG. Deliciousness and creativity were certainly present at the Puyallup Fair's SPAM recipe contest! Per the folks at the Fair:

The first meal of the day is the most important and SPAM challenged chefs of all ages to prepare a recipe that bursts the normal breakfast routine. The Great American SPAM Championship at the Puyallup Fair, which runs through Sept. 25, awarded first, second and third place awarded those chefs for both Adult and Kids Chef categories. In the Adult category, Jason Munson of Auburn took first place and $150 with his scrumptious breakfast treat, “Maple SPAM Doughnuts.”

The best part though? They shared the recipe. Awesome. Here it is:

Maple SPAM Doughnuts

Recipe courtesy The Puyallup Fair

  • 1 can of Hickory Smoke SPAM
  • 1 ¾ cups All-purpose Flour
  • ½ tsp. baking soda
  • ¼ tsp. salt
  • 1/3 cup brown sugar, packed
  • 1 egg
  • 2 tbsp butter (melted)
  • ½ cup & 4 tsp. buttermilk
  • 1 ¼ cups confectioners’ sugar
  • 1 tsp. maple flavor

Procedure

To make SPAM rings

  1. Remove the SPAM from the can and slice into 5 even strips, slicing from lid side to bottom width wise.
  2. Place SPAM in frying pan and brown both sides.
  3. Let the SPAM cool. Use 1½ inch biscuit cutter and cut the SPAM to fit the doughnut pan (about 20 rings total). Then take a knife and cut out the center of the pieces so it can fit in the doughnut pan over the center dimple of the pan. Set aside. Take the leftover piece of SPAM and chop up and put back in the frying pan and crisp up the pieces and set aside.

To make the dough

  1. In a medium mixing bowl, whisk together flour, baking soda, and salt.
  2. In a large mixing bowl, beat together brown sugar, egg and melted butter until mixture is smooth. Beat in the flour mixture and ½ cup buttermilk. Stir only until all ingredients are combined. Scoop batter into a quart or gallon-sized plastic bag and chill for 1 hour.
  3. Preheat oven to 325 degrees and remove the bag from the refrigerator after batter has chilled.
  4. Spray a mini doughnut pan with non-stick cooking spray.
  5. Snip the corner off the plastic bag and pipe batter into mini donut cavities, filling each about 2/3 full. Place the SPAM Ring on top of the dough.
  6. Bake for 10 minutes, until doughnut springs back when lightly pressed.
  7. Turn doughnuts out to cool on a wire rack.

To make the glaze

  1. Whisk the confectioners’ sugar, 1 tsp maple flavor, and 4 tsp buttermilk in a small bowl, adding the buttermilk as necessary to make the glaze thick enough to stick easily to the doughnuts.
  2. When doughnuts are completely cooled, dip tops of donuts in glaze. Top with the little pieces of fried SPAM.
© Cakespy, all rights reserved. Powered by Squarespace.