Home Home Home Home Home Home Home
CakeSpy

Featured: 

My adventure at Ben & Jerry's in Vermont!


Unicorn Love: the Eating Disorder Recovery Blog


 Buy my brilliant books!

Buy my new book!

Buy my first book, too! 

CakeSpy Online Retail!


Archives
Gallery

Fantastic appliance for cake making on DHgate.com

everyrecipe.co.nz

Craftsy Writer

Entries in recipes (704)

Tuesday
Sep202011

Chip off the Old Block: Peanut Butter Chips with Jelly Salsa Recipe for Peanut Butter and Co.

Everyone knows that chips and salsa are a delicious precursor to a Mexican meal. But what about giving them a sweet and spicy and rich peanut butter makeover to continue the party post-dinner?

It’s time to introduce Peanut Butter Dessert Chips with Fruit Salsa, a dish wherein plain flour tortillas are brushed with a decadent peanut butter, brown sugar and butter mixture and baked until crispy, then served with jam or preserves. It’s a snap to prepare and makes for some sweetly addictive eating.

For the full entry and recipe, visit Peanut Butter and Co.!

Monday
Sep192011

Pop It: Raspberry Red Velvet Truffle Pops Recipe from Duncan Hines

So, you guys. In case you missed the big news, I was invited to attend the Emmy Awards Red Carpet viewing party with Duncan Hines this past weekend. And it ruled. Of course, it was very exciting to see famous people in pretty dresses and very nice suits. But--here's the big thing--there was also plenty of cake.

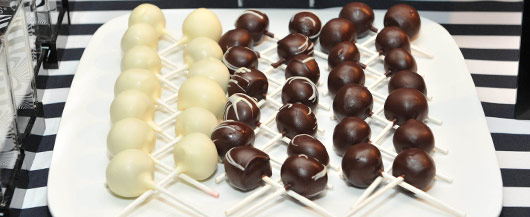
A slew of cake pop recipes were created by Team U.S.A.’s World Cup Pastry Team’s captain, Chef Gilles Renusson, and Duncan Hines was the official dessert sponsor of the 63rd Primetime Emmy Awards Governor’s Ball; this one in particular impressed this sweet sleuth, with raspberry preserves adding a certain something to Red Velvet cake filling--a certain something that made me wonder how many I could fit in my mouth at once.

They were kind enough to share the recipe, which appears below; the Red velvet pops are the white chocolate coated ones in the photo above. Click on the names for recipes for the other varieties, Chocolate Almond and Chocolate Orange Liqueur. 

Raspberry Red Velvet Truffle Pops 

Duncan Hines® Red Velvet Cake Mix with Chambord, Comstock® or Wilderness® pureed raspberries, and Duncan Hines® Butter Cream Frosting

Ingredients:

  • 2 2/4 cup Baked Duncan Hines Red Velvet cake crumbs 
  • 1 T. Duncan Hines Butter Cream Frosting
  • 1 t. Chambord raspberry liquor 
  • 1/3 cup Pureed Raspberry Pie Filling (or jam would work)
  • 14oz White Coating Chocolate (recommended: Wilton Candy Melts)

Instructions

  1. Bake Duncan Hines® Red Velvet Cake Mix as directed on the back of the box in a 13x9 cake. Allow to cool completely.
  2. Crumble cake up into a large bowl.
  3. Soften glace in microwave for 10 seconds.
  4. Add softened frosting, Chambord and pureed raspberry pie filling and stir until incorporated.
  5. Roll mixture into walnut-sized cake balls and transfer to a wax paper lined baking cookie sheet. Make sure balls are tightly packed and look smooth with no cracks.
  6. Transfer cookie sheet with cake balls to freezer or refrigerator for 15 to 20 minutes.
  7. Place white pate glace in a small, deep microwave-safe bowl. Microwave in 30-second bursts, stirring each time until completely melted. The melted coating should coat a spoon but still be able to slowly drip off. If coating is too thick, add shortening or vegetable oil 1/2 teaspoon at a time. Do not exceed 2 teaspoons per 16 ounces of candy coating or the cake pops will crack.
  8. Remove cake balls from freezer. Dip tips of lollipop sticks into white pate glace and insert sticks into cake balls no more than halfway into center. Let them set for 1 to 2 minutes, resting on the cake ball, sticks in the air.
  9. Pick up cake pop by the stick and dip into white pate glaze. Gently tap stick against side of bowl and rotate cake pop to help excess coating fall back into bowl. (Reheat and/or melt more glace as needed.)
  10. Poke stick of cake pop into Styrofoam block to stand up straight and dry completely, about 5 minutes.
Monday
Sep192011

Stuff It: Nutella Stuffed Shortbread for Serious Eats

It's a fact: stuff is better when it's stuffed with stuff.

Instead of trying to say that five times fast, go ahead and preheat your ovens, because you'll want to make time move faster in an effort to get these cookies in your mouth sooner. Because if there's anything better than a deliciously crumbly shortbread cookie, it's one that is stuffed with rich, creamy, chocolate-and-hazelnut-laden Nutella.

I'm tempted to deem these the perfect lunchbox treat for back-to-schoolers, but really they're the ideal mid-day pick me up for anyone.

For the full entry and recipe, visit Serious Eats!

Thursday
Sep152011

Sweet to Eat: Chocolate Salted Caramel Lollipops Recipe from Sweet Confections by Nina Wanat

Photo by White On Rice CoupleSo, the other day I received a review copy of this book. It had a gorgeous cover, and an alluring title: Sweet Confections: Beautiful Candy to Make at Home. The book was written by Nina Wanat, whom I have never met but would like to, for several reasons, including:


  1. She grew up in New Jersey (like me!)
  2. She is the founder of Bonbonbar Confections in San Francisco. OMG!
  3. She has a sweet blog called Sweet Napa.
  4. This book totally rules. It's user-friendly, has gorgeous pictures by the folks who run the website White on Rice. My apologies for messing with their lovely photo above.


here's a sneak peek at my favorite recipe from the book so far: Chocolate Salted Caramel Lollipops!

Chocolate Salted Caramel Lollipops

Makes, like, 20.

 Equipment

  • Lollipop molds or silicone mat and baking sheet
  • 1-quart saucepan
  • Heatproof silicone spatula
  • 2-quart saucepan
  • Candy Thermometer
  • Large spoon
  • Lollipop Sticks

Ingredients

  • 1 tablespoon corn syrup 
  • 1 tablespoon butter
  • 3/4 tablespoon kosher salt
  • 1/2 cup cream
  • 1 cup sugar
  • 1.5 ounces chocolate, chopped
  • Flaky sea salt, for garnish

Procedure

  1. If you don't have lollipop molds, place a silicone mat on a baking sheet.
  2. Boil the corn syrup, butter, and kosher salt, and cream in a 1-quart saucepan over medium heat. Meanwhile, caramelize the sugar over medium-high heat with a heatproof spatula in a 2-quart saucepan. When the sugar is caramelized, immediately reduce the heat to low, and add the cream mixture, scraping the pan. Stir over medium-high heat until the mixture is smooth. Add the chocolate. Cook to 274 degrees F, stirring slowly but constantly.
  3. Remove from heat and quickly drop the syrup from the tip of a large spoon into the cavities of the lollipop molds, if using. Alternatively, drop the syrup onto the silicone mat so that it forms 2-inch discs, placed to lave space for the sticks. Place a lollipop stick in the center of each disc, and twist it 180 degrees so that it is fully covered by the syrup. Sprinkle the coarse salt on top, crushing it between your fingers as you sprinkle it so it is not too jagged. Let cool completely. Peel off the lollipops, and store in an airtight container.
Saturday
Sep102011

Carnival Cookies Recipe from Super Natural Every Day

I will tell you the truth. When I first encountered the recipe for Carnival Cookies in the lovely and amazing cookbook Super Natural Every Day: Well-loved Recipes from My Natural Foods Kitchen by Heidi Swanson, the first thing that captured my attention was the name. Carnivals are fun! But as I scanned the ingredients, I became alarmed: "these sound sort of healthy." But then, the more I lingered on the entire list, I thought "gosh, these sound fairly delicious, in spite of some alarmingly healthy-sounding ingredients!".

And you know what? I was rewarded when I tried them out in my own kitchen. They tasted vaguely granola-y, but not in a bad way. In a decadent way. But...here's the thing. (Duh) I forgot to photograph these beauties before bringing them to an event, but you can find some pretty pictures here.

Carnival Cookies

Ingredients

  • 1 1/2 cups well-mashed bananas
  • 1 teaspoon pure vanilla extract
  • 1/4 cup barely warmed (not solid) extra-virgin coconut oil
  • 1 1/2 cups rolled oats
  • 1/2 cup almond meal
  • 1 teaspoon aluminum free baking powder
  • 1/2 teaspoon ground cinnamon
  • 1/2 teaspoon fine-grain sea salt
  • 2/3 cup shelled whole peanuts
  • 1 cup dark chocolate chips
  • 1 1/2 cups popped corn

Procedure 

  1. Preheat oven to 350 with racks in the top and bottom third of the oven. Line two baking sheets with parchment paper.
  2. In a large bowl, combine the bananas, vanilla, and coconut oil. Set aside. In another bowl, whisk together the oats, almond meal, baking powder, cinnamon, and salt. Add the dry ingredients to the wet, stirring until combined. Fold in the chocolate, then the peanuts, and lastly the popped corn. The dough is looser than a standard cookie dough, but don't worry.
  3. Firmly shape balls with your hands, about 1 heaping tablespoon each, and place them about 1 inch apart on the prepared baking sheets.
  4. Bake 14-17 minutes, swapping the baking sheets from top to bottom once along the way, until the bottoms are deeply golden. Remove from the oven and allow the cookies to cool on a wire rack. Makes 24 cookies. 
Thursday
Sep082011

Gobba Gobba Hey: Matcha Gobs with Lemongrass-Ginger Filling Recipe from a Sweet New Gob Cookbook

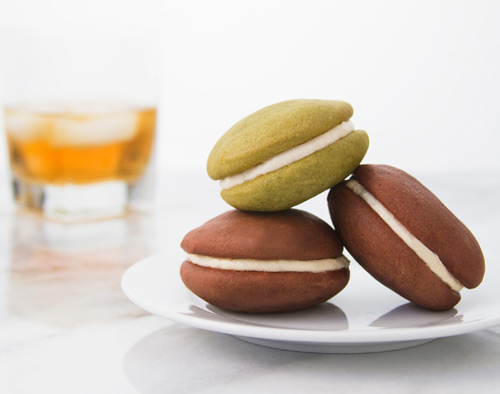
Photo: Gobba Gobba HeyTrue Story. Recently I received an email from an esteemed publisher you may know of called Bloomsbury, asking if I'd be interested in a review copy of their new release, entitled Gobba Gobba Hey: A Gob Cookbook. It was written by Steve Gdula, who owns a gob (um, whoopie pie) business by the same name in San Francisco.

As a lover of the Whoopie Pie or Gob (it's a geographical thing), even though I wouldn't call them "the new cupcake", I was beyond delighted to receive this sweet book in the mail, and even more delighted when I found the writing style to be engaging, the business backstory to be interesting, and the recipes to be delectable.
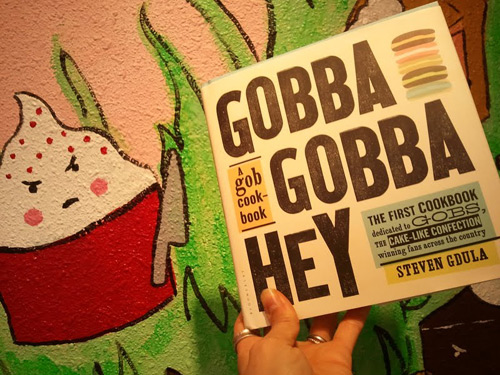
But one of my favorites from the book? Matcha Green Tea Gobs with Lemongrass-Ginger Filling. NOM!

And they were kind enough to allow me to reprint the recipe here. Lucky you! here goes:

Matcha Green Tea Gobs with Lemongrass-Ginger Filling

Recipe courtesy Gobba Gobba Hey

For the batter

  • 4 cups all purpose flour
  • 1/4 cup highest quality Matcha Green Tea powder
  • 1/2 teaspoon baking powder
  • 1.5 teaspoons baking soda
  • 1 teaspoon salt
  • 2 cups sugar, sifted
  • 8 tablespoons butter, softened, cut into 1/2 inch cubes
  • 2 eggs 
  • 1 teaspoon vanilla extract
  • 1 cup buttermilk, at room temperature
  • 2 tablespoons sour cream

For the filling

  • 8 tablespoons unsalted butter, softened, cut into 1/2 inch cubes
  • 12 tablespoons cream cheese, cut in 1/2 inch cubes
  • 1 teaspoon vanilla extract
  • 1-2 teaspoons fresh lemon juice
  • 3-4 tablespoons lemongrass-ginger syrup (steps to make below)
  • 2 cups confectioners' sugar, sifted

For the lemongrass-ginger syrup

  • 1 cup sugar
  • 2-inch pieces fresh ginger, sliced into four or five rounds, skin peeled
  • 1/2 cup lemongrass (about 3 stalks), outer husk and bottom tip removed, sliced in rounds
  • 1/2 cup water
  • juice of 1 lemon
  • 1/2 cup loosely packed Rau Ram leaves (optional)

Procedure

  1. Make the cookies. Preheat the oven to 350 F. Line three 8x13-inch cookie sheets with parchment paper.
  2. In a large bowl, sift together the flour, matcha powder, baking powder, baking  soda, and salt. Whisk together until they're evenly green in color.
  3. In another large bowl, cream the sugar and butter with a mixer on medium speed. Add the egg yolks to the creamed ingredients and mix on medium. Add the egg whites and vanilla, and mix on medium-high until the mixture looks like a dense pudding.
  4. Alternate adding the dry ingredients and the buttermilk to the egg mixture, mixing on medium speed after each addition. Then add the sour cream, and mix well. 
  5. Using a tablespoon or pastry bag, drop 1 1/2 inch rounds of batter on the prepared cookie sheets, leaving 1 inch between each round. Bake 8 minutes, or until the gob domes have risen. Remove the gobs to a wire rack to cool.
  6. Make the filling, part 1. First, make the lemongrass-ginger syrup which you'll set to the side. Place the sugar, ginger, and water in a saucepan. Bring the liquid to a boil over medium heat, stirring to dissolve the sugar. Add the lemon juice and the rau ram leaves, if using, to the syrup, and stir well. Remove the pan from heat and set aside, covered, to let the syrup steep for at least 20 minutes. Strain out the lemongrass, rau ram leaves, and ginger and lemon seeds and pulp, and reserve the syrup for the gob filling. This mixture will keep, tightly covered, in the fridge for up to a week with the rau ram, 2 weeks without it.
  7. Make the filling, part 2. Cream together the butter and cream cheese with a mixer on medium speed.
  8. Add the vanilla, 1 teaspoon lemon juice, 3 tablespoons of the lemongrass-ginger syrup, and confectioners' sugar; beat on medium high, scraping down the bowl as needed to reincorporate the ingredients. Taste and add another teaspoon of lemon juice or another tablespoon of lemongrass-ginger syrup if you'd like.
  9. To frost your gobs (I love saying that), flip the baked gob domes over on a cookie sheet and match up similarly shaped and sized domes. Add 1 tablespoon of filling to the flat side of an overturned dome, then place another dome on top, sandwich-style. Allow the gobs to fully set by refrigerating them on a baking sheet for at least 1 hour. Wrap the gobs in plastic wrap to keep them from drying out.
Wednesday
Sep072011

Pumpkin Pull-Aparts Recipe

I don't have a bread machine. But if you do, have I ever got a good use to suggest for it: Pumpkin Pull-Aparts. Especially now that it is post-Labor Day and it's time to put away your white shoes and flavor EVERYTHING with pumpkin.

This recipe was shared with my by the fine folks at Robert Rose publishing, who recently released The Artisan Bread Machine: 250 Recipes for Breads, Rolls, Flatbreads and Pizzas. Here's the recipe:

 Pumpkin Pull-Aparts

adapted from The Artisan Bread Machine: 250 Recipes for Breads, Rolls, Flatbreads and Pizzas by Judith Fertig

Equipment: bread machine with a 1 1/2 lb capacity, Rolling pin

9-inch square pan, greased

  • 1/3 cup granulated sugar
  • 1/2 teaspoon salt
  • 1 large egg, beaten
  • 2/3 cup canned pumpkin puree
  • 1/3 cup lukewarm buttermilk
  • 2 tablespoons unsalted butter, softened
  • 2 2/3 cups all purpose flour
  • 2 tsp instant yeast

Filling

  • 1/2 pumpkin or apple butter
  • Topping 
  • 2 tablespoons sugar mixed with 1 teaspoon cinnamon

Procedure

  1. Add sugar, salt, egg, pumpkin, buttermilk and butter to the bread pan. Spoon flour on top of liquid. Add yest.
  2. Select dough cycle and press start.
  3. When the cycle is finished, transfer to a floured surface and punch down gently. Lightly dust with flour and roll out onto a 12 by 10 inch rectangle, with the long side closest to you.
  4. Prepare the filling. Spread the pumpkin or apple butter over the dough, leaving a half-inch perimeter along both long sides. Lightly brush the long edge further from you with water. Starting with the opposite long side, roll dough into a tight cylinder and pinch seam to seal. Using dental floss or a sharp knife, cut cylinder into 9 slices.
  5. Dip both spiral sides of the rolls in cinnamon sugar. Place spiral side up in prepared pan. Cover with plastic wrap and let rise in a warm, draft-free place for 30 minutes. Side remaining cinnamon sugar to the side. Meanwhile, preheat oven to 350F.
  6. Remove plastic wrap and sprinkle reserved cinnamon sugar over rolls. Bake for about 30 minutes or until risen and lightly browned and an instant-read thermometer reads 190F. Cool in pan on a wire rack; serve while still warm.
Saturday
Aug272011

Sweet Imprints: Peanut Butter and Jelly Chocolate Thumbprint Cookies Recipe

Pop quiz! What's delicious?

A. Thumbprint cookies.
B. Chocolate
C. Peanut Butter and Jelly
D. All of the above

The answer is D, and even further, they're better when all put together, at once. Case in point: buttery chocolate thumbprint cookies filled with peanut butter and jelly! A twist on several classics, I recently made these and based on how quickly they got eaten, I'd say that they were a big (sweet) success.

Peanut Butter and Jelly Chocolate Thumbprint Cookies

Ingredients

  • 3/4 cup all purpose flour
  • 1/3 cup unsweetened cocoa powder
  • 1/4 teaspoon salt
  • 1/4 cup unsalted butter
  • 1/4 cup sugar
  • 1/2 teaspoon vanilla extract
  • 2 tablespoons light cream

Procedure

  1. Preheat your oven to 400°F.
  2. Mix the flour, cocoa, and salt in a large bowl. Set to the side.
  3. In the bowl of an electric mixer fitted with the paddle attachment, cream the butter until it is light and fluffy.
  4. Stir in the sugar and vanilla until incorporated.
  5. Add the cream, mixing until it forms a stiff dough.
  6. Break off a piece of dough and roll into a ball about 1 to 1 1/2 inches in diameter. Using your hand, gently flatten (it's ok if they crack lightly on the sides) and using your thumb, press an indent in the center. Repeat with the remaining dough. Place the cookies on two parchment-lined baking sheets, leaving about 1 1/2 inches between each cookie. In the center of each cookie, put either a small dollop of peanut butter or jelly. I alternated both, and even put both peanut butter and jelly in a few.
  7. Bake until lightly browned (since the dough is fairly dark, look for a dull finish on top) and firm to the touch, 18-24 minutes. Transfer to wire racks to cool.
Monday
Aug222011

Frozen Hot Chocolate Recipe for Serious Eats

If you've ever visited Serendipity 3 in New York City, you are probably aware of—and hopefully have sampled—their signature dessert, the Frrrozen Hot Chocolate.

If you've never sampled this sweet treat, it's sort of like the richest, most decadent, most tricked-out-with-chocolate Frappuccino-type drink (sans coffee, of course) that you've ever tasted. With the sheer amount of chocolate in this drinkable dessert, it gets into every sip, slurp, or bite (because the consistency is such that it works with a straw or a spoon).

This adaptation, believe it or not, is even more decadent than Serendipity 3's, employing cream instead of milk and even more chocolate than the original--but if you're feeling guilty, simply split it into smaller servings. They won't be huge, but I promise, they will be mighty.

For the full entry and recipe, visit Serious Eats!

Wednesday
Aug172011

Microwave Chocolate Peanut Butter Chip Fudge Recipe

There was a time, in my childhood, during which my parents chose to go without a microwave. I know--hippies!

As a result, I became exceedingly adept at cooking everything with the toaster--for instance, putting foil on top of the toaster oven and heating up microwave pizza using the heat rising from inside of the toaster. Totally not a fire hazard at all. 

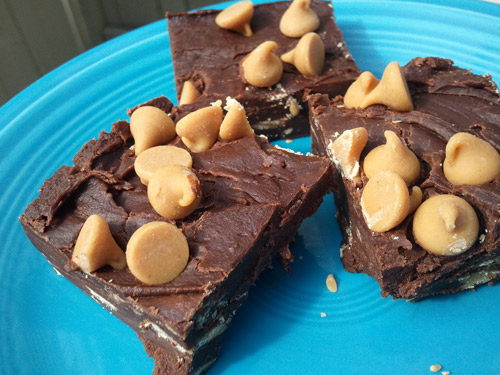
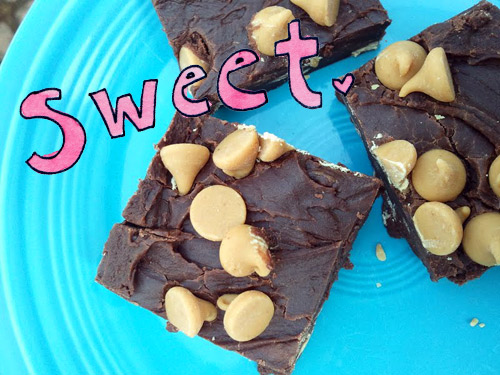
These days, now that I have a microwave of my very own, I really want you to know that I appreciate its presence very much and strive to honor it whenever possible. And what bigger tribute to la belle microwave than making delicious microwave fudge? This is a riff on a recipe I found on Allrecipes.com, but I made the executive decision to use half and half instead of milk (good idea) and to add a healthy dose of peanut butter chips for added rich deliciousness. Here's how you make some microwave magic at home:

Microwave Chocolate Peanut Butter Chip Fudge

  • 4 cups confectioners' sugar, sifted
  • 1/2 cup unsweetened cocoa powder, sifted
  • 1/2 cup half and half, divided
  • 1/2 cup unsalted butter, cut into 1/2 inch cubes
  • 1 teaspoon vanilla extract
  • 3/4 cup peanut butter chip morsels, divided into 1/2 and 1/4 cup


Procedure

  1. Line an 8x8-inch or 9x9-inch pyrex pan with parchment paper or waxed paper.
  2. In a large microwave safe bowl, stir together the confectioners' sugar and cocoa. Pour 1/4 cup of the half and half over the mixture and place butter in bowl. Do not mix (it will be too thick to mix, anyway). Microwave on high until butter is melted, about 2 minutes. Stir in the vanilla and 1/2 cup of the peanut butter morsels. Stir vigorously until smooth. You can also put the mixture into a stand mixer if that sounds exhausting. If your mixture is too dry, add up to 1/4 cup more half and half, a little at a time, until the mixture comes together in a fudge-like consistency.
  3. Spoon the mixture into your prepared pan and using a rubber spatula, spread the mixture so that it is evenly distributed. If desired, sprinkle the top with the remaining peanut butter morsel chips.
  4. Chill in the refrigerator for an hour, or the freezer for half an hour, before serving. Makes about 16 squares.

© Cakespy, all rights reserved. Powered by Squarespace.