Home Home Home Home Home Home Home
CakeSpy

Featured: 

My adventure at Ben & Jerry's in Vermont!


Unicorn Love: the Eating Disorder Recovery Blog


 Buy my brilliant books!

Buy my new book!

Buy my first book, too! 

CakeSpy Online Retail!


Archives
Gallery

Fantastic appliance for cake making on DHgate.com

everyrecipe.co.nz

Craftsy Writer

Entries in chocolate (18)

Monday
Jan122015

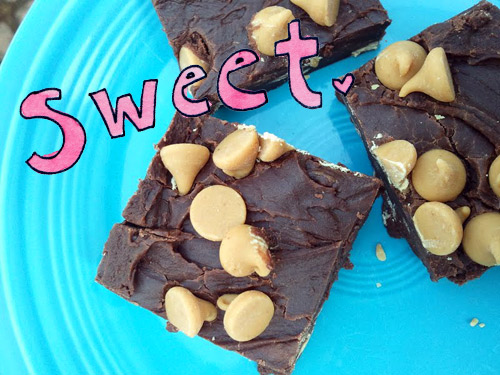
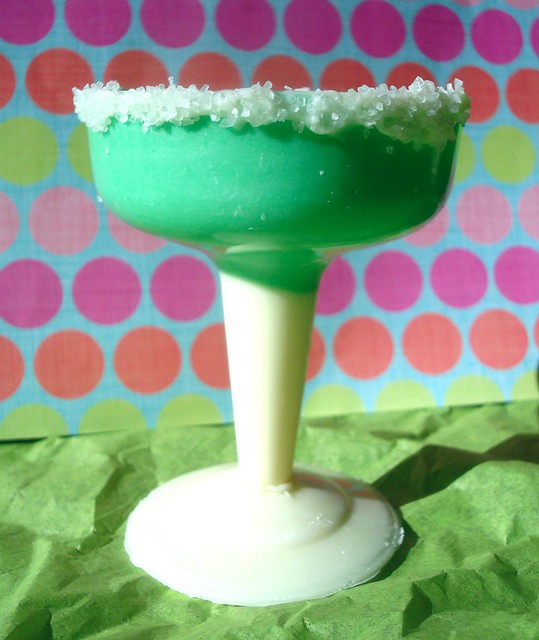
White Chocolate Dessert Cups that Look Like Margarita Glasses

Edible dessert cups

Today, let's forget about everything else and focus on a life skill that will serve you as long as you are breathing and are able to feel delight:

How to make edible dessert cups that look like margarita glasses.

This is a riff on a "How to make edible chocolate dessert cups" post I wrote for Craftsy--whilst I was writing it, I realized that, OMG, the plastic champagne coupes I was using as molds actually kind of resembled margarita glasses, too. So I decided to amp up the association by tinting the chocolate so that it would resemble a margarita in a cup.

Don't try to take a sip: this is solid white chocolate, decorated with a salty (that's real salt--I think dessert loves salt!) rim. While yes, it's fine for out-of-hand eating, I think it's extra special when you fill it with a pudding (how about a margarita pudding?), mousse, or even whipped cream. It's a whimsical and true delight-giving treat. 

How to make a chocolate cup

Makes 4-6 dessert cups

Adapted from Taste of Home

Ingredients

  • 12 ounces (1 bag) white chocolate morsels
  • flavorings or food colorings of your choice (optional)
  • coarse sugar for the "rims"

Equipment

  • Dollar store champagne coupes with removable bases

1. Divide the chocolate into two portions: 1/4 and 3/4. I found it easier to melt each batch separately; the small portion plain, and the larger portion with green coloring. You can learn how to melt white chocolate here.

2. Separate the removable bases from the cups of your champagne coupes. Start with four of them, and if you still have a good amount of the mixture when you’ve filled all of them, you can use the other two coupes (this will depend on how thickly you apply the candy).

3. Fill each hollow stem with your melted white chocolate mixture, up the stem. Switch to the green chocolate. Now, use a pastry brush or spoon to brush the sides and "bowls" of the cups (author's note: I started with a spoon for filling the stem, and then graduated to a pastry brush to apply chocolate to the sides of the cup). Set the tops back on the bases (they'll remain upright this way), and place in the refrigerator for about 15 minutes, or until set.

4. Once your 10 minutes are up, remove from the refrigerator and give them a generous second coat with the green, putting emphasis on the sides of the cup. Place back in the refrigerator on the bases until set.

5. Remove the tops from the bases; the chocolate should be set to the point where you can set the coupes on their sides while you proceed. Grab those bases, and invert them.

6. Fill each of the bases with most of the remaining melted white mixture, leveling the top. Place them with the coupes in the refrigerator. You should have a little white chocolate left — keep it on hand.

Chocolate bases

7. Once everything is set (that is to say, the chocolate is completely hard and firm), remove from the refrigerator (to keep things cool, remove the coupes and bases one at a time). Gently, using a sharp knife, ease the edges of the plastic from the chocolate. The pieces should come out without too much trouble.

If the plastic cracks or breaks, that’s ok — you only spent a dollar on these! If there is some breakage on your candy cups, don’t panic. You can place the cracked bit in place, and press it together using the remaining white chocolate mixture as “glue”.

Base attached to top

8. Use a little white chocolate or icing along the edge of the top of the cups, and adhere some coarse sugar along the rim.

9. Adhere the bases and cups using the remaining white chocolate as glue. Let them set again in the refrigerator for about 20 minutes before filling with the dessert of your choice. If not using immediately, let them rest in the refrigerator until ready to serve your dessert so that any ambient heat doesn't make the base and top separate.

What is your favorite whimsical dessert?

Wednesday
Dec242014

The Only Flourless Chocolate Cake Recipe.

If you believe my mother (and she's a pretty honest person), my first word as a baby, aside from "mama" and "papa"...was "chocolate". Apparently, it occurred following an incident where my grandma gave baby-me a fat spoonful of chocolate frosting, against my mother's wishes. As the story goes, my eyes lit up and I said the magic word: "chok-lit". True story.

So clearly, chocolate has played an important role in my life. It's been a lifelong friend.

In spite of that, however, I don't consider myself a "chocoholic". I would more often choose a blondie than a brownie, and I like the cookie part better than the chocolate chip part of cookies. But when I do get a chocolate craving, it is fierce, and I want chocolate and nothing else in my mouth.

In Santa Fe, where I currently reside, I have been introduced to one of my favorite chocolate cakes, which always satisfies chocolate cravings: the flourless decadence cake at Whole Foods. It's a very dense chocolate cake with (because, why not) a thick ganache topping). I don't know exactly what it is about this cake, but it is GOOD. Here's a picture of it:

Birthday cake

When I recently wrote an article for New Mexico Magazine (out in January!), one of the recipes I developed was for a decadent flourless chocolate cake. When I made it, I was surprised at how close the cake part was to the Whole Foods variety, so I tried a new variation which featured not only flourless chocolate cake, but an all-over ganache topping.

Well, my friends, it worked, and I believe I have found the perfect homemade hack of the Whole Foods decadence cake.

Flourless chocolate cake

I don't know how to express it in words, quite, but I will try. This cake is very, very, very, very, very, very, very, very, very, very, very chocolatey. If you have a chocolate craving, this will do the trick. There's more than a full pound of chocolate encased in its glossy ganache-coated exterior. This cake means chocolate business.

The salt is key in this recipe, as it brings out the chocolatiness. If you want, you can add a teaspoon of coffee powder to amp up the chocolate flavor even more, but I don't find it necessary.

If you love chocolate, this is the only flourless chocolate cake recipe you'll ever need. If you don't love chocolate, this might be he one that makes you a believer.

Process shots from cake making: Flourless chocolate cake

Whipping the egg whites

Flourless chocolate cake

Adding the eggs to the chocolate Flourless chocolate cake

Folding the egg whites into the chocolate

Flourless chocolate cake

Pour into the pan

Flourless chocolate cake

Baked cake

The only flourless chocolate cake recipe.

Makes one 9-inch round cake

For the cake

  • 1 pound bittersweet or semisweet chocolate, coarsely chopped
  • 11 tablespoons (1 stick plus three tablespoons) unsalted butter, cut into ½ inch cubes
  • 5 large eggs, divided
  • 1 teaspoon vanilla extract
  • ¼ teaspoon salt
  • 2 tablespoons sugar

For the sauce

Procedure

  1. Preheat the oven to 325°F. Grease a 9-inch round cake pan and line the bottom with parchment paper. Grease the top of the parchment paper.
  2. In the top of a double boiler or in a large bowl set atop a saucepan of lightly simmering water with 2 inches between the top of the water level and the bottom of the bowl, melt the chocolate and butter. Stir frequently until the chocolate and butter have melted to the point where there are only a few small lumps. Remove from heat and continue stirring until these unmelted bits have melted in the residual heat.
  3. Whisk in the egg yolks into the still-warm chocolate mixture. Whisk quickly so that the eggs will be incorporated without beginning to cook (nobody likes scrambled eggs in their cake). Stir in the vanilla extract.
  4. In a separate bowl using a hand mixer, or the bowl of a stand mixer, beat the egg whites and salt until soft peaks form. Once soft peaks form, stop the mixing and add the sugar. Scrape down the sides of the bowl if necessary to make sure no sugar has stuck to the sides of the bowl. Continue mixing until the whites have attained firm peaks, but not so long that they become dry.
  5. Using a rubber spatula, fold the egg white mixture into the chocolate mixture in two separate additions (it’s just easier to manage that way). Mix only until there are no more traces of white and the mixture is fully combined.
  6. Using the same rubber spatula, scrape the thick chocolate mixture into your prepared baking pan.
  7. Place the pan in a larger baking dish or roasting pan, and fill the larger pan with water until it reaches halfway up the cake pan’s height.
  8. Place the entire unit (cake pan within bain-marie) into the oven. Bake for 30 minutes. The top and sides will be set, but the middle may jiggle a bit. This is OK.
  9. Remove the cake from the pan of water (the water level should have reduced making it easier to remove). Let the cake cool in the pan. When ready to remove from the pan, run a sharp knife around the perimeter of the cake pan to loosen the edges. Place a serving platter on top of the cake pan, and flip both the pan and the plate so that the cake is on top. It should come out easily. The parchment may stay in the pan or it may come off with the cake; remove from the cake if so. Store in the refrigerator until the cake has completely set.
  10. While the cake cools, make the ganache as specified in the recipe. Let it cool until it has thickened to a spreadable but thick consistency, and spread all over the cake. 
  11. Keep the cake in the refrigerator until ready to serve; let it come to room temperature before serving.

Do you like flourless chocolate cake?

Thursday
Dec112014

The Best Chocolate Coconut Oil Maple Syrup Dipping Sauce

Chocolate coconut sauce and cornmeal cookies

Well, did I intrigue you with the title? I hope so, because this sauce is IT, dudes and dudettes.

What can you dip in chocolate coconut oil maple syrup sauce? Any and everything you can think of. Cookies, ice cream, cake, pie. I haven't tried it with a hamburger and fries yet but I'm pretty sure it would manage to improve that, too. Seriously--this stuff is just that good.

Chocolate coconut sauce and cornmeal cookies

This recipe was included in a preview review copy of a coming-soon novel entitled Criminal Confections (A Chocolate Whisperer Mystery). The book is super cute, exactly the type of mystery-meets-chick lit-meets foodie fiction type of book I read when I am alone (if I'm in public, it's War and Peace or something that makes me look smart, of course). I haven't finished the book so I haven't come to the recipe within the story yet, but it was included on the marketing sheet that came with the book, and I thought it sounded interesting.

Chocolate coconut sauce and cornmeal cookies

This sauce comes together in oh, about two minutes, and offers many delicious rewards. I have been enjoying it as a dipping sauce served alongside cornmeal pecan cookies (I'll post that recipe soon), but like I said, it really does make everything better.

"Hayden Mundy-Moore's Chocolate Butter"

Notes from the author: the keys to this recipe are the coconut oil and pinch of salt. The coconut oil gives the chocolate butter just the right luscious consistency. The salt (flaky sea salt is great if you've got it!) adds complexity. Natural cocoa powder and Dutch-processed cocoa powder both work well in ths recipe. Honey can be substituted for maple syrup, if you prefer.

from Criminal Confections (A Chocolate Whisperer Mystery)

  • 1/4 cup refined coconut oil
  • 1/4 cup pure maple syrup
  • 1/4 teaspoon vanilla extract
  • 1/2 cup unsweetened cocoa power
  • pinch of salt

Melt the coconut oil in the microwave or on the stovetop over low heat. Stir in the rest of the ingredients and whisk until smooth. It will become thicker as it cools. Enjoy!

What's your favorite dipping sauce for sweets?

Thursday
Jan302014

Chocoholics Anonymous: 20 Delicious Quotes About Chocolate

Chocolate quotes

"Exercise is a dirty word. Every time I hear it I wash my mouth out with chocolate."

-- Charles M. Schulz

love

"Don't wreck a sublime chocolate experience by feeling guilty. Chocolate isn't like premarital sex. It will not make you pregnant. And it always feels good."

-- Lora Brody

hershey

"Chocolate says "I'm sorry" so much better than words."

--Rachel Vincent

"There are two kinds of people in the world: those who love chocolate, and communists.”

-- Leslie Moak Murray

apology

"Your hand and your mouth agreed many years ago that, as far as chocolate is concerned, there is no need to involve your brain."

-- Dave Barry

"Anything is good if it's made of chocolate."

-- Jo Brand

bradbury

"What you see before you, my friend, is the result of a lifetime of chocolate."

-- Katharine Hepburn

"There's no metaphysics on earth like chocolates."

 -- Fernando Pessoa


chocolateheaven

"Blood is really warm, it's like drinking hot chocolate but with more screaming."

-- Ryan Mecum

tragedies

"Always serve too much hot fudge sauce on hot fudge sundaes. It makes people overjoyed, and puts them in your debt."

-- Judith Olney

artemotion

"Happiness is German engineering, Italian cooking, and Belgian chocolate."

-- Patricia Briggs

winewomen

Wednesday
Apr252012

Sweet Schooling: Wellesley Fudge Cake Recipe

Wellesley Fudge Cake

Wellesley Fudge cake--a deeply decadent chocolate cake topped with a slab of fudge frosting--seems an unlikely sweet to associate with the prim-and-proper ladies of Wellesley (the college featured in the classic feat of cinema Mona Lisa Smile). 

Clearly by the popularity of this recipe, it seems that those young ladies had as voracious an appetite for the sweet stuff as they did for knowledge. But to really look at the origins of this cake, we’ve got to rewind a little bit, to the invention of fudge itself.

Wellesley Fudge Cake


Fudge, that semi-soft candy made from butter, sugar, and various flavorings (very commonly chocolate) is an american-ized version of french bonbons and creams, and it became popular in the US in the early 1900s. The Oxford English Dictionary suggests that the name is perhaps derived from the word “fadge”, which is an old-timey term for “to fit pieces together”. Of course, not to confuse you, but an Irish dish called “Fadge” does exist, but it is actually an apple potato cake, traditionally served at Halloween.

As an interesting side note, the word “fudge” referring to a cheat or hoax dates to the 1830s, before the candy was popular--but this may explain how the name was assigned to the candy, too.

You see, those young college ladies would use the sweet stuff as their excuse to stay up late: candy-making was an acceptable activity, and they would use it as an excuse to stay up late, ostensibly to talk about boys and other forbidden subjects. “Nearly every night at college,” said the Vassar girl, “some girl may be found somewhere who is making ‘fudges’ or giving a fudge party.” The timing seems to work out: the word “fudge” for a confection showed up as early as the 1890s, and by 1908 the term was commonly used in association with women’s colleges.


IMAG0570

A 1909 cookbook produced by Walter Baker & Co. (producer of Baker’s chocolates) includes three different recipes for fudge, each just slightly different and named, respectively, after Vassar, Smith, and Wellesley colleges.

In fact, there is a letter in the Vassar archives which says,

“Fudge, as I first knew it, was first made in Baltimore by a cousin of a schoolmate of mine. It was sold in 1886 in a grocery store...I secured a recipe and in my first year at Vassar, I made it there--and in 1888 I made 30 pounds for the Senior auction, its real introduction to the college, I think.”

So why would it proliferate, and be adapted to an even richer and more over the top treat, the decadent Wellesley Fudge Cake, at this particular school? Perhaps because it was such a forbidden pleasure there. An 1876 circular to parents states that the college refuses to accept students who are broken down in health, maintaining that a proper diet is key for proper learning, and that “we have therefore decided not to receive any one who will not come with the resolution to obey cheerfully all our rules in this respect, and pledged in honor neither to buy nor receive in any manner whatsoever any confectionery or eatables of any kind not provided for them by the College.” Further, the founder of Wellesley College held that, “pies, lies, and doughnuts should never have a place in Wellesley College”. Well, naturally it would take off here: it tasted positively sacre-licious!

By 1913, fudge and fudge cakes were was common on the tea-room menus surrounding the college.I will help

Every few decades the cake enjoys a renaissance; a little fussy to make in that it requires a bit of candy-making prowess, it is astoundingly easy to eat. The confection was bound for success too: soon, it was even featured prominently as

Some versions call for an unfrosted cake; others, which I favor, feature a double dose of chocolate, the base of which is brownie-like, coated with a more fudge-like frosting.IMAG0574

Note: Traditional recipes called for “thick sour milk”; I'm not quite sure what that even is, so this recipe employs buttermilk. After testing another traditional recipe with some help by Java Cupcake, I find this a superior cake. 

The recipe that finally ended up tasting best? This one, lightly adapted from the geniuses at Cook's Country Magazine. Their original version appears in the book Cook's Country Blue Ribbon Desserts.

Wellesley Fudge Cake
Adapted from Cook's Country Blue Ribbon Desserts

Cake

  • 2 1/2 cups all-purpose flour
  • 2 t. baking soda
  • 1 t. baking powder
  • 1/2 t. salt
  • 3/4 c. hot water
  • 1/2 c/ Dutch-processed cocoa powder (I used Hershey's Special Dark which also works fine)
  • 16 T. (2 sticks) unsalted butter, cut into 16 pieces and softened
  • 2 c. granulated sugar
  • 2 large eggs
  • 1 c. buttermilk, room temperature
  • 2 t. vanilla extract

Frosting

  • 1 1/2 c. packed light brown sugar
  • 1 c. evaporated milk
  • 8 T. (1 stick) unsalted butter, cut into 8 pieces and softened
  • 1/2 t. salt
  • 8 oz. bittersweet chocolate, chopped
  • 1 t. vanilla extract
  • 3 c. confectioners’ sugar, sifted

To make the cake:

  1. Adjust an oven rack to the middle position and heat the oven to 350 degrees. Grease and flour two 8-inch square baking pans, then line the bottoms with parchment paper. Combine the flour, baking soda, baking powder and salt in a bowl. Set aside.
  2. In a small bowl, whisk the hot water and cocoa together until smooth and set aside. In a large bowl, beat the butter and granulated sugar together with an electric mixer on medium-high speed until light and fluffy, 3-6 minutes. Beat in the eggs, one at a time, until incorporated. Mix in one-third of the flour mixture, followed by 1/2 cup of the buttermilk. Repeat with half of the remaining flour mixture and the remaining 1/2 cup buttermilk. Add the remaining flour mixture and mix until combined. Reduce the mixer speed to low and slowly add the cocoa mixture until incorporated.
  3. Give the batter a final stir with a rubber spatula to make sure it is thoroughly combined. Scrape the batter into the prepared pans, smooth the tops, and gently tap the pans on the work surface to settle the batter. Bake the cakes until a toothpick inserted in the center comes out with a few crumbs attached, 25-30 minutes, rotating the pans halfway through baking. Let the cakes cool in the pans for 15 minutes. Run a small knife around the edges of the cakes, then flip them out onto a wire rack. Peel off the parchment paper, flip the cakes right side up, and let cool completely before frosting, about 2 hours. (The cakes can be wrapped tightly in plastic wrap and stored at room temperature for up to 2 days.)
  4. To make the frosting: Stir together the brown sugar, 1/2 cup of the evaporated milk, 4 tablespoons of the butter, and salt in a large saucepan and cook over medium heat until small bubbles appear around the edge of the pan, 4-8 minutes. Reduce the heat to low and simmer, stirring occasionally, until large bubbles form and the mixture has thickened and turned deep golden brown, about 6 minutes. Transfer to a large bowl. Stir in the remaining 1/2 cup evaporated milk and remaining 4 tablespoons butter until the mixture has cooled slightly. Add the chocolate and vanilla and stir until smooth. Whisk in the confectioners’ sugar until incorporated. Let the frosting cool to room temperature, stirring occasionally, about 1 hour.
  5. Line the edges of a cake platter with strips of parchment paper to keep the platter clean while you assemble the cake. Place one of the cake layers on the platter. Spread 1 cup of the frosting over the cake, right to the edges. Place the second cake layer on top, press lightly to adhere, and spread the remaining frosting evenly over the top and sides of the cake. Refrigerate the cake until the frosting is set, about 1 hour. Remove the parchment strips from the platter before serving.


Monday
Jan022012

La Dulce Vita: Almost Flourless Chocolate Cake with Dulce de Leche Recipe for Serious Eats

Around this time of year, an unnerving amount of people make declarations that they are going to avoid dessert, all under the alarming title of "New Year's Resolution".

Personally, I'd rather resolve to eat more deliciously. And if you resolve similarly, you'll undoubtedly get a lot of pleasure from Almost Flourless Chocolate Cake with Dulce de Leche.

This recipe is largely based on Evelyn Sharpe's 1969 recipe for "French Chocolate Cake", as discovered on Amanda Hesser's now-defunct Recipe Redux column, but is made even better with the addition of dulce de leche and ice cream or whipped cream on top.

For the full entry and recipe, visit Serious Eats!

Wednesday
Aug172011

Microwave Chocolate Peanut Butter Chip Fudge Recipe

There was a time, in my childhood, during which my parents chose to go without a microwave. I know--hippies!

As a result, I became exceedingly adept at cooking everything with the toaster--for instance, putting foil on top of the toaster oven and heating up microwave pizza using the heat rising from inside of the toaster. Totally not a fire hazard at all. 

These days, now that I have a microwave of my very own, I really want you to know that I appreciate its presence very much and strive to honor it whenever possible. And what bigger tribute to la belle microwave than making delicious microwave fudge? This is a riff on a recipe I found on Allrecipes.com, but I made the executive decision to use half and half instead of milk (good idea) and to add a healthy dose of peanut butter chips for added rich deliciousness. Here's how you make some microwave magic at home:

Microwave Chocolate Peanut Butter Chip Fudge

  • 4 cups confectioners' sugar, sifted
  • 1/2 cup unsweetened cocoa powder, sifted
  • 1/2 cup half and half, divided
  • 1/2 cup unsalted butter, cut into 1/2 inch cubes
  • 1 teaspoon vanilla extract
  • 3/4 cup peanut butter chip morsels, divided into 1/2 and 1/4 cup


Procedure

  1. Line an 8x8-inch or 9x9-inch pyrex pan with parchment paper or waxed paper.
  2. In a large microwave safe bowl, stir together the confectioners' sugar and cocoa. Pour 1/4 cup of the half and half over the mixture and place butter in bowl. Do not mix (it will be too thick to mix, anyway). Microwave on high until butter is melted, about 2 minutes. Stir in the vanilla and 1/2 cup of the peanut butter morsels. Stir vigorously until smooth. You can also put the mixture into a stand mixer if that sounds exhausting. If your mixture is too dry, add up to 1/4 cup more half and half, a little at a time, until the mixture comes together in a fudge-like consistency.
  3. Spoon the mixture into your prepared pan and using a rubber spatula, spread the mixture so that it is evenly distributed. If desired, sprinkle the top with the remaining peanut butter morsel chips.
  4. Chill in the refrigerator for an hour, or the freezer for half an hour, before serving. Makes about 16 squares.

Sunday
May152011

Chocolate Love: Mom's Chocolate Cake Recipe from Macrina Bakery

Photo: Macrina BakeryIt's the most wonderful time of the month, a week in, when the rent has already been paid and we all receive Macrina Bakery's recipe of the month in our inbox. Le nom!

This month, they've featured "Mom's Chocolate Cake", which is introduced thusly: "This dessert is named in honor of those homemade chocolate cakes that moms are famous for. I like to apply the frosting in big swirls."

Here's how to make it happen at home.

Mom's Chocolate Cake

INGREDIENTS:

Makes 1 (9-inch) layer cake
For the cake: 

2 eggs
3/4 cup whole milk
1/3 cup canola oil
2 teaspoons pure vanilla extract 
1-3/4 cups granulated sugar
1-1/2 cups unbleached all-purpose flour
1/4 cup dark cocoa powder, sifted
1 teaspoon baking powder
1 teaspoon baking soda
3/4 teaspoon salt
3/4 cup boiling water

For the vanilla syrup: 
1/4 cup pure vanilla extract
1/4 cup granulated sugar
1/4 cup water

For the chocolate frosting: 
12 ounces unsweetened chocolate, coarsely chopped
1 pound (4 sticks) unsalted butter, at room temperature 
3-1/2 cups powdered sugar, sifted
2 tablespoons pure vanilla extract

PREPARING THE CAKE LAYERS:
Preheat the oven to 325°F. Prepare a 9 x 3-inch cake pan by brushing the inside with oil, then lining the bottom with a 9-inch circle of parchment paper. Set aside.

Combine eggs, milk, canola oil, and vanilla extract in a medium bowl and mix well with a whisk. Set aside.

Sift sugar, flour, cocoa powder, baking powder, baking soda, and salt into the bowl of a stand mixer. Toss with your hands to combine. Attach the bowl to the stand mixer. Add the wet ingredients to the bowl of dry ingredients. Using the whisk attachment, mix on medium speed until combined, about 2 minutes. Keep mixing as you add the boiling water in a slow stream, mixing just until the water is incorporated, about 30 seconds.

Pour the batter into the prepared cake pan. Place pan on center rack of oven and bake for 55 to 60 minutes or until cake is set in the center. Test center with a skewer to make sure the cake is done. Remove from the oven and let cool in the pan on a wire rack for at least 30 minutes.

PREPARING THE VANILLA SYRUP: 
Combine ingredients in a small saucepan and bring to boil over medium-high heat. Stirring frequently, cook until sugar is dissolved and the liquid is syrupy, 2 to 3 minutes. Remove from heat and let cool.

PREPARING THE CHOCOLATE FROSTING: 
Place chocolate in a medium stainless steel bowl. Place bowl on top of a saucepan filled with 2 inches of simmering water, making sure that the bottom of the bowl does not come in contact with the water. It’s important that the water be just simmering; if it’s too hot it will scorch the chocolate. Stir chocolate with a rubber spatula until all of the pieces have melted and reached a smooth consistency. Remove the bowl from the heat and let cool to room temperature.

Combine butter and powdered sugar in the bowl of your stand mixer. Using the paddle attachment, mix for 5 to 8 minutes to cream the butter. Start on low speed and gradually increase to medium. Starting out on a higher speed will likely result in a snow storm of powdered sugar, a real mess. When the butter mixture is light and fluffy, add the melted chocolate and mix until incorporated. Add the vanilla extract and continue mixing a few more minutes until the frosting is thick enough to spread. If the frosting gets too soft, simply chill it in the refrigerator to firm it up. If it stays in the refrigerator for too long, let it sit out for a few minutes and then re-whip it.

ASSEMBLING THE CAKE 
Invert the cooled cake to remove it from the pan. If it sticks, run a  sharp knife around the sides of the cake to release it from the pan. Peel the parchment paper off the bottom of the cake. Using a sharp bread knife, carefully cut the cake horizontally into 3 equal layers. Place the bottom layer on a serving plate or cardboard cake circle and brush it with a little vanilla syrup. Spread a generous amount of chocolate frosting (about 1/4 inch) over the cake. Top it with another layer of cake and repeat the process. Add the final cake layer. Place a dollop of frosting on top of the cake and spread it 1/8 inch thick, spreading any excess frosting down onto the sides. Spread a little more frosting on the sides until the entire cake has what bakers call a crumb coat: a thin underlayer of frosting that keeps crumbs out of the final layer of frosting. Crumbs will be clearly visible through the frosting. Chill the cake in the refrigerator for 20-30 minutes. The remaining frosting can stay at room temperature while the cake chills.

Remove the cake from the refrigerator and add the final layer of frosting. I like to create a swirl pattern in the frosting, just like the cakes I remember from childhood. Store in the refrigerator for up to 2 days. This cake is best served at room temperature, so remove it from the refrigerator 1 hour before serving. 

Saturday
Feb192011

Dark But Sweet: Bittersweet Chocolate Gateau Recipe from Macrina Bakery, Seattle

Image: Macrina BakeryTopping the list of things that make you go NOM? Howsabout a big slice of Bittersweet Chocolate Gateau? It's the recipe of the month from Seattle's famous Macrina Bakery, and I don't know about you, but I think it would be a perfect cake to enjoy for breakfast, lunch, dinner, or all of the above.

Bittersweet Chocolate Gateau

  • 10 ounces bittersweet chocolate
  • 9 eggs
  • 12 tablespoons (1-1/2 sticks)
  • unsalted butter, at room temperature
  • 3/4 cup granulated sugar
  • 1/4 cup dark cocoa powder, sifted
  • 2 cups (1 pint) fresh raspberries
  • Lightly Sweetened Whipped Cream (recipe follows)
  • Powdered sugar


Procedure

  1. Preheat oven to 350°F. Oil a 9 x 13-inch springform pan. Set aside.
  2. Chop chocolate into small pieces and place in a small stainless steel bowl. Place bowl on top of a saucepan filled with 2 inches of simmering water, making sure that the bottom of the bowl does not come in contact with the water. It’s important that the water be just simmering; if it’s too hot it will scorch the chocolate. Stir chocolate with a rubber spatula until all of the pieces have melted and reached a smooth consistency. Remove the bowl from the heat and set it on the stovetop to keep it slightly warm.
  3. Separate eggs, placing yolks in a small bowl and whites in a medium bowl. Set bowls aside.
  4. Combine butter and sugar in the bowl of a stand mixer and using the paddle attachment, mix on low speed for 1 to 2 minutes. Increase speed to medium and mix for about 5 minutes more to cream the butter. The mixture will become smooth and pale in color. Start adding the egg yolks, 2 at a time, taking care to mix each addition fully before adding more yolks. Scrape down the sides of the bowl with a rubber spatula as needed. After all of the yolks are incorporated, add the sifted cocoa powder and continue mixing until combined.
  5. Remove the bowl from the stand mixer and fold in the melted chocolate with a rubber spatula. The batter will thicken. Using a whisk or hand-held mixer, whip egg whites until medium-stiff peaks form. Gently fold the whipped egg whites into the batter, one third at a time. Continue folding the batter until there are no visible white streaks; it is important that the whites be fully incorporated into the batter. The final mixture should have a sponge-like texture. Pour the batter into the prepared springform pan and scatter half of the raspberries over the top. Poke the berries down with your fingers until they are just below the surface.
  6. Place pan on center rack of oven and bake for 45 to 50 minutes, or until the center is set. Let cool on a wire rack for 30 minutes. Release the sides of the pan and lift, leaving the cake on the pan bottom. Dust the top of the cake with powdered sugar and garnish with the remaining raspberries. Serve with Lightly Sweetened Whipped Cream. It’s best to enjoy this cake the day it’s baked, but it can be stored at room temperature for up to one day. It will become very dense and fudge-like if kept in the refrigerator.
  7. It's also most excellent with freshly whipped cream!
Tuesday
Dec212010

Sweet Giveaway: Delicious Candy from Sarris Candies

The holidays can be a stressful time. Stress makes you hungry.

But at least one lucky reader (well, from the lower 48 US States, that is) won't starve to death, because Sarris Candies was kind enough to offer some sweet booty for a giveaway!

Never heard of Sarris Candies? Too bad, because not only do they have delicious chocolates, but they come with a delicious backstory which includes both chocolate and love:

You might say it all started when Frank Sarris found a sweetheart. As a young man trying to win the affections of the lovely Athena, Frank presented her with a gift as sweet as she was, a box of chocolates. Athena's face lit up as she lifted the lid and Frank knew he was in love. He also knew he could make better chocolate.

And so he began, first producing small amounts in his basement for friends and family and then, as the word spread, he began making more and more candy for the local market. Frank and Athena married soon after and Sarris Candies was born in the basement of their Canonsburg (PA) home. 

and it goes on...

To this day, Frank and Athena are still sweet on each other. One taste of Sarris Chocolates and you'll fall in love, too!

What could you win? Good stuff. The parcel will start with a one-pound assortment:

Our most popular assortment containing old time favorites such as freshly roasted nuts, double dipped in our rich milk chocolate, assorted meltaways, fresh fruit creams, toasted coconut, caramels and more all nestled in a beautiful gold foil gift box

But wait, there's more! Said reader will also receive a sweet and salty delight known as the Pretzel Bag:

In the kitchen, bakers hand-twist fresh dough into those old, familiar knots, then oven-bake them to just the right crispness. Each pretzel is then lovingly dipped into decadently rich milk, dark or white chocolate. 

How do you put your name in the running? Simply leave a comment below saying what your favorite type of chocolate is when you receive an assortment. Do you dig in for the often square-shaped caramels, like me? Or do you try to find an elusive maple cream? Or perhaps you covet the chocolate covered cherries?

Of course (duh) if you can't wait, you can always order online here.

The giveaway will close on Tuesday, December 28 at 12pm PST!

© Cakespy, all rights reserved. Powered by Squarespace.