Home Home Home Home Home Home Home
CakeSpy

Featured: 

My adventure at Ben & Jerry's in Vermont!


Unicorn Love: the Eating Disorder Recovery Blog


 Buy my brilliant books!

Buy my new book!

Buy my first book, too! 

CakeSpy Online Retail!


Archives
Gallery

Fantastic appliance for cake making on DHgate.com

everyrecipe.co.nz

Craftsy Writer

Entries in recipes (704)

Wednesday
Nov162011

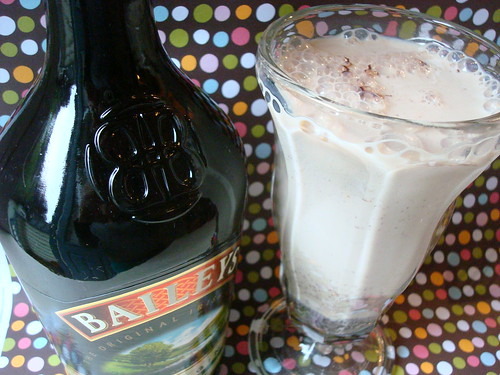
Baileys Friendsgiving: The Baileys Frothy Recipe

Baileys Frothy

Good morning, everyone!

It being Wednesday morning and all, I thought I'd help you get through the day (and week) with a super sweet and slightly intoxicating idea: The Baileys Frothy!

I came up with this recipe as part of the Friendsgiving campaign I'm participating in courtesy Baileys. 

This cocktail is the perfect way to kick off a party--inspired by the NYC classic, the Brooklyn Egg Cream, this frothy, sweet, nostalgic soda-fountain favorite is a wonderful way to kick off a festive evening.

Baileys Frothy

1 tablespoon chocolate syrup (u-bet is the best, if you can find it)
2 oz. Baileys, very cold
2 tablespoons milk, very cold
1/2 cup seltzer water (not club soda)

Pour the milk and Baileys in a tall (Collins) glass. Add the seltzer, and stir very gently. Add in the chocolate mixture very slowly, stirring with a tall spoon very gently, so that you disturb the foam as little as possible. You will end up with a 2-toned frothy drink, chocolaty on the bottom and frothy and light on top. 

This recipe contains no more than 0.6 fl. oz. of alcohol per serving. Join Baileys on Facebook for more recipes and inspiration to throw your own.

Tuesday
Nov082011

Sweet and Crunchy: Candied Yam Rice Krispie Treats Recipe for Serious Eats

It's time to combine two marvelous marshmallow-based recipes to form one delicious treat: the Candied Yam Rice Krispies Treat.

What's not to love about this seasonal mashup? Separately, both cereal treats and candied yam casseroles are delicious; both dishes rely on marshmallows for their sweet, signature taste. But the key to this combination is their contrasting crispy textures; when they come together, you're rewarded with a crispy-creamy-moist-and-chewy sort of marshmallow nirvana, sweetly spiced and perfect with hot chocolate or chai tea.

For the full entry and recipe, visit Serious Eats!

Thursday
Nov032011

Sweetheart Mini Cherry Pies Recipe from Mini Empire Bakery

 Totally sweet! In addition to my interview(s) with Morgan and Christy of Mini Empire Bakery, wherein we discuss their adorable new book Mini Pies: Adorable and Delicious Recipes for Your Favorite Treats, they were also kind enough to let me share one of the sweetest recipes from the book: Sweetheart Cherry Pies! Now, you know my feelings about fruit in dessert (too much like health food!), but in this case, as the buttery crust-to-filling ratio is high, they have a cute upgrade from hearts being placed on top, and there is the chance of topping them with ice cream, I find them beyond acceptable--I find them excellent.

Sweetheart Cherry Pies

  • 1 pound fresh sweet cherries, pitted and diced in 1/2 inch pieces
  • 1/2 cup sugar, plus extra for sprinkling
  • 1/2 tablespoon cornstarch
  • 1 tablespoon lemon juice
  • Pie crust (for one pie)
  • 1/4 cup soy milk

Procedure 

  1. Preheat oven to 350 degrees F. Generously grease a 12-cup muffin tin with butter or cooking spray.
  2. Combine the cherries, 1/4 cup sugar, cornstarch, and lemon juice in a large bowl.
  3. On a floured surface, roll out the pie crust to thickness of 3/16 inch. Using a 4-inch diameter round cutter, cut 12 crusts. Re-form and re-roll dough as necessary, keeping plenty of flour on the work surface.
  4. Using a mini cookie cutter of your choice, use leftover dough to cut out 12 small shapes as pie toppers (suggested: hearts).
  5. Carefully shape crusts into the wells of the tin, crimping the edges with your fingers.
  6. Fill each mini pie with 1 1/2 tablespoons of the cherry mixture. Don't fill in too much juice with the cherries, or they will bubble over. Top each pie with one of the toppers.
  7. With a pastry brush, brush the crusts with soy milk, then sprinkle with sugar.
  8. Bake for 20-25 minutes, or until the crust is golden brown. Allow to cool for several minutes in the tin, then carefully remove from the tin and allow to cool fully on a wire rack. To remove, try first to spin the pies in the muffin wells. If they need some help, run a butter knife along the edge of the crusts to pop them out of the in.
  9. Serve, or store in an airtight container for up to 2 days.
Thursday
Nov032011

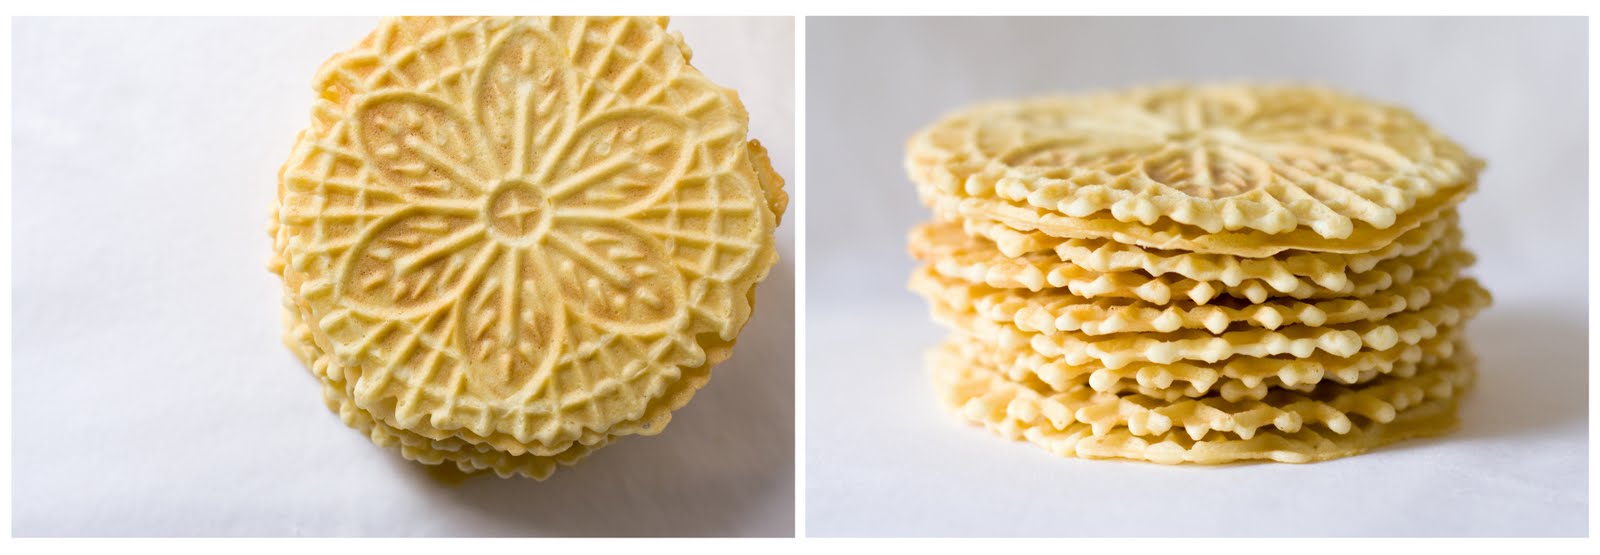
Pizzelle Recipe: Breakfast of Champions, from Cake Gumshoe Rachel

Photo: Not Just SweetsCakeSpy Note: This delicious recipe comes from Cake Gumshoe Rachel, who writes the website Not Just Sweets.

My grandpa, whose family was from the Abruzzi region of Italy,  believed in starting the day with his favorite breakfast: pizzelle cookies dunked in his morning coffee.  He always kept an empty coffee tin filled with pizzelles by the front door so when friends or family walked in they could help themselves to a cookie.  At least once a week we would make pizzelles using his recipe:

Pizzelles

  • 3 eggs
  • 3/4 cup sugar
  • 1 1/2 sticks butter, melted
  • 1 3/4 cups flour
  • 1 teaspoon baking powder
  • 1 1/2 teaspoon vanilla extract
  • 1 1/2 teaspoon anise extract*

Procedure

  1. Add in the order listed. Drop by spoonful onto center of pre-heated pizzelle iron.
  2. Close lid and cook until steaming stops, about 45 seconds.
  3. Place a towel on the side of the iron and place pizzelles on towel and allow to cool.

*If you prefer a more mild anise flavor, use 2 teaspoons of vanilla extract and 1 teaspoon of anise extract. These cookies are easy to make and will stay fresh for 3 days in an airtight container. You can serve plain or sprinkle with powdered sugar or shape into ice cream cones and cups. Pizzelle irons are available online or at your local Williams-Sonoma store.

Tuesday
Nov012011

Happy Hour: Eggnog With Brandy and Rum from Ice Cream Happy Hour

Photo courtesy of Ulysses Press; recipe reprinted with permission from Ice Cream Happy Hour (Ulysses Press).

Everyone knows that the happiest hour is one that involves ice cream...but what about when the weather gets cold and you want to keep toasty?

The natural solution is Eggnog. And now that it's after Halloween, I say "it's time." As the book says,

One of the joys of egg nog is that it seems so innocent, with its egg yolks and spiced cream, and yet it has an almost devilish side of dark rum and brandy. This ice cream is as rich as it is flavorful, and it has enough rum and brandy to keep you happy through the holidays. And like any good egg nog, freshly grated nutmeg adds a special touch.

 Eggnog with Brandy and Rum

 Ingredients

  • 1 cup milk
  • 1¾ cups heavy cream
  • pinch of salt
  • 6 egg yolks
  • ¾ cup sugar
  • 2 teaspoons vanilla extract
  • 1 teaspoon freshly grated nutmeg
  • 1 packet (1 tablespoon) gelatin
  • ⅓ cup cold water
  • ⅓ cup cold (refrigerated) brandy
  • ⅓ cup cold (refrigerated) dark rum


Makes about 1 quart

1. Scald the milk and cream with the salt; don’t add the sugar yet. Mix the milk, cream, and salt in a medium saucepan over medium low heat until the salt is dissolved. Continue heating until the mixture is steamy and makes a slight sizzling noise when you move the pan. This is called scalding.

2. Whisk the egg yolks and temper. Whisk the egg yolks with the sugar and temper with ⅓ cup of the scalding milk mixture. Gently stream about one-third of the hot milk mixture into the eggs while whisking continuously. This is called tempering. It’s important to whisk while streaming the hot milk. If you just pour in the hot milk and then whisk, you may get scrambled eggs.

3. Thicken the custard over low heat. Pour the egg and milk mixture into the rest of the milk mixture in the saucepan and stir continuously on low heat with a heatproof spatula. Make sure you scrape the bottom evenly while you continuously stir. The custard is thick enough when you can draw a line on the back of the spoon with your finger and the line retains its shape.

4. Whisk in the vanilla extract and nutmeg.

5. Strain, cover, and chill the custard for at least 8 hours. Strain the custard through a fine-mesh strainer into a heatproof container. Cover with plastic wrap so that it’s directly touching the entire surface of the custard and none of it is exposed to air. This prevents a skin from developing. Transfer the container to an ice bath and let it cool for about 30 minutes to stop the cooking process. Transfer the container to the refrigerator. Chill until the custard is completely cold, at least 8 hours. Once the custard is completely cold…

6. Dissolve the gelatin in the cold water. When the custard is cold and you’re ready to churn the ice cream, dissolve the gelatin. Pour the water into a small saucepan or microwave-safe container and evenly sprinkle the gelatin on top. Allow to sit until the gelatin appears to have absorbed as much water as it can, about 2 minutes. This is called blooming. Gently warm over low heat and stir until the gelatin is completely dissolved into the liquid, about 3 minutes. If using a microwave, heat on medium power and check every 30 seconds until the gelatin is completely dissolved. The total time will depend on the microwave’s voltage.

Note: It’s important that the gelatin gets completely dissolved at this stage. Once the alcohol is mixed in, the gelatin denatures and will never fully dissolve. However, once the alcohol is added, clumps may form. This is fine since in most cases you strain the gelatin mixture before adding it to the custard. Do not try to reheat the gelatin mixture once you’ve added the alcohol; this will only denature the gelatin further, making it unable to solidify the ice cream, and it will also cook off the alcohol.

7. Spike the custard with the cold brandy, dark rum, and gelatin mixture. Refrigerate the alcohol until completely cold. Do not speed up the process by putting it in the freezer, which may make the gelatin set up too much before it is added to the custard. Pour the gelatin into a medium bowl and whisk in the cold alcohol until combined. Do not attempt to skip this step by pouring the alcohol directly into the saucepan or microwave-safe container with the gelatin. There might be enough residual heat to heat up the custard and prevent it from thickening in the ice cream maker (we learned this the hard way). Pour the cold custard into a large bowl. Stream the alcohol and gelatin mixture through a fine-mesh strainer into the custard and whisk until thoroughly blended.

8. Churn the ice cream for at least 20 minutes. Pour the cold custard immediately into the ice cream maker and churn for at least 20 minutes, or as directed. Due to the alcohol content, you may wish to churn it longer to get the desired thickness. If you don’t want to serve the ice cream immediately, or you want a firmer texture, transfer it to a freezer-proof container and freeze for several hours before serving.

Monday
Oct312011

Trick or Sweet: Fun-Size Candy Bar Studded Cheesecake Recipe for Serious Eats

What's so "fun" about Fun-Size candy bars, anyway? Those paltry portions taste like deprivation to me—unless we're talking about eating five or six, all at once. But I digress.

For a sweet treat that embraces the excessive sweetness of the Halloween spirit but also takes advantage of surplus candy (or the cheap prices of Halloween candy the day after), try your hand at this Fun-Size Candy Studded Cheesecake. A rich and creamy cheesecake gets a chocolatey upgrade from coarsely chopped candy in a variety of your choosing. Lucky enough to have extra Snickers bars? Go for it, or make it a mix; mine included a melange of Nestle favorites, including about 15 assorted mini Nestle Crunch, Baby Ruth, and Butterfinger bars. One thing's for sure: the size of this cake makes for mega-fun.

For the full entry and recipe, visit Serious Eats!

Monday
Oct312011

Bake a Cake In It: Cake Baked in a Pumpkin Recipe for Serious Eats

It's been proven time and time again that stuff is better when it's baked inside of a cake. For example: cupcake-stuffed cupcakestruffle-stuffed cupcakes, the entire website Bake it in a Cake.

But what happens when you do the reverse, and bake a cake inside something unexpected? Like a pumpkin?

The original idea here was to make mini cakes in cored-out small pumpkins, but the baking was irregular; baking a batch of cake in one large pumpkin yielded a far more delicious (and good-looking) result.

The moisture of the pumpkin yields a cake that had a texture something like a baked pudding—very dense and flavorful. To keep things from getting too pumpkin-heavy I tried this recipe with carrot cake; the flavors and spices worked beautifully with the pumpkin scent and flavor. It's even better when generously frosted and served with ice cream.

For the full entry and recipe, visit Serious Eats!

Thursday
Oct272011

Smear Campaign: Smearcase Recipe for Serious Eats

If you ask me, a baked good had better be great to get away with an exceedingly unappetizing name like Smearcase.

And happily, it is—this little-known Baltimore specialty, introduced to me by Rachel Rappaport of Coconut & Lime, is sort of like a thinner-crusted cousin to the pride of St. Louis known as Gooey Butter Cake. A dense, cakey crust encases a big ol' smear of gooey cream cheese-based custard filling; when sliced into squares, it's sort of like cheesecake condensed into a bar cookie form.

Note: While not strictly traditional, I added a handful of lightly roasted walnuts to the top of my Smearcase, with delicious results.

For the full entry and recipe, visit Serious Eats!

Wednesday
Oct262011

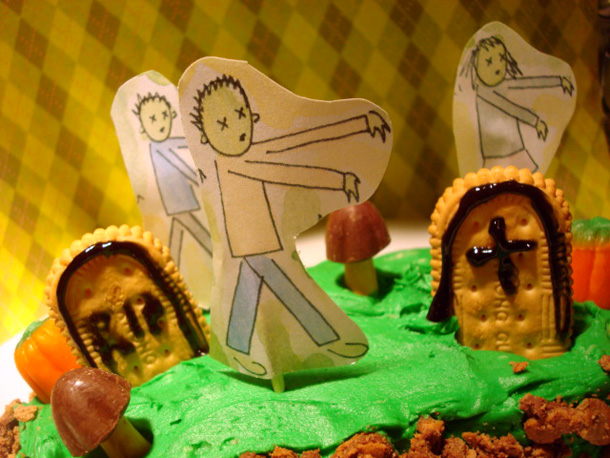
Creepy Cute: Zombie Graveyard Cake Recipe for Serious Eats

Zombies don't eat cake—they eat people's brains. But this Halloween, here's a way to turn the tables: Zombie Graveyard Cake.

This is just about the tastiest graveyard you'll ever come across. Starting with a generous amount of grass green-tinted frosting, the cake is then lined with cookie crumbles to resemble the residual grave-escape dirt, dotted with cookie "graves", and decorated with zombie cutout cake picks (printable illustrations to cut out can be found here) to form a delightful dessert that is creepy and cute all at once.

For the full entry, visit Serious Eats!

Tuesday
Oct252011

Sweet Fancy: Chocolate Paprika Cake Recipe from Kim and Jake's Cakes, Boulder CO

Photo: Kim and Jake's CakesThere is a song called "Daylight" by a band called Matt & Kim. I like this song. And I liked it even more when I learned that the Matt and Kim in question went to the same college as me, Pratt Institute.

But then I learned that they were several years younger than me and were kind of big deals in the music world, and then I kind of stopped liking them so much. In fact, my eyes kind of narrowed every time that song came on the radio. Stupid-younger-than-me-overachievers.

So now I turn to another duo, Kim and Jake, who run Kim & Jake's Cakes. Ahh, that's better. And they've offered up a recipe to share, for this delectable Chocolate Paprika Cake! An unexpected but delicious fall treat. Lucky us. Here's the recipe.

Image: Kim and Jake's CakesChocolate Paprika Cake

Ingredients For the Cake:

  • 6 eggs
  • 3 cups sugar
  • 1.5 cups vegetable oil
  • 1 cup dark cocoa
  • 3 tsp salt
  • 2 tsp sweet paprika
  • 1 ½ tsp smoked paprika
  • 3 tsp Urfa chilies
  • 1 ½ tsp baking soda
  • ½ tsp baking powder
  • 2 tsp vanilla
  • 4 cups flour
  • 2 ¾  cups strong brewed coffee

Baking Instructions:

  1. Preheat oven to 300 degrees
  2. Line two 8 inch pans with oil and flour or spray down with Baker’s Joy
  3.  Combine all ingredients except for flour and coffee into a six qt. mixer bowl.  Using the whisk attachment put on speed 2 and mix until the batter is shiny and everything is incorporated.  Alternately add flour and coffee a cup at a time starting with the flour. When everything has been added, scrape down sides of bowl and mix on speed 3 for one minute.
  4. Pour contents into prepared pans and bake for 55 minutes.  Remove from pan and let cool.

Ingredients For the Icing:

  • 2 lbs butter (room temp)
  • 4 lbs powdered sugar
  • 1 Table spoon milk
  • 1 table spoon vanilla
  • ½ tsp  each: sweet paprika, salt, black pepper

 To make the icing:  Whip butter on high for 5 minutes.  Scrape sides and repeat.  Add powdered sugar a cup at a time with mixer on speed 1.  Add milk, vanilla, and spices.  Whip on speed 3 to incorporate everything fully. To assemble Cake:  Level the tops of the layers, Apply a thin layer of icing to the top of one layer and set the remaining layer on top of it.  With a spatula use the rest of the icing to evenly cover the cake.   Serves 12.


© Cakespy, all rights reserved. Powered by Squarespace.