Home Home Home Home Home Home Home
CakeSpy

Featured: 

My adventure at Ben & Jerry's in Vermont!


Unicorn Love: the Eating Disorder Recovery Blog


 Buy my brilliant books!

Buy my new book!

Buy my first book, too! 

CakeSpy Online Retail!


Archives
Gallery

Fantastic appliance for cake making on DHgate.com

everyrecipe.co.nz

Craftsy Writer

Entries in recipes (704)

Thursday
Sep032009

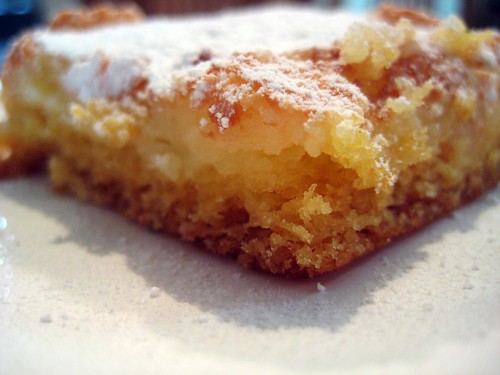
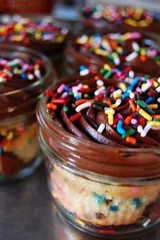
What a Brownie-Noser: A Sweet Recipe from Julia M. Usher's Cookie Swap

Brown(ie) Noser from Julia M. Usher's Book
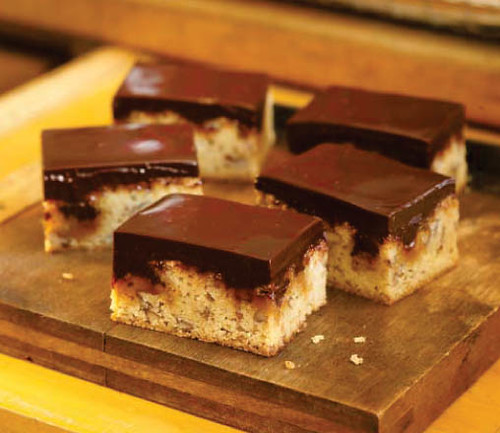
The Brown(ie) Noser: photo from Cookie Swap by Julia M. Usher used with permission.


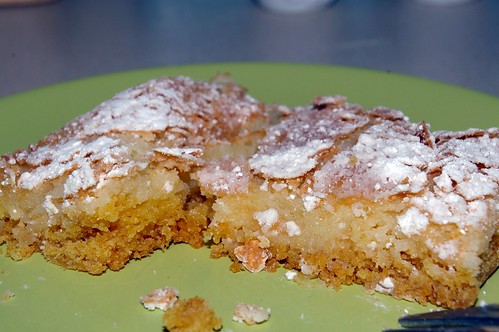
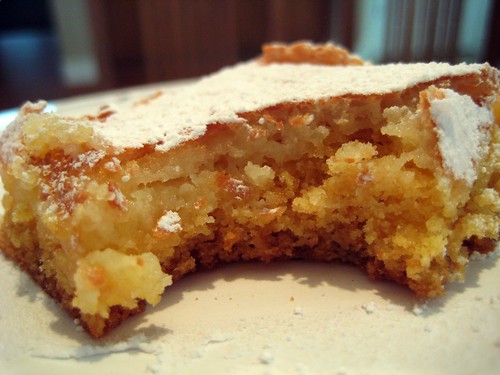
As promised in the interview with Julia M. Usher, author of Cookie Swap: Creative Treats to Share Throughout the Year (which you can win here!), here's a recipe for decadent butterscotch brownies with caramel and ganache on top!

Caramel Topping
  • 8 ounces caramel candies (about 27 cubes)
  • ¼ cup heavy cream
  • 1 tablespoon unsalted butter
  • 4½ teaspoons all-purpose flour
  • ½ teaspoon pure vanilla extract

Butterscotch Brownies


  • 2½ cups all-purpose flour
  • 2 teaspoons baking powder
  • 3⁄8 teaspoon salt
  • 1¼ cups (2½ sticks) unsalted butter, chopped into
  • tablespoon-size pieces
  • 2¼ cups firmly packed light brown sugar
  • 3 large eggs, room temperature
  • 1½ teaspoons pure vanilla extract
  • 3 tablespoons dark rum (optional)
  • 2 cups pecan halves, toasted and coarsely chopped
  • Ganache Glaze (optional)

    • 16 ounces premium semisweet chocolate
    • finely chopped or ground in a food processor
    • 1½ cups heavy cream
    • 1 tablespoon light corn syrup
    Directions:
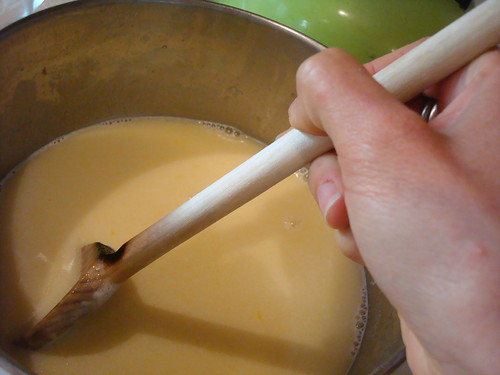
    1. Make the Caramel Topping. Unwrap the caramel candies and combine with the cream and butter in a small nonreactive (stainless steel or coated) saucepan. Place over medium heat and cook, stirring regularly to prevent scorching, until the caramels and butter are completely melted and the mixture has boiled. Remove from the heat. Stir in the flour, mixing well to break apart any lumps. Add the vanilla extract and set the topping in a warm place so the caramel stays fluid while you prepare the brownie batter.
    2. Position a rack in the center of the oven and preheat the oven to 350 degrees F. Line a 10 x 15 x 2-inch glass baking dish (sometimes called a roasting pan, p. 10) with foil, leaving a 1-inch overhang around the top edge of the pan. Smooth out any big wrinkles in the foil and then lightly coat the foil with nonstick cooking spray.
    3. Mix the Butterscotch Brownies. Combine the flour, baking powder, and salt together in a medium bowl. Set aside.
    4. Place the butter in a medium (3-quart) saucepan over low heat. Once the butter has fully melted, remove it from the heat and stir in the brown sugar, mixing until smooth. (Note: Don’t be surprised if the butter and sugar do not completely come together at this point; some separation is normal.) Cool a few minutes; then add the eggs one at a time, whisking well after each addition. Add the vanilla extract and rum, if desired. Gradually add the flour mixture, whisking all the while to keep the batter lump free. Stir in the pecans. Turn the batter into the prepared pan and level with a small offset spatula. (The batter will be less than 1 inch thick, but it will bake to about twice its original thickness.)
    5. Drizzle the caramel topping evenly over the batter. (If the caramel has thickened and is difficult to drizzle, gently reheat it.) Marble the top (and break apart any large caramel blobs) by drawing a spatula through both the topping and the batter in a random pattern.
    6. Bake until a cake tester inserted into the center comes out with moist crumbs on it, and the brownie has pulled away from the edges of the pan, about 35 to 40 minutes. Transfer to a wire rack and cool completely in the pan. (Areas that had larger helpings of caramel topping may sink slightly, but don’t worry; the ganache will completely cover any holes.)
    7. Prepare and apply the Ganache Glaze (optional). Make the glaze only after the brownies have completely cooled. Follow the instructions for Ganache (below).
    8. While the ganache is fluid, pour it evenly over the brownie. Gently tilt or shake the pan so that the ganache completely coats the brownie top. Cover with foil, taking care to keep it from touching the ganache. Refrigerate 3 to 4 hours, or until the ganache is firm enough to cut cleanly.
    9. Remove the brownies from the pan in one block by gently pulling up on the foil overhang. Place directly on a cutting board. Remove all foil, and trim any uneven edges before cutting into 1½-inch squares. For the neatest cuts, slice the bars while the ganache is firm and wipe the knife clean with a warm, damp cloth between slices. Serve at room temperature.
    Ganache Directions:
    1. Place the chopped (or ground) chocolate in a large bowl so it
    2. forms a shallow layer. Set aside.
    3. Pour the cream into a medium (3-quart) nonreactive (stainless steel or coated) saucepan. Place over medium to medium-high heat and scald the cream. (That is, heat the cream to just below the boiling point. The cream will put off steam, but no bubbles should break on its surface.)
    4. Immediately strain the hot cream through a fine-meshed sieve directly onto the chocolate. Let the mixture sit 1 to 2 minutes without stirring, and then gently whisk until the chocolate is entirely melted. (If the chocolate does not completely melt, set the bowl over barely simmering water in a double boiler and stir regularly until smooth. Do not overheat, or the ganache may break.) Stir in the corn syrup.
    5. To use the ganache as a glaze, pour it while lukewarm. Alternatively, for piping ganache, pour it into a shallow pan to a ½- to ¾-inch depth, cover, and refrigerate 20 to 25 minutes, or until slightly thickened. Stir occasionally during chilling to maintain a uniform consistency. (Hard, overchilled pieces of ganache should be broken up, as they can easily clog pastry tips when piping.) Chilling time will vary with starting ganache temperature, refrigerator temperature, and depth of the ganache. Watch the ganache closely, as it can quickly overchill and become difficult to pipe.


    For more information about Julia M. Usher, visit her site, become a Facebook fan or follow her on Twitter!


    Wednesday
    Sep022009

    Turning Trix: Tricked-Out Trix Treats

    Tricked Out Trix Treats
    It's already been established that Rice Krispies are not the only cereal treat on the sweet circuit. Trix Treats are one of the sweetest alternatives, and certainly one of the prettiest.

    But why stop at simple cereal treats? Having recently found myself with a bit of extra cream cheese frosting, I decided to tempt fate by making a good thing even better, and sandwiched a healthy dollop of frosting between Trix Treat halves. And after tasting the result, which was relentlessly rich and sweet and probably not low-carb, all I can say is that it only serves to reinforce my deep-seeded belief that frosting makes everything better.
    Trix Treats!

    If it's true that you are what you eat, then certainly eaters of these sweet treats are rich, colorful, and absolutely fabulous.

    Tricked-Out Trix Treats


    Makes about 12

    Ingredients for Trix Treats:
    • 3 tablespoons butter or margarine
    • 4 cups miniature marshmallows
    • 6 cups Trix Cereal
    Ingredients for cream cheese frosting (note: this makes about 3 cups of frosting, so there will be extra. I had made a batch of this frosting for cupcakes and used the leftover frosting for the Trix Treats. I have not tried to halve the recipe, but that could be an option if you don't want extra.)
    • 1 (8)-ounce package of cream cheese, softened (do not substitute low-fat; it just doesn't work the same way)
    • 1/2 cup unsalted butter, softened
    • 2 teaspoons vanilla extract
    • 1/4 teaspoon salt
    • 4 to 6 cups confectioners' sugar (depending on your desired consistency)
    Directions for the Trix Treats:
    1. In large saucepan melt butter over low heat. Add marshmallows and stir until completely melted. Remove from heat.
    2. Add Trix cereal. Stir until well coated.
    3. Using wax paper evenly press mixture into 13 x 9 x 2-inch greased pan. Let cool completely. Cut into 2-inch squares.
    Directions for cream cheese frosting:
    1. In a large mixing bowl, beat the cream cheese, butter, vanilla and salt until the butter is completely incorporated into the cream cheese and it has a smooth consistency. Add the confectioners' sugar cup by cup, stirring after each addition, until it has reached the desired consistency.
    Assembling it all:
    Using a sharp knife, cut squares in half. Apply a liberal dollop of either vanilla buttercream or cream cheese frosting to the bottom and re-apply the top half. For extra flair, apply rainbow sprinkles to the exposed frosting on the sides to really trick out your treats. Serve immediately.


    Monday
    Aug312009

    Love Me Tender, Love Me Sweet: Elvis's Banana Pudding

    Elvis's Banana Pudding
    When it comes to Elvis and food, undoubtedly you're going to think of his famous favorite sandwich, comprised of peanut butter, fried bacon, banana, and (depending on who you ask) honey, all nestled between slices of white bread and prepared in a griddle, grilled cheese style.

    I know. With a dish like that associated with your name, you practically don't need to do anything else in life.

    But Elvis did.
    Elvis's Banana Pudding
    Not only did he give us a plethora of musical hits and aforementioned sandwich, but as part of his legacy he also gave us an intensely creamy, meringue-topped banana pudding. Apparently, it was part of the Graceland doctrine that a batch this pudding be prepared nightly; as rumor has it, the King would mash up various pills in it (although if they were a pick-me-up or come-down, I don't know). Of course, I learned this all from the best possible source: a postcard from Graceland from one of my oldest friends.
    Elvis PuddingPostcard about Elvis Pudding

    A banana pudding so craveable immediately had me intrigued, and of course I made up a batch right away. I cut the original recipe in half and omitted the meringue topping (the egg whites can be frozen for later use); it seemed to work out fine, and yielded an unbelievably creamy and rich pudding. While I think I still prefer the Magnolia Bakery banana pudding, this one definitely wins points for its rich history and taste.

    Elvis's Banana Pudding (With Some Liberties Taken)

    • 2 large (or three small) ripe bananas
    • 4 eggs, separated
    • 1 1/4 cups sugar
    • 1/8 lb butter
    • 3 cups milk
    • 1 tablespoon vanilla extract
    • 1 1/2 tablespoons cornstarch
    • About half a box of Nilla Wafers


    Pudding
    1. In a large saucepan, mix together the milk, egg yolks, sugar, cornstarch and butter and cook over medium heat until mixture thickens (for me, this was about 25 minutes--but you've got to be watching it the whole time). Add vanilla.
    Elvis's Banana PuddingElvis's Banana Pudding
    2. In a medium (9x13 inch) pyrex pan or similarly sized baking pan, layer the bananas and wafers.

    3. Pour the pudding over the bananas and wafers.
    4. If you want to add the meringue topping: beat the egg whites with 4 tablespoons sugar until soft peaks form. Cover the pudding with the meringue.
    5. With or without meringue, bake for 15 minutes in a preheated 350 degree oven.
    * As a serving note, it's lovely served in a parfait glass with a thick dollop of whipped cream.


    Thursday
    Aug272009

    Butter Me Up: The Famous St. Louis Gooey Butter Cake

    Gooey Butter Cake
    Photos and recipe c/o CakeSpy buddy Kerry of Lollicakes.

    I first learned of the existence of the St. Louis Gooey Butter Cake a while back during the Regional Specialties cake poll. The name alone had me hooked: I had to know more.

    But first things first: what is a Gooey Butter Cake, this food that the St. Louis Convention & Visitors Commission calls "one of St. Louis' popular, quirky foods"? While variations exist, it seems that the most important aspects are a bottom layer of buttery yellow cake and a and a top layer of...well, gooiness: but depending on who you ask, the top layer will consist of either egg and cream cheese, or butter and sugar. But in general, it is served as a coffee cake and not as a dessert cake.

    As it turns out though, the foundation of the cake's story is about as soft as its gooey innards: there are varying accounts of who invented it and when.
    Gooey Butter cake

    Photo credit: Jen V., CakeSpy reader

    According to Wikipedia, a legend about the cake's origin is included in Saint Louis Days...Saint Louis Nights, a cookbook published in the mid-1990s by the Junior League of St. Louis:
    The cake was supposedly first made by accident in the 1930s by a St. Louis-area German American baker who was trying to make regular cake batter but reversed the proportions of sugar and flour.
    But then again, according to What's Cooking America, at least two families take credit for the cake. The first is the Danzer family:


    In late 1942 or early 1943, Johnny Hoffman of St. Louis Pastries Bakery was working on a Saturday and made what eventually turned out to be Gooey Butter Cake. You're right, it was a mistake! He subsequently called Herman Danzer, my dad, and told him he thought he may have something and asked to come to my dad's shop on Spring & Gravois to see if they could duplicate it.

    They worked all Saturday, and through many trials and errors got it pretty good. The final batch they made, my dad suggested they add glycerin to get it really gooey. It worked - whereupon my mom, Melba Danzer, came into the shop from the store to see what these two guys were doing. When she tried it she said "this sure is gooey" subsequently, the name.

    And then there's the Koppe family:


    My father, John Koppe, a St. Louis baker, also developed the Gooey Butter Cake in the early 1940s...he owned and operated Koppe Bakery during World War II on California and Arsenal Streets in South St. Louis. His shop was located on the corner of two major bus lines, so people who were transferring would often stop in while waiting for their bus.

    The Gooey Butter Cake was a smash hit with customers. The lines of customers spilled out the door and around the block. This cake was very gooey, rich, and exceptionally delicious! I remember that the goody butter cake is best described as very "GOOEY." You could eat it with a spoon! The top was sprinkled with powdered sugar and the edge was slightly crispy to hold it together - almost like a pudding. It was baked in a square shape and, of course, was light colored, like butter.

    But while the cake's origins may be up in the air, one thing's for sure: it's a St. Louis institution. One company, Gooey Louie, specializes in a variety of takes on the Gooey Butter cake, including a variety of different flavors (including a "design-your-own-flavor" feature) as well as individual-serving cakes and tiny "Gooey Butter Bites". Around the St. Louis area it's a common cake to find in bakeries. Though not as common elsewhere, at least one savvy Cake Gumshoe sighted a version of it in a Seattle area Safeway!
    Gooey Butter Cake
    And happily, another Cake Gumshoe, Kerry of Lollicakes, was brave enough to try out the recipe to see for herself. Here's the recipe she used:


    The Best St. Louis Gooey Butter Cake Recipe

    Ingredients:

    • 1 box yellow cake mix with pudding in the mix (Pillsbury works best) 
    • 4 extra large eggs 
    • 1 stick melted butter 
    • Pure vanilla extract 
    • 1 8 oz. package cream cheese 
    • 1 box powdered sugar (3 1/2 cups)
    • Crisco or pam for greasing pan
    Equipment:
    • 9 X 13 Pan 
    • Mixer 
    Directions:


    BUTTER CAKE MIXTURE:

    1. Get 9 x13 pan and grease with Crisco on the bottom and all sides. 
    2. Put yellow cake mix in mixing bowl. DO NOT FOLLOW THE DIRECTIONS ON THE CAKE BOX. Add 2 extra large eggs, 1 stick of melted butter in microwave about 35 seconds, and 1/2 tsp. pure vanilla extract. Mix together in mixer. Batter will have a very most feel to it. Take cake batter and spread evenly through 9 x 13 pan so it evenly covers the bottom of the pan. 
    3. Clean off mixers and mixing bowl. 

    GOOEY MIXTURE:


    1. Melt cream cheese in microwave about 45-50 seconds. 
    2. Put 3/4 of the powdered sugar in mixing bowl setting aside about 1/4 of the box for topping to sprinkle on after the cake is baked and cooled. In mixer add 3/4 powdered sugar, melted cream cheese, and 2 extra large eggs. Mix together in mixer. This will have a very GOOEY consistency as this is the gooey part of the cake. Take the Gooey mixture and layer on top of the cake batter mixture in pan. 

    COOKING INSTRUCTIONS:
    1. Here at sea level we bake it at 350 for 30-40 minutes or until the top of the cake is browned (Note: Kerry baked hers for 35 minutes and thought it was perhaps slightly over-baked). You want to make sure the gooey mixture on top of the cake is not too gooey otherwise it will be like a liquid. It is okay if the edges are brown and the top of the cake is lightly browned as well. 
    2. Once cooked remove from oven and let cool about two hours before cutting and adding remaining powdered sugar. Add remaining powdered sugar to coat/cover top of cake, cut like brownies and serve. 


    Monday
    Aug242009

    Put a Lid On It: How To Ship Cupcakes in Mason Jars, from Beantownbaker.com

    How-to: Cupcakes in Jars, a guest blog post from Beantown baker
    Continuing our monthlong celebration of birthdays and all things sweet, Jen from the very sweet site Beantown Baker has dreamed up a thoughtful way to share birthday cake with friends who are far away: cupcakes baked in Mason Jars! Here she goes:

    One of the things I love most about baking is sharing my baked goods with other people. Whether it's baking something for a friend who had surgery, got a promotion, or for no reason at all, I get real joy out of baking for other people. Since most of my family is 1000+ miles away, they don't usually get to experience my baked goods. Last fall when we were coming into what I call birthday season, 6 birthdays from Oct-Dec, I really wanted to bake for my family members with birthdays coming up.

    Since cupcakes are my favorite thing to bake, I decided to send them cupcakes. I had seen this idea online and decided to give it a shot. I sent cupcakes in a jar to family members across the country. They were all pretty shocked when the packages came. It was fun to get the phone calls from each of them thanking me for the creative way to share my baking with them. My Dad loved it so much, I've been told that he tells everyone about it. As a not-so-subtle hint, he also gave me a box of new jars for my birthday. I think he's expecting more cupcakes in a jar this year for his birthday!
    Cupcakes in Jars: Guest Blog from Beantown BakerCupcakes in Jars: Guest Blog from Beantown Baker

    How to Make and Ship Cupcakes in Mason Jars


    You'll need: a batch of cupcakes (Jen's recipe for Funfetti cupcakes with chocolate frosting follows); one half-pint Mason jar per cupcake, plus ribbon for garnish.
    1. Bake cupcakes as directed and allow to cool completely. Remove cupcake liner and cut cupcake in half either vertically or horizontally. Place 1/2 of the cupcake into a sterilized 1/2 pint wide mouth jar. Add frosting to jar. At this point, add some fun extra, such as crushed Oreos or sprinkles. Place the other half the the cupcake in the jar (if you cut the cupcake vertically, it is easier to put both halves in the jar and pipe frosting between the two pieces). 
    2. Frost the cupcake as if it weren't in a jar. Add lid and ring to jar. Decorate with ribbon if you want. Be sure to tell your recipients to slide the lid off the jar as opposed to just pulling it up. Otherwise half of the frosting will stick to the lid.
    3. Mail immediately or place in freezer for a day or two then mail them. I like to freeze them and let the thaw as they are traveling to the unsuspecting recipients.

    Cupcakes in Jars: Guest Blog from Beantown Baker
    Yellow Funfetti Cupcakes
    • 3 cups cake flour
    • 1 Tbsp baking powder
    • 1/2 tsp salt
    • 1 cup unsalted butter, cubed and softened to room temperature
    • 2 cups sugar
    • 5 large eggs
    • 2 tsp vanilla
    • 1 1/4 cups buttermilk
    • 1/4 cup sprinkles
    Directions:
    1. Preheat oven to 350. Butter and line with parchment paper two 8×2-inch pans (These cakes rose over the top of my 2-inch pans - you could very well have a mess on your hands if you try 1.5 inch pans). Set aside.
    2. In a medium bowl, sift together the flour, baking powder, and salt. Place butter in the large bowl of an electric mixer, fitted with a paddle attachment. Beat for 3 minutes on MEDIUM-HIGH speed until the butter is light and creamy in color. Stop and scrape the bowl. Cream the butter for an additional 60 seconds.
    3. Add the sugar, 1/4 cup at a time, beating 1 minute after each addition. Scrape the sides of the bowl before each addition. Add the eggs one at a time. Reduce the mixer speed. Stir vanilla into the buttermilk. Add the dry ingredients alternately with the buttermilk. Mix just until incorporated. Scrape the sides of the bowl and mix for 15 seconds longer. Stir in sprinkles.
    4. Spoon the batter into the prepared pan and smooth the top with a knife or off-set spatula. Lift up the pan with the batter, and let it drop onto the counter top a couple of times to burst any air bubbles and allowing the batter to settle. Center the pans onto the lower third of the oven and let bake 45 to 50 minutes or until the cake is lightly brown on top and comes away from the sides of the pan and a toothpick inserted in the center comes out clean.
    5. Let cool completely in the pans before removing the cakes and frosting.

    Chocolate frosting
    • 1 stick (1/2 cup) butter or margarine
    • 1/3 cup HERSHEY'S Cocoa
    • 3 cups powdered sugar - I used 2 1/2 cups
    • 1/3 cup milk
    • 1 teaspoon vanilla extract
    Directions: 
    Melt butter. Stir in cocoa. Alternately add powdered sugar and milk, beating to spreading consistency. Add small amount additional milk, if needed. Stir in vanilla. About 2 cups frosting.


    Keep updated on all of Jen's sweet adventures on beantownbaker.com!


    Thursday
    Aug202009

    Sea Biscuit: The Hermit Cookie of 1880-90

    Delicious Sandwich Cookie
    The late 1800s were a pretty eventful time in the USA: in New York, the Brooklyn Bridge was opened and Lady Liberty was installed; in the West, Billy the Kid and Jesse James bit the dust; the nation also grew, officially adding Washington, Montana and the Dakotas to the Union. And according to Betty Crocker's Cooky Book, the cookie of the decade was the Hermit:

    One of our earliest favorites--rich with spices from the Indies, plump with fruits and nuts, Hermits originated in Cape Cod in Clipper Ship days. They went to sea on many a voyage, packed in canisters and tucked in sea chests.


    Now, you may be wondering where this morsel got its funny name. There are a few theories uncovered on historycook.com:


    Some say that the cookies were named because they look like a hermit's brown sack-cloth robe, but the earliest recipes are for white and round cookies. One possible lead is that the Moravians, an ethno-religious group well-known for thin spice cookies in North Carolina and Pennsylvania, were sometimes called "herrnhutter" in German or Dutch, and that might have sounded like "hermits" to an English-speaking cook.


    Funny name and hazy origins aside, there's definitely another reason why hermits have lingered in our cookie jars: they're rich, cakey, moist, and satisfying. Adding raisins makes them taste vaguely virtuous, if you're into that--I'm not, so I substituted chocolate chips, and it worked out quite deliciously. They got even better when I sandwiched a slab of cheesecake filling between two of them (I think frosting would also work fantastically).
    Hermits
    Hermits


    - makes about 3 dozen small cookies or 24 large cookies; if you're interested in the cheesecake filling shown in the top photo, you can find the recipe here -
     
    • 1/2 cup butter
    • 1 cups brown sugar, packed
    • 1 eggs
    • 1/4 cup cold coffee
    • 1 3/4 cups flour
    • 1/2 tsp baking soda
    • 1/2 teaspoon salt
    • 1/2 teaspoon nutmeg
    • 1/2 teaspoon cinnamon
    • 1 cup chocolate (or white chocolate) chips
    • 3/4 cup coarsely chopped nuts (I used walnuts)
    1. Mix butter, sugar and egg thoroughly. Stir in coffee.
    2. Sift dry ingredients together; mix bit by bit into the butter/egg mixture.
    3. Once incorporated, add the chocolate chips and nuts and stir only until incorporated.
    4. Chill dough for at least 1 hour.
    5. Heat oven to 400 F. 
    6. If you want small cookies, drop rounded teaspoonfuls of dough onto your cookie sheet; if you're not scared of a big cookie, do as I did and use an ice cream scoop. 
    7. Bake 8-10 minutes for small cookies, 12 or so minutes for larger ones, or until there is the slightest crispiness on the bottom (as they have a light brown hue from the coffee, you've got to be careful about this!).


    Tuesday
    Aug182009

    South African Munchies: Delicious Crunchies

    South African Crunchies
    I first discovered Crunchies, a (natch) crunchy South African bar cookie, when CakeSpy Buddy Naomi handed one to me and said "eat this". Of course I was more than happy to oblige. Now, these cookies (made by local catering company On Safari) vaguely resembled granola bars, but one bite made the difference achingly clear. These cookies have a flavor that granola bars could only aspire to: crunchy, salty-sweet, coconutty, and very buttery.

    So what's the deal with these cookies?
    South African Crunchies
    As one South African blogger reminisced,

    Growing up in South Africa, the one cookie-tin constant that every child will remember is crunchies. They were usually one of the first things that your mom let you bake and kept forever in an airtight container, so we all grew up on crunchies. To me, they were distressingly unglamorous....but they certainly were a stalwart of every cookie tin that I remember growing up.

    Want to make some crunchies? While On Safari's recipe is proprietary, I did find a crunchie recipe on the Hulett's Sugars (a South African manufacturer of sweeteners) which seems pretty legit.


    South African Crunchies

    • 310ml (1¼ cups) flour
    • 310ml (1¼ cups) breakfast oats
    • 310ml (1¼ cups) coconut
    • 185ml (¾ cups) Huletts White Sugar
    • 20ml (4 teaspoons) Huletts Golden Syrup
    • 125ml (½ cup) butter or brick margarine
    • 5ml (1 teaspoon) bicarbonate of soda
    • 45 - 60ml boiling water
    1. Combine dry ingredients.
    2. Melt the Huletts Golden Syrup and butter together. Combine the bicarbonate of soda with the water and add to the butter mixture.
    3. Mix together with the dry ingredients.
    4. Press the mixture into a Swiss roll tin (or for a thicker crunchie, bake in a square 20cm x 20cm tin) and bake for 20 minutes at 150ºC. Gently press down the sides if they seem to rise too much.
    5. When light brown, remove from the oven and cut into squares. Switch off the oven. Return crunchies to the oven, for about 10 minutes to dry out.
    6. Allow to cool before removing from tin.


    Sunday
    Aug162009

    Taste the Rainbow: A Homemade Funfetti Recipe from iheartcuppycakes

    Sprinkles have been spilled.
    Continuing our monthlong celebration of birthdays and all things sweet, CB from the inimitable iheartcuppycakes.com has kindly donated not only some sweet birthday memories, but also her super sweet recipe for homemade Funfetti Cupcakes. All the fun of a classic childhood treat--but grown up for more adult palates. Here goes:

    My birthday is in July. I'm an Independence baby. Tom Cruise eat your heart out! When I was very little my mom would make me a Funfetti birthday cake from cake mix while I "helped" by licking the beaters. It was my favorite part! Even to this day. Don't judge me! It's Funfetti. HA! I think that's why I am not as anti-cake mix like some other bakers because of those great birthday memories with my mom.
    Guest post from iheartcuppycakes

    Here is my recipe for homemade Funfetti Cupcakes:

    Funfetti Cupcakes


    Recipe adapted from Cupcakes by Shelly Kaldunski


    Makes about 12 cupcakes

    For the cupcakes

    • 1-1/4 cups AP flour
    • 1-1/2 tsp baking powder
    • 1/4 tsp salt
    • 3/4 cup sugar
    • 6 tbsp butter, room temperature
    • 1 large egg + 1 egg white, room temperature
    • 1 tsp vanilla extract
    • 1/2 cup milk (I used half-and-half instead)
    • 2 tbsp rainbow sprinkles

    For vanilla buttercream
    • 2 sticks butter
    • 7 cups powdered sugar, sifted
    • 1/4 cup milk
    • 1 teaspoon vanilla

    Guest post from iheartcuppycakes
    Instructions


    To make cupcakes—

    1. Preheat oven to 350F.
    2. Line cupcake pan with paper liners.
    3. In a large bowl, sift flour, baking powder and salt. Set aside. In a stand mixer, fitted with flat beater, beat the sugar and butter until well combined, about 2-3 minutes. Add egg and egg white, one at a time, beating on low.
    4. Then add vanilla. Gradually add flour mixture in 3 additions, alternating with milk in 2 additions, ending with the flour mixture. Fold in rainbow sprinkles.
    5. Fill cupcake liners about 1/2-2/3 full. Bake for about 17-20 minutes or until a toothpick inserted in the middle comes out clean. Remove from pan and cool completely on a wire cooling rack before frosting.

    To make buttercream—
    In a stand mixer, fitted with flat beater, beat butter until creamy, about 2-3 minutes. Add 5 cups of sifted powdered sugar, milk, and vanilla, beat until combined. Add more powdered sugar until you get to the consistency you want.


    [NOTES: I think I added about 6-1/2 cups, give or take a few tbsp, to get the consistency I wanted. If its too stiff, you can add a little more milk.]

    Frost with vanilla buttercream and garnish with more rainbow sprinkles.

    ENJOY!


    Keep up with CB at iheartcuppycakes.com or via her twitter feed!


    Thursday
    Aug132009

    Guest Blog Post: Lemon Berry Cupcakes by Pâtisserie Natalie

    Lemon Berry Cupcakes by Pâtisserie Natalie
    When you visit Pâtisserie Natalie, you'll undoubtedly be impressed. The pictures are simply gorgeous; the recipes are creative and sophisticated, yet unfussy.

    But you'll be even more impressed knowing that the baker/writer/photographer behind it all is still in high school. No, really.

    With a professional-looking portfolio of photographs and recipes already under her belt, Natalie's future sure does look sweet; happily, she has prepared a guest post exclusively for CakeSpy.com! Here goes:

    Hi, my name is Natalie, from Pâtisserie Natalie. I'm so excited to get to do a guest post for CakeSpy; I've been a fan for a long time. I'm a high school student from Seattle who loves photography, food styling, and baking. I've been interested in the arts since I was really little, and found my real calling through blogging. I didn't discover the food blogging world until recently. I also didn't realize how much I would love it. My blog gives me a way to share my design and creative flow with other people, as well as see other artist's work.

    Lemon Berry Cupcakes by Pâtisserie Natalie
    I started baking more seriously about 2 years ago, but it is now an addiction. Ask anyone who knows me and they will tell you I am more frequently in the kitchen then not. I absolutely cannot stay away from my kitchen aid mixer and my camera. I am self-taught in html/css coding, and do all my own graphics and layout work for my blog (CS Note: she's interested in pursuing a career in web/graphic design and photography).


    I decided to make these Lemon Berry Cupcakes because as many people know, Seattle doesn't have that many sunny days during the year. Summer flavors for me are lemon and berries. Seeing as the sunny days are limited, I felt that I needed to make something that used those flavors. While I don't mind the rain at all (I love it, actually), many people are a little bummed that our summer days here are ending. With that in mind, I made these cupcakes as a sort of "summer revival." I've been working on the recipe for this lemon pound cake for a while, but I think I've finally got it. I'm often disappointed by lemon cake, as it doesn't actually taste lemony. That is not a problem for this cake at all. It's very moist and soft, which is not usually the case with pound cake. The frostings are made from raspberries and blackberries, which is why those frostings are so pink.


    Lemon Pound Cake

    • 3 cups all purpose flour
    • 1 teaspoon salt
    • 1/2 teaspoon baking powder
    • 1/2 teaspoon baking soda
    • 2 sticks unsalted butter; softened
    • 2 cups sugar
    • 3/4 cup plain yogurt
    • 3 tablespoons lemon zest
    • 2/3 cup lemon juice
    • 5 eggs
    1. Preheat oven to 350 degrees F.
    2. Sift together the flour, salt, baking powder, and baking soda. Whisk together in a large bowl thoroughly, and set aside.
    3. In a stand mixer, beat butter and sugar until smooth.
    4. In a medium bowl, stir together yogurt, lemon zest, and lemon juice.
    5. Add the eggs to the butter and sugar one at a time, beating in between each addition.
    6. With the mixer on a low speed, add the flour mixture in 3 parts, alternating with the yogurt mixture in 2 parts. Start and end with the flour mixture.
    7. Line a muffin pan with paper liners and scoop even amounts of the batter into the cups, filling almost to the top.
    8. Bake for 16 minutes, rotating the pan after 8 minutes. Once golden brown around the edges, remove from oven and place on a cooling rack for at least 2 hours before icing.


    Lemon Berry Cupcakes by Pâtisserie Natalie
    Blackberry & Raspberry Buttercreams

    • 2-1/2 sticks unsalted butter; softened
    • 1 teaspoon salt
    • 2-1/2 cups powdered sugar; sifted
    • 1/4 cup blackberry sauce
    • 1/4 cup raspberry sauce
    1. Beat butter and 1 cup of powdered sugar until smooth. Divide into two parts, removing half from the mixer bowl. Add the blackberry sauce to the mixer bowl, along with 3/4 cup of powdered sugar. Place buttercream in a piping bag and pipe a circle around the outer edge of the cupcake top, spiraling in towards the center.
    2. In the same mixer bowl, add the remaining half of the butter and powdered sugar that was set aside. Add the raspberry sauce and 3/4 cup powdered sugar and beat until smooth. Place in a piping bag and pipe an extra dollop on top of the blackberry buttercream.

    Blackberry Sauce
    • 1 cup blackberries
    • 2 teaspoons sugar
    • 1 teaspoon lemon or lime juice
    Combine ingredients in a sauce pan and place over medium heat. Stir frequently until juices from berries boil. Using a wooden spoon, crush the berries in the pan. Let boil for 2 minutes to make sauce more dense. Strain the mixture if you prefer to have smoother frostings. Cool in refrigerator.

    Raspberry Sauce
    • 1/2 cup raspberries
    • 2 teaspoons sugar
    • 1 teaspoon lemon or lime juice
    Combine ingredients in a sauce pan and place over medium heat. Stir frequently until juices from berries boil. Let boil for 2 minutes to make sauce more dense. Cool in refrigerator.


    Thursday
    Aug132009

    Love and Crumbs: A Peach Crisp Recipe from Moonrat

    Happy Birthday to Moonrat
    August is totally the sweetest month: it's the month during which CakeSpy was created, and it's also the month of your humble Head Spy's birthday! And so, in celebration of all of this sweetness, there's going to be a month-long celebration of birthday treats, featuring memories (and recipes) from a collection of CakeSpy pals. It kicks off with the lovely and amazing Moonrat, writer of the Editorial Ass blog, which gives a behind-the-scenes look at the publishing industry (and plenty of other fun social commentary). And--bonus--it happens to be her *actual* birthday! As for her laissez-faire birthday treat? Here goes:

    Dadrat's Birthday Peach Crisp

    When you're a kid, having a summer birthday seems like the short end of the stick. Not only are all your friends away on vacation when you want to have a party, but you can't even bring cupcakes into school for your class!

    But I got over my righteous anger pretty quick, because I was a really, really lucky kid whose dad had a penchant for fruit trees. The white peach tree in our back yard would drop peaches at the exact right time each year for Dad to make me some of his peach crisp. Here's his recipe, Dadrat-approved.

    Here's how Dadrat did it:

    First, he'd make me collect all the peaches and check them for worms (pesky buggers; the antithesis of delicious!). But in case you don't have a white peach tree in your yard, or live in a cement box in the city (like yours truly), you can also buy peaches at the store. If you can find white peaches, they're really, really nice--softer, fibrous, tangy. You'll need about 4 cups. Unless you're doubling or tripling the recipe, which we usually do.


    Then he'd preheat the oven to 425. Or around there; Dad dislikes numbers and favors cooking impressionistically. But let 425 be a guidepost for normal people.

    Now while the oven is preheating, prep your peaches. You don't want any fuzzy skin in the crisp, so you're going to have to peel them. Luckily, there's a trick. If the peaches are fresh, put them in boiling water for about 30 seconds. Apparently this is called "blanching"--which is particularly humorous if you're using white peaches already. But anyway. Take them out and let them cool, and the skins will come right off. Definitely wait until they cool, though, so you don't burn your mitts. Peel, and slice.

    Now stick your peach slices in a large bowl. Mix with:
    • 3/4 cup brown sugar
    • 1 tablespoon vanilla
    • 1 teaspoon of flour
    • 1 teaspoon cinnamon
    • 1/2 teaspoon nutmeg (if you like nutmeg, which I really really do)

    Butter the bottom of a casserole and pour the peaches in. Squeeze some lemon (or lemon juice) over the peaches if you feel like it.


    In a separate bowl, combine

    • 1/2 cup flour
    • 3/4 cup uncooked rolled oats
    • 1/4 cup brown sugar
    • 1/2 stick of cold butter, chopped up into little squares
    If you want, you can throw in walnuts, too, which we never did when I was a kid, but which suddenly strikes me as an awesome idea, unless you are allergic to nuts, in whcih case I don't recommend it. But for everyone else, walnuts are both delicious and an excellent source of iron.


    Sprinkle this dry mixture over the top of the peach mixture in the casserole. If you like--and I do--sprinkle an additional teaspoon of brown sugar over the top. It gets sweet and crusty.

    Bake for about a half an hour. If you do it right, it doesn't turn to mush. My dad quothe, "The only reason to cook it is to heat it up."

    Now you can eat it.


    Keep up with Moonrat's rad adventures (and the occasional fuzzy animal picture) at editorialass.blogspot.com.


    © Cakespy, all rights reserved. Powered by Squarespace.