Home Home Home Home Home Home Home
CakeSpy

Featured: 

My adventure at Ben & Jerry's in Vermont!


Unicorn Love: the Eating Disorder Recovery Blog


 Buy my brilliant books!

Buy my new book!

Buy my first book, too! 

CakeSpy Online Retail!


Archives
Gallery

Fantastic appliance for cake making on DHgate.com

everyrecipe.co.nz

Craftsy Writer

Entries in recipes (704)

Tuesday
Jan042011

Slice of Life: Bob Andy Pie Recipe from Dangerously Delicious Pies

Recently, when leafing through the amazing book Killer Pies: Delicious Recipes from North America's Favorite Restaurants, a conflict presented itself: which recipe to try first?

Happily, the answer presented itself quickly enough, when I found the entry for Dangerously Delicious Pies in Baltimore, Maryland. 
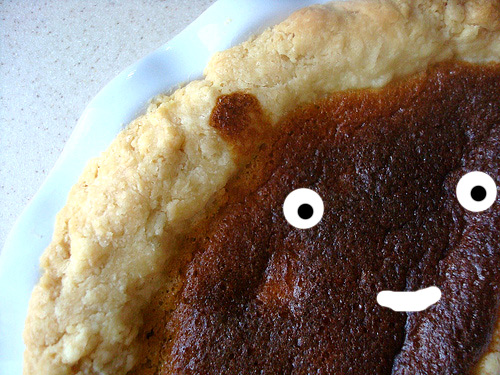
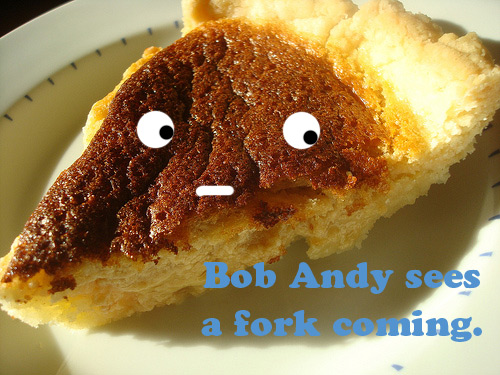
The pie in question? The "Bob Andy". 

What's a Bob Andy Pie, you ask? Well, according to proprietor (part time baker, part time rock musician) Rodney Henry, this pie is "really awesome...I call it 'White Trash Creme Brulee.'" I didn't need any more backstory beyond that: I was already headed to the kitchen.

Happily, the Bob Andy is what is considered a "staple" pie, meaning it contains the basic ingredients most people have in their pantry at any given time. 

Unhappily, it just so happened that just returning from a trip, my pantry was somewhat empty, and I found myself with roughly half of the milk and butter called for in the original recipe. But it occurred to me: is it possible to half a pie recipe? After all, I had split a pie in three parts before, why not just create a foil barrier and bake it as a half-pie?
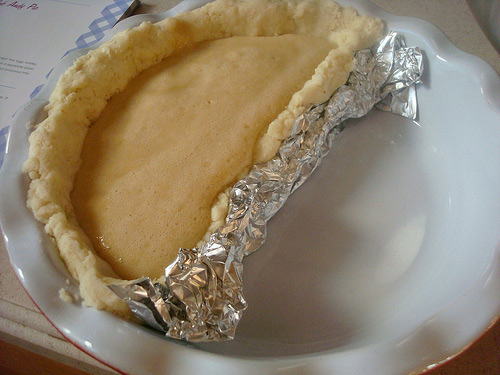
So I gave it a try, and amazingly, it worked. I had a little extra filling, which I simply baked up as custards in cupcake-cups. I can't say it would work for every type of pie, but I was happy with the result.
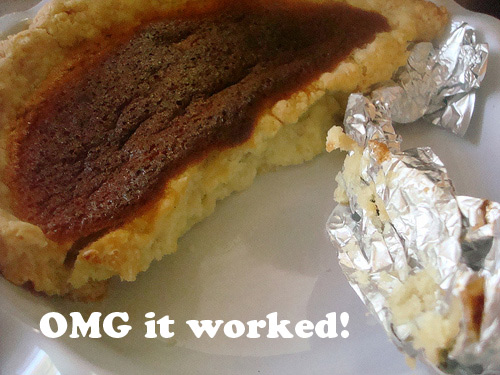
Bob Andy Pie, Halved

  • 2 eggs, separated
  • 1 cup sugar
  • 1/2 tablespoon ground cinnamon
  • 1 1/2 tablespoons flour
  • 1/2 cup (1 stick) unsalted butter, melted
  • 1 1/2 cups milk
  • 1 unbaked round of pie dough (enough for a 9-inch pie), cut into 60/40 portions, of which you'll use the 60 part (use the rest for pie fries!)

Procedure

  1. Preheat the oven to 375.
  2. Prepare your pie dough. Roll it out, and place it in your pie plate. Using a piece of foil, form a barrier in half of the tin, and shape your dough up the side of it, so that you have a sort of makeshift pie semicircle in which to pour your filling.
  3. Mix all of the filling ingredients except for the egg whites together to make a custard.
  4. With a hand mixer, beat the whites in a separate bowl until stiff peaks form, about 5 minutes. Fold the whites into the custard and pour into the pie shell. Bake for 1 hour. 
  5. Remove when it's browned on top, and when (owner's words) "everything moves together. It shouldn't be jiggly like milk."


Tuesday
Dec282010

Intensely Delicious: Chocolate Cake Bars Recipe Adapted from Intensely Chocolate by Carole Bloom

I'll tell you the truth: I kind of fainted when I got a personal email from cookbook author and baking legend Carole Bloom. After all, I consider her book The International Dictionary of Desserts, Pastries, and Confections: A Comprehensive Guide With More Than 800 Definitions and 86 Classic Recipes to be an essential reference guide, and every other thing little thing she's done is magic, too. 
But for real, there it was: an invitation to check out her newest book, Intensely Chocolate. With a name like that, what wasn't to love? Sign me up!

Well. Here's the first recipe I tried. Her version is for "Individual Chocolate Bundt Cakes With White Chocolate Passion Fruit Frosting", but you know, I'm not too-too fancy, so I baked the cake batter in a single pan instead, and topped it with delectable brown sugar frosting and Peanut Butter M+M's. But my baking experiment only serves to prove Bloom's prowess: this recipe is easily dressed up or down, and is completely delicious either pinkies-out fancy or footloose and fancy-free.

Chocolate Cake Bars with Brown Sugar Frosting and Deeply Un-Fancy M+M's

Ingredients

  • 6 ounces unsweetened chocolate, finely chopped
  • 1 3/4 cups cake flour
  • 1 teaspoon baking soda
  • 1/2 teaspoon kosher or fine grained sea salt
  • 1 stick (4 ounces) unsalted butter, softened
  • 1 cup superfine sugar
  • 2/3 cup firmly packed light brown sugar
  • 2 large eggs, room temperature
  • 2 teaspoons pure vanilla extract
  • 1 cup sour cream (I used yogurt)

For the topping

  • 1/2 cup heavy cream
  • 1/4 cup brown sugar
  • 1/2 teaspoon vanilla extract
  • 3 tablespoons unsweetened cocoa powder

Procedure

  1. Position the oven rack in the center position. Preheat oven to 350. Coat an 8x8 or 9x13-inch pan with nonstick spray, and line with parchment paper.
  2. Melt the unsweetened chocolate in the top of a double boiler over low heat, stirring often with a rubber spatula to ensure even melting. Remove from heat and set to the side for a moment.
  3. Over a bowl, sift together the flour and baking soda. Add the salt and toss into the blend.
  4. Beat the butter in the bowl of an electric stand mixer using the flat beater attachment until soft and fluffy, about 2 minutes. Add the superfine sugar and brown sugar and beat together well, stopping occasionally to scrape down the sides of the bowl.
  5. Use a fork to lightly beat the eggs and vanilla extract in a small bowl. Add to the butter mixture. Mix together, stopping to scrape down the sides of the bowl every now and again. The mixture may look curdled at first, but as you continue to mix and scrape down the bowl, it will become smooth.
  6. Add the dry ingredients and sour cream in alternate stages, making for about 4-5 total stages of adding ingredients. Mix thoroughly after each addition.
  7. Add the melted chocolate and blend completely.
  8. Pour into your prepared pan.
  9. Bake for 35-50 minutes (since the original recipe for bundt cakes, it called for a bake time of 25-30 minutes, but baking it in a pan takes longer). It's done when a cake tester / toothpick comes out mostly clean.
  10. Remove from oven and transfer to rack to cool completely before cutting. I topped mine with frosting AFTER cutting.
  11. While you wait for the cakes to cool, make yo'self some frosting. Pour the heavy cream into a medium bowl, and whip with an electric mixer. Add sugar, vanilla and cocoa powder; whip until stiff and spreadable. Refrigerate until needed.
  12. Top each cake with a dollop, and with candy if desired (I had extra m+m's from making cornflake wreaths so used them on top).
Sunday
Dec262010

Violet and White: A Snowstorm, Plus SpyMom's Vanilla Cupcakes With Lavender Buttercream Recipe

The snowflake is totally not photoshopped! I actually (accidentally) captured it on film!Guess what? It is snowing in New Jersey. Like, a lot. In fact, to the point that we've been nostalgically recalling the Blizzard of '96. A real post-Christmas miracle!

But wait, there's more to this miraculous day. You do not need to worry about the SpyCrew starving in the snow, because SpyMom made cupcakes. Delicious ones, based on Magnolia Bakery's recipe (now, I personally am not a Magnolia naysayer, but SpyDad is, and even he said that this homemade version had a leg up on the original), but with an added element of pinkies-out-ness from lavender coloring powder to the frosting, and candied violets (edible!) used as garnish. 

Want a piece of this holiday magic in your own home? Here goes:

SpyMom's Christmas Miracle Cupcakes

  • 1 1/2 cups self-rising flour
  • 1 1/4 cups all-purpose flour
  • 1 cup (2 sticks) unsalted butter, softened
  • 2 cups sugar
  • 4 large eggs, at room temperature
  • 1 cup milk
  • 1 teaspoon vanilla extract

For the frosting 

  • 1 cup (2 sticks) unsalted butter, softened
  • 6 to 8 cups confectioners' sugar
  • 1/2 cup milk
  • 2 teaspoons vanilla extract
  • Violet food coloring, such as this one from Wilton
  • Edible candied violets

Procedure

  1. Preheat oven to 350 degrees F.
  2. Line 2 (1/2 cup-12 capacity) muffin tins with cupcake papers.
  3. In a small bowl, combine the flours. Set aside.
  4. In a large bowl, on the medium speed of an electric mixer, cream the butter until smooth. Add the sugar gradually and beat until fluffy, about 3 minutes. Add the eggs, 1 at a time, beating well after each addition. Add the dry ingredients in 3 parts, alternating with the milk and vanilla. With each addition, beat until the ingredients are incorporated but do not over beat. Using a rubber spatula, scrape down the batter in the bowl to make sure the ingredients are well blended. Carefully spoon the batter into the cupcake liners, filling them about 3/4 full. Bake for 20 to 25 minutes, or until a cake tester inserted into the center of the cupcake comes out clean.
  5. Cool the cupcakes in tins for 15 minutes. Remove from the tins and cool completely on a wire rack before frosting.
  6. While they cool, prepare your frosting. Place the butter in a large mixing bowl. Add 4 cups of the sugar and then the milk and vanilla. On the medium speed of an electric mixer, beat until smooth and creamy, about 3 to 5 minutes. Gradually add the remaining sugar, 1 cup at a time, beating well after each addition (about 2 minutes), until the icing is thick enough to be of good spreading consistency. You may not need to add all of the sugar. If desired, add a few drops of food coloring and mix thoroughly. (Use and store the icing at room temperature because icing will set if chilled.) Icing can be stored in an airtight container for up to 3 days.


Thursday
Dec232010

Rule of Thumb: Thumbprint Cookies Recipe from Cake Gumshoe Alana

Hi, my name is CakeSpy. And as a professional sleuth of sweetness, I just want to give you fair warning: if you give me a secret family recipe, I will share it.

Oh, just kidding. Clearly this recipe, from Cake Gumshoe (and buddy) Alana isn't a big secret, otherwise she wouldn't have given me a recipe card along with the tin of yum she delivered last week, brimming with soft molasses cookies and (my favorite!) jam-filled thumbprints.

And I'm totally passing on the recipe to you, sweet readers. 

Alana's No-Longer-Secret Family Recipe for Thumbprint Cookies

  • 1 cup butter, softened
  • 1/2 cup packed brown sugar
  • 2 eggs, yolks and whites separated
  • 2 teaspoons vanilla
  • 2 cups flour
  • 1/2 teaspoon salt
  • 1 1/2 cup finely chopped nuts
  • 8 ounces raspberry jam

 Procedure

  1. In a large bowl, mix butter, sugar, egg yolks, and vanilla until smooth. Sift together f lour and salt and then work into batter. Chill  dough for at least one hour.
  2. Preheat oven to 375. Form dough in 3/4 inch balls.
  3. Beat egg whites in a bowl with a fork til slightly bubbly.
  4. Roll the balls in the egg whites, then in the chopped nuts.
  5. Place 1 inch apart on an ungreased cookie sheet.
  6. Bake at 375 for 5 minutes. Remove cookie sheet from oven and press the back end of a wooden spoon into the centers of the cookies to form a small indent.
  7. Return cookies to the oven; bake for 8 more minutes, or until golden brown.
  8. Transfer cookies to a wire rack and fill with a generous dab of jam. Let cool.


Monday
Dec202010

Snowbound: Snowy Snickerdoodles Recipe from SpyMom

Lucky, lucky you. SpyMom has another sweet holiday recipe to share: Snowy Snickerdoodles. No, you won't get an explanation of where the name comes from, but you will get a recipe that is bound to be delicious, because that's how she rolls.

Snowy Snickerdoodles

Ingredients

  • 1 cup sugar
  • 1/2 cup butter
  • 1 large egg
  • 1 teaspoon vanilla
  • 1 1/2 cups flour
  • 1 1/2 teaspoons cinnamon
  • 1 teaspoon baking powder
  • 1/4 teaspoon salt
  • cinnamon sugar

Procedure

  1. In a mixer bowl, cream together sugar and butter; beat in egg and vanilla
  2. Combine flour, cinnamon, baking powder and salt
  3. Add to butter mixture
  4. Blend well
  5. Cover and refrigerate 2 hours or till firm enough to roll into balls
  6. Shape dough into small balls about 3/4-inch in diameter
  7. Roll in cinnamon sugar to coat
  8. Set cookies 1-inch apart on lightly greased cookie sheets
  9. Bake at 350° for 10 minutes or till the edges are lightly browned.
  10. Cool slightly on pans, then remove to racks to cool completely.


Monday
Dec202010

Silly Goose: A Trompe L'oeil Cake Made to Look Like a Christmas Goose, For Serious Eats

We could go round in circles discussing which treat is the ultimate Christmas sweet—is it cookies? Bûche de Noël? Or perhaps fruitcake?

But instead of engaging in this wild goose chase, why not make a Christmas Goose Cake?

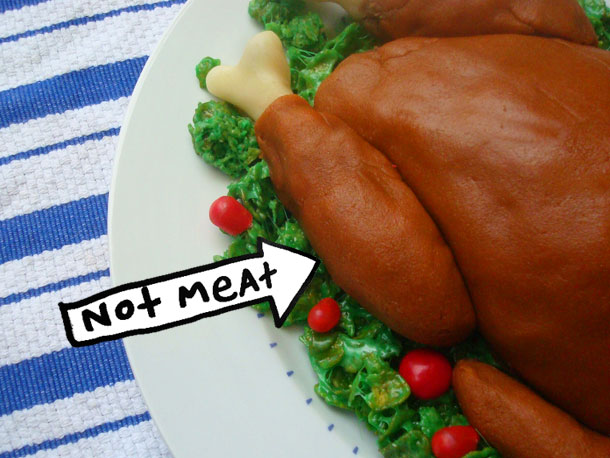
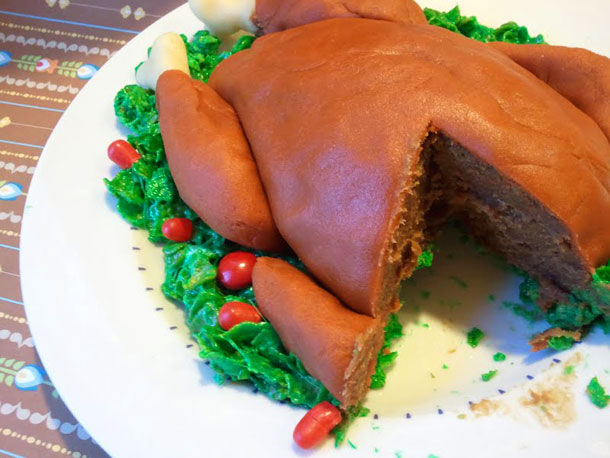
Paying homage to a classic Christmas dinner, this treat isn't meat—it's totally sweet! It's a trompe l'oeil designed to look like a Christmas goose, made from decadent cake crumbled with frosting and covered with rich marzipan. Extra points for serving it on an equally sweet bed of either candy salad or artfully arranged batch of cornflake wreath batter!

For the full recipe and entry, click on over to Serious Eats!

Sunday
Dec192010

Bread and Circus: Molded Gingerbread Cookies Recipe

Christmas is all about sharing.

Of course, some things are more fun to share than others--for instance, SpyMom's Molded Gingerbread cookies recipe, which yields pretty and delicious cookies showcasing vivid scenes from her collection of old-school cookie molds from House on the Hill.

Of course, while the recipe is fun to share, I wouldn't blame you if you couldn't bring yourself to share the actual cookies. 

Gingerbread Recipe from SpyMom


  • 1/2 cup molasses
  • 1/4 cup sugar
  • 3 tablespoons butter
  • 1 tablespoon milk
  • 2 cups flour
  • 1/2 teaspoon baking soda
  • 1/2 teaspoon salt
  • 1/2 teaspoon nutmeg
  • 1/2 teaspoon cinnamon
  • 1/2 teaspoon ground cloves
  • 1/2 teaspoon powdered ginger


Procedure

Preheat oven to 350 and butter cookie sheets. Heat the molasses to the boiling point, then add the sugar, butter, and milk. Mix the flour with the baking soda, salt, nutmeg, and rest of the spices. Add to the first mixture and blend well. Add a few tablespoons of water, enough so that the dough holds together and handles easily. Roll or pat out the dough about 1/4 inch thick. Press into molds, or cut out in whatever shapes you'd like (Ninjabread men, anyone?). SpyMom doesn't specify if it's best to let them chill before baking, but the recipe calls for baking these babies for 5-7 minutes. Garnish as desired, confectioners' sugar might be nice. 

Thursday
Dec162010

You Mochi My Day: Mochi Cake Recipe from CS Buddy Cindy

Dinner parties rule for many reasons:

  1. You get to hang out with cool people, and sometimes meet new people.
  2. You get to eat a bunch of delicious things.
  3. IMPORTANTLY: Dessert is pretty much inevitable.

And after a recent dinner party at CS buddy Cindy's house, after being very impressed with her delightfully dense, lightly but not excessively sweet, almond-y Mochi Cake, she was a kind and generous hostess indeed and even sent the recipe:

As promised here is the recipe for the "Mochi Cake" (for lack of a more appropriate name). I checked the rice cup I was using and it is roughly the equivalent of 3/4 (wet) cup. Let me know if you have any questions and I hope it's rather straightforward.

Mochi Cake

*1 cup = 1 rice cup or 3/4 standard (wet) cup

Ingredients:

  • 1 box (16 oz) Mochiko (sweet rice flour - I use the Koda Farms one, which can be purchased at most Asian grocery stores)
  • 2 cup Milk (or Milk substitute, I used Almond Milk for the one you guys had)
  • 1 scant cup vegetable oil (I tend to use slightly less to avoid excess oil)
  • 1 to 1.5 cup sugar
  • 1 generous tbsp baking powder
  • 4 eggs (if you only 3 eggs or want to use up to 5 eggs that works okay too but 4 seems to be the best ratio)

Optional ingredients:

  • dried fruits (eg. longan, raisins, etc.)
  • rice wine (enough to cover and rehydrate fruits)
  • can of cooked red beans (again can be purchased at the Asian grocery store, be sure to get one that has the beans in it and not completely mashed - Shirakiku Anko Red Bean Ogura)

Procedure

  1. If using dried fruits, add enough rice wine to cover and rehydrate dried fruits
  2. While fruits are rehydrating, mix together mochiko, milk, oil, sugar, baking powder and eggs thoroughly
  3. Line a baking pan (I use a rectangular baking pan, approx. 9" X 13") with aluminum foil & brush lightly with oil
  4. Fill baking pan with batter
  5. If including dried fruits or cooked red beans, use spoon to drop dollops on top of batter, then use finger or butter knife to stir/distribute throughout batter (you can make swirls with the pattern if desired)
  6. Bake for 25-30 minutes @ 390 - 400F (until when pierced with toothpick comes out clean)
Thursday
Dec162010

Sweetly Intoxicating: Christmas Cookie Cocktail Recipes
Everyone knows that the winter holidays are the most intoxicating time of the year.

Wait--that wasn't quite right. What I meant was, the holidays are the best time of the year to get intoxicated. (I mean, let's be honest) And what better way to get toasted--and stay toasty--than with Christmas cookie-inspired cocktails?

Well, Partida tequila was kind enough to send on the SpyStaff some tasty tequila samples (also officially marking the first time we've ever received a fedex parcel fulla tequila) and recipes--and here are our two favorites for you to (*hic!*) enjoy.

Seven Layer Cookie (pictured top)

Spy notes: This delectable cocktail confection tastes sweet and goes down almost too easily--but be warned, it's a stiff drink and moderation is key!

  • 3/4oz Godiva Liqueur
  • 3/4oz Coconut Rum
  • 1/2oz Butterscotch Schnapps
  • 1/2oz Partida Anejo Tequila
  • 1/4oz Frangelico
  • 1/2oz Baileys
  • 1/2oz Amaretto

Garnish rim of a martini glass with crushed cookie crumbs.  Shake all ingredients in a shaker with ice and strain into martini glass. 

Toasted Macaroon

  • 1 oz Coconut Milk
  • 1-1/2oz Coconut Rum
  • 1/4oz Licor 43
  • 1/2oz Partida Blanco Tequila
  • 1/2oz Frangelico

Combine ingredients in a shaker and shake with ice.  Strain into a glass filled with ice and garnish with toasted coconut shavings on top. 

Tuesday
Dec142010

Apple of My Eye: Applescotch Cookies Made With Jiffy Baking Mix

I've always had a soft spot for "Jiffy" brand baking mixes. Not necessarily because of their superior taste (though I think they're perfectly serviceable) but because of their packaging. These petite packages have a distinctly retro look, but not in an ironic way--more like they've never changed the initial 1930 design (why mess with a good thing?). 

Unable to resist the packaging, I recently found myself in possession of a box of Jiffy Apple Cinnamon Muffin Mix. Two questions occurred to me:

  1. Where did these mixes come from?
  2. What can I make with this mix that is not muffins?

Where the magic happens! Photo: Chelsea MillingHappily, the Chelsea Milling website (their parent company) was able to shed light on both of these pressing questions. As for the history? Here it is, from their site:

Chelsea Milling Company is operated by a family whose roots in the flour milling business date back to the early 1800’s. We have been milling flour here in Chelsea for over 120 years.

Mabel White Holmes, grandmother of our President, Howdy S. Holmes, developed and introduced to the homemaker the first prepared baking mix product, “JIFFY” Baking Mix, in the spring of 1930. Currently we offer 22 “JIFFY” Mixes. Our mixes provide you, our consumer, with the best value available.

Chelsea Milling Company is a complete manufacturer. We store wheat. We mill wheat in to flour. We use that flour for our own mixes. We make our own “little blue” boxes. We do it all-that’s why our mixes provide you with the best possible value. Value is using the highest quality ingredients and the best price!

Our entire operation is located in Chelsea, Michigan and our product is shipped out to all 50 states, as well as some foreign countries through the United States Military.

Finding this pretty fascinating, I'd like to state for the record that if they invited me to come and tour their factory, it would be like the awesomest thing ever.

As for a recipe? Happily, they have a handy recipe finder by mix--and I quickly settled on the delectable-sounding "Applescotch Cookies". Incredibly easy to make, these cookies fall somewhere between cakey and chewy, and the mellow, buttery butterscotch flavor works extremely well with the apple-spice flavor from the mix. Here's the recipe.

Applescotch Cookies

  • 1 pkg. "JIFFY" Apple Cinnamon Muffin Mix
  • 1 Tbsp. instant butterscotch pudding
  • 1/4 tsp. nutmeg
  • 2 Tbsp. quick oats
  • 1 Tbsp. margarine or butter, softened
  • 1 egg
  • 1/3 cup butterscotch pieces

Procedure

  1. Preheat oven to 375°, grease baking sheet. 
  2. Mix together muffin mix, pudding and nutmeg.
  3. Cut in softened margarine or butter until mixture resembles fine crumbs. Add oats.
  4. Mix in egg until well blended. Add butterscotch pieces.
  5. Roll into 3/4 to 1" balls and place on cookie sheet.
  6. Bake 10-12 minutes, or until lightly browned on the edges.
© Cakespy, all rights reserved. Powered by Squarespace.