Home Home Home Home Home Home Home
CakeSpy

Featured: 

My adventure at Ben & Jerry's in Vermont!


Unicorn Love: the Eating Disorder Recovery Blog


 Buy my brilliant books!

Buy my new book!

Buy my first book, too! 

CakeSpy Online Retail!


Archives
Gallery

Fantastic appliance for cake making on DHgate.com

everyrecipe.co.nz

Craftsy Writer

Entries in recipes (704)

Monday
Nov152010

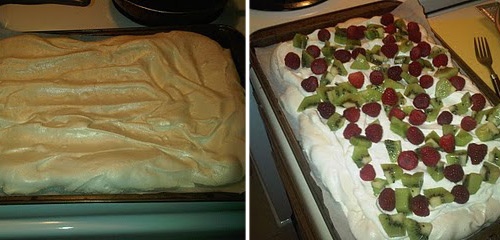
Australian Sweetness: A Pavlova Recipe from Cake Gumshoe Emma

CakeSpy Note: One of my favorite things in the world is discovering the favorite desserts of readers from around the world. Here's a profile on one sweet treat, the wonderful Pavlova (a dessert named after someone famous!), from Australia-based Emma! You can read more about her adventures on her blog, Emma's Eatery. Here's her favorite Pavlova recipe:

Pavlova is one of my ultimate favourite deserts to make. It is so easy, but quite “wow” type dish, the meringue is a real crowd pleaser. Pavlova is a meringue cake – light, fluffy with a chewy interior.  I usually make this at Christmas as a desert when all my high-school girlfriends come over for dinner, and they absolutely adore it! (The red and green fruit with the white cream really add to the Christmas effect!) I don’t think I would be allowed to switch up the dessert anymore because it has become such a staple at our high-school Christmas dinner reunion!

The only thing with meringues is that they are somewhat temperamental - so don't try to make them on a rainy day because you won’t end up with the stiff peaks you need.

For all you looking to bake something fun, quick and easy – this is the dish for you!

Pavlova

Ingredients

- 4 egg whites
- 1 cup sugar
- 1 tsp white vinegar
- 1 tbsp cornstarch or cream of tartar
- 1 pack of raspberries
- 4 kiwis
- 2 tbsp sugar
- 1 tbsp vanilla
- 1 half pint whipping cream (250ml)

Procedure

- Preheat oven to 250 degrees F 
- Line a baking sheet with parchment paper 
- Separate egg yolks and egg whites (it is easier to do this when the eggs are cold) 
- In the bowl of your electric mixer (Kitchen Aid Mixers work very well) beat the egg whites on medium - high speed until they hold soft peaks
- Slowly add in the sugar, a tablespoon at a time and continue to beat until the meringue hold stiff peaks and is somewhat glossy looking
- Make sure the meringue is smooth not gritty (if it feel gritty the sugar is not dissolved, so keep beating until the meringue feels smooth)
- With a spatula fold in vinegar and cornstarch until combined
- On your parchment paper draw a large circle, and fill in with meringue (make sure the edges of the meringue are higher than the center)
- Bake for 1 hr or until golden brown

To assemble: 

- Whip the whipping cream and add in vanilla and 2tbsp sugar for flavor
- Place whipping cream a top the meringue (do this right before you are ready to serve, otherwise the meringue will be soggy) 
- Sprinkle raspberries and kiwi over the top (you can really use any fruit you like)
- Serve immediately 

Want some more Australian sweetness? You might like this bakery tour of Sydney with Cake Gumshoe Dianne!

Monday
Nov152010

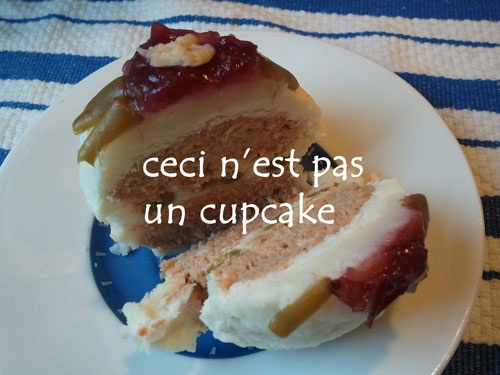
Thanksgiving Sweetmeats: Turkey Cake With Mashed Potato Frosting and More for Serious Eats

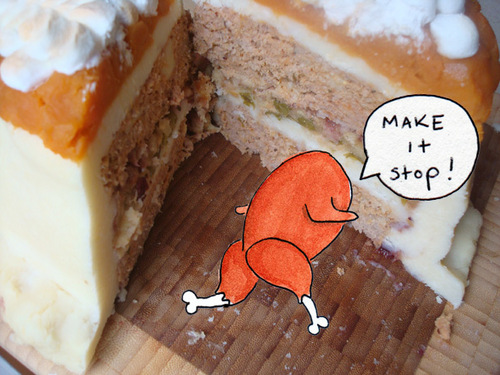
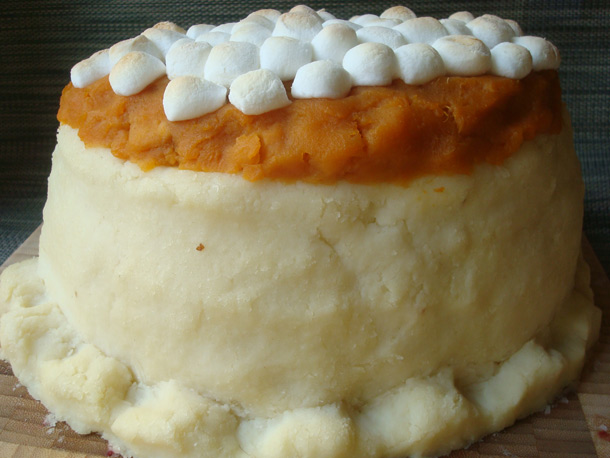
This Thanksgiving, there's a new delivery method for stuffing turkey in your pie-hole: bake it as a cake.

That's right: inspired by this recipe on Chow.com, I decided to serve up layers of turkey, mashed potatoes, cranberry sauce, green bean casserole, and marshmallow-topped sweet potatoes, all in one beasty feast of a trompe l'oeil cake.

While some may have trouble coming to terms with the savory nature of such a sweet-looking treat, ultimately brave eaters will be rewarded: it's like the best of Thanksgiving leftovers all stacked into one tasty bundle.

Note: This recipe is actually quite open-ended in terms of how you stuff your turkey cake. I added a layer of green beans and fried onions to mine, but if you prefer to add or omit any of the classic Thanksgiving side dish flavors, it's totally up to you.

Monday
Nov152010

Gluten-Free as a Bird: GF Turkey Meatloaf Cupcakes for the Gluten-Free Girl Thanksgiving Recipe Roundup

I eat gluten. There, I said it. And I kind of it.

But here's the thing. Some people can't eat gluten. Like, because it will make them sick and/or die and stuff. And that is the opposite of cool.

But then again, there are people like Shauna--you may know her as Gluten Free Girl--who can't eat gluten, but not only refuse to let it ruin their lives, but actually learn to "love the food that loves them back".

And she just came out with a great new book (to follow up her previous great book), entitled Gluten-Free Girl and the Chef. Her husband is named Danny, my husband is named Danny. Adorable!

So when someone like the incredibly awesome Shauna asks me to take part in a gluten-free Thanksgiving recipe challenge, I'm gonna give it a try.

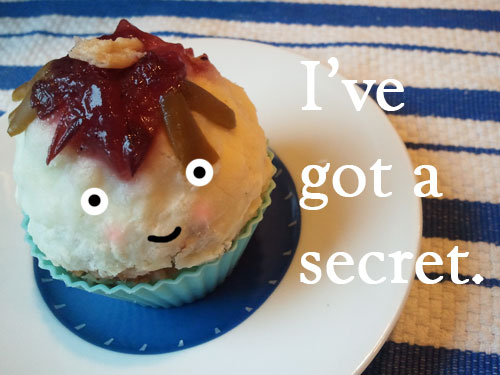
Of course, because it's in my nature to be slightly bratty, I went gluten-free...as a bird. Literally. I baked it, but it's not a cake: these cupcakes are a gluten-free variation of the turkey trompe l'oeil cake I made for Serious Eats. They may not be sweet, but the sentiment is...and in an awful-meets-awesome sort of way, these sweetmeats are kind of tasty in spite of themselves.

Turkey Meatloaf "Cupcakes"

Lightly adapted from the recipe found here

Note: When it comes to gluten-free ingredients, be sure to read everything. Even things that you wouldn't think of as having gluten--say, ketchup or oats--often do. So do your homework!

  • 2 pounds ground turkey breast
  • 1 cup quick-cooking oats (be careful to find a truly GF brand)
  • 1/2 cup white cheddar cheese, grated
  • 1/3 cup ketchup (be sure to check the ingredients and use a GF brand)
  • 1/3 cup finely chopped onion
  • 1/4 cup finely chopped Italian parsley
  • 3 tablespoons soy sauce substitute such as tamari
  • 1 1/2 teaspoons minced fresh thyme leaves
  • 1/2 teaspoon freshly ground black pepper
  • 2 medium garlic cloves, minced
  • For the filling and topping:
  • 5 cups mashed potatoes (recipe of your choice)
  • 1 cup sauteed green beans
  • 1/2 cup sauteed onions 
  • 2 cups stuffing (use this recipe!)
  • 1/2 cup whole berry cranberry sauce, drained of excess liquid

For the procedure, click over to Serious Eats--basically you will follow the same steps for the "cupcakes", but reduce the baking time by about 10 minutes because they are served in smaller vessels. Serve with any combination of GF Thanksgiving sides you'd like, and garnish with gravy (white flour free, please) if desired. 

Of course, if all this is too much for you to...ah, digest, check out the other GF entries which are linked to from Shauna's blog, and here's a direct link to a few of my favorites: a gluten-free pumpkin pie, a gluten-free sweet potato and crabapple clafoutis (!), and a rather delectable-looking gingerbread cake.

Tuesday
Nov092010

Table Fare: Salt-N-Pepper Sandwich Cookies Recipe from Baked Explorations

I'm here today to tell you that you really, really, really need to buy Baked Explorations: Classic American Desserts Reinvented, the new book by Matt Lewis and Renato Poliafito.

Of course, to offer full disclosure, I should probably tell you first that I am hopelessly and madly in love with these two adorable NYC-based bakers.

There are a few reasons why:

1. Their two bakeries, Baked, in Brooklyn and South Carolina, respectively, are to die for.

2. Their first book, Baked: New Frontiers in Baking is not only an essential baking tool full of some of the best recipes I've ever tried, but it's beautiful and fun to look at too.

3. They're both adorable, talented, and have a great sense of humor--and can wax philosophical about the joys of crumb cake and peanut butter-chocolate combos like nobody I've ever met.

4. Oh, and Porkchop approves:

Now, if you're not already halfway in love with them already, buy the new book and you will be. It's the perfect follow-up to their bestselling first book, this time featuring classics from all around America. Featuring gorgeous pictures and plenty of baked good lore, this one is full of treasures that you'll be delighted to discover.

Here's my first discovery from the book, the cover recipe for Salt-N-Pepper Sandwich cookies. I first heard about these babies on Good Food, and have been intrigued ever since. Happily, they were worth the wait: though mine were more free-form in terms of the final look, I made mine with fancy Cherry Almond Pistachio sea salt and brought them to the Jill Labieniec artist reception at my store, and they disappeared in record time.

Salt-N-Pepper Sandwich Cookies

Adapted from Baked Explorations

Ingredients for the cookies

  • 3 1/2 cups flour
  • 3/4 teaspoon salt
  • 1/4 teaspoon fleur de sel or fancy sea salt (I used Secret Stash Sea Salt)
  • 2 teaspoons white pepper
  • 1/4 cups (3 sticks) unsalted butter, cut into 1-inch cubes, cool but not cold
  • 1 1/4 cups granulated sugar
  • 1 3/4 cups confectioners' sugar
  • 3 large egg yolks
  • 1 tablespoon pure vanilla extract
  • 3 ounces good quality dark chocolate, melted

Ingredients for filling

  • 5 ounces vegetable shortening, room temperature
  • 4 tablespoons (1/2 stick) unsalted butter, cut into small chunks, at room temperature
  • 3 1/4 cups confectioners' sugar, sifted
  • 1 tablespoon pure vanilla extract
  • 1 teaspoon light rum (I didn't use this and it came out fine)

Procedure

  1. In a large bowl, sift together flour, salt, fleur de sel, pepper, and cocoa powder. Set aside.
  2. In the bowl of a stand mixer fitted with the paddle attachment, beat the butter and sugars together until light and fluffy, about 3 minutes. Scrape down the bowl, and add the egg yolks, one at a time, beating until each is incorporated. Add the vanilla and melted chocolate and beat until uniform in color. Scrape down the sides and bottom of the bowl and beat again shortly, until incorporated.
  3. Add half of the dry ingredients and beat for 15 seconds. Again, scrape down the bowl and give it a quick second mix to incorporated.
  4. Loosely shape the dough into two balls, wrap tightly in plastic wrap, and refrigerate for at least 3 hours (note: I did make some right away, and while the texture wasn't as good they tasted fine).
  5. Preheat the oven to 350 F. Line two baking sheets with parchment paper.
  6. Unwrap one ball of dough and divide into two equal portions. Place the first portion on a lightly flour-dusted surface and return the other half to the fridge.
  7. Use your hands to knead the dough until pliable. The original recipe calls for rolling it into a disc (to use cookie cutters) but I actually rolled it into a log to slice and bake my cookies. If you want to do it their way, use a 2-inch round cookie cutter to create the tops and bottoms, and transfer to your waiting baking sheet, leaving about 1 inch of space around each cookie. If you want to go my route, roll the dough into a log and slice 1/2 inch thick slices, using your hands to make them pleasingly round if the dough gets too soft, and place on the baking sheet.
  8. Sprinkle the tops of the cookies with a little extra fancy salt, and then bake them for 10-12 minutes, rotating the sheets halfway through the baking time. The tops of the cookies will look dry and may have small cracks on top--don't worry, it's ok. Place the baking sheets on wire racks to cool for 5 minutes, and then use a spatula to transfer the cookies to racks to cool completely.
  9. While they cool, make up your filling. In the bowl of a stand mixer fitted with the paddle attachment, beat the shortening and butter until lump-free and smooth. Add the sugar in three parts, mixing each part until just combined. Add the salt, vanilla, and rum and beat again for 10 seconds. The filling should be thick, but spreadable (like Oreo filling). If it is too thick, add a drop or two of water as needed. If the mixture is too thin, add a little extra confectioners' sugar.
  10. Assemble the cookies. Use a pastry bag or small spoon (I used a small knife) to spread a dab of filling onto the flat (bottom) side of a cookie. Place another cookie, flat side down, on top. Press down slightly so that the filling spreads to the edges of the cookie. Repeat with the remaining cookies. Let them sit for about 15 minutes before serving. Store the cookies at room temperature in an airtight container for up to three days.
Tuesday
Nov092010

In the Kutchen: A German Cake Recipe for CakeSpy's Dad's Birthday

Guess what? Yesterday was CakeSpy's dad's birthday. Happy birthday, SpyDad!

And for this occasion, SpyMom made up something very special: Blitz Kutchen. What's that, you ask? Well, it's a recipe from the The Settlement Cook Book, the "first classic collection of American ethnic recipes"--a book which really reflects the American melting pot, with recipes which take inspiration from several of the "old countries" but often involve ingredients discovered or more readily found on US soil.

But that's not the only reason this crumb cake is special: as SpyMom says of why she chose this recipe to make for the Mr.: "It is his favorite German crumb cake I made the first birthday I was married to him."

Isn't that just so adorable you could die? Here's the recipe.

Further notes from SpyMom: "I use a old round pan, the vanilla option and this was the first time I added the almonds to the crumb topping. They are good though. And I added apple slices before the crumbs went on, love it that way."

Crumb Cake (Blitz Kutchen)

For the cake

  • 1 cup butter
  • 1 cup sugar
  • grated rind of 1 lemon, or 1 teaspoon vanilla
  • 4 eggs, unbeaten
  • 2 cups flour
  • 2 teaspoons baking powder

Crumb Topping (streusel)

  • 1/2 cup flour
  • 2-4 tablespoons butter
  • 5-6 tablespoons sugar
  • 1/2 teaspoon cinnamon
  • almonds

Procedure

Preheat oven to 350. Cream butter and sugar, add lemon rind or vanilla, add the eggs one at a time (reserving one egg white). Beat well, then add flour and baking powder (mixed). Stir well, pour into a buttered oblong shallow pan, 8x12 inches. Spread with the reserved egg white, cver with streusel, and bake 1/2 hour or until browned.

To prepare the streusel: Mix first 4 ingredients by rubbing well with the finger tips until small crumbs are formed. Add a few chopped or pounded almonds. Sprinkle over the cake before baking.

Monday
Nov012010

Live and Let Pie: Bourbon Orange Pecan Pie Recipe from megpies

CakeSpy Note: This is a guest post from the very talented Megan of megpies--let's let her take it from here!

Hello Everyone! I’m Megan from megpies and I’m so thrilled to be a guest on Cakespy!

One year ago, I started a small pie business completely by accident. In fact, this Thanksgiving marks megpies’ first anniversary! Sharing its Anniversary with Thanksgiving is only fitting since it’s my favorite holiday. The smell of food cooking early in the morning, having people over, getting the linen napkins out…these are the things that make it special. Now that megpies is born, it makes it all the more dear to my heart.

In honor of the Thanksgiving season coming up I would like to share one of my most popular pie recipes – Bourbon-Orange Pecan Pie. It’s not Thanksgiving without pie! In fact, my family is so into pie that traditionally we will eat pie for breakfast on Thanksgiving morning. Our reasoning is that we’d rather not wait until we’re too full of dinner to enjoy the pie! So pie is first on Thanksgiving – it’s our favorite part after all! I hope you enjoy it at your Thanksgiving table this year.

Bourbon-Orange Pecan Pie

Photos by www.halliewestcott.com

  • 1 uncooked pie crust
  • 3 eggs
  • ¾ cup light brown sugar
  • 1 cup light corn syrup
  • ¼ tsp salt
  • 1 tbl – 1 ½ tbl orange zest
  • 2 tbl bourbon
  • ¼ cup melted unsalted butter
  • 2 cups (plus 1 cup for decoration) Pecan halves

 Procedure

  1. Place the uncooked pie crust into a 9” pie pan and gently form into the pan. Crimp the edges as desired. Place the pie shell in the fridge while you prepare the filling.
  2. Preheat the oven to 375 degrees.
  3. Wisk the eggs and add the brown sugar and corn syrup. Wisk again to combine.
  4. Add the salt, orange zest and bourbon. Wisk again to combine.
  5. Add the melted butter and wisk until combined.
  6. Pour in 2 cups Pecan halves and toss.
  7. Pour the mixture into the pie crust shell
  8. Arrange the remaining cup of Pecan halves around the outer edge of the pie.
  9. Place the pie on a baking sheet and wrap the edges in foil to prevent the crust from burning.
  10. Bake on the bottom rack of your oven for 40-50 minutes until the top looks dry and starts to rise a bit. Let cool for at least 1 hour before serving.

 megpies Tips:

  1. While forming the crust to the pan, be careful not to stretch your dough. Any stretching you do now, will shrink as it bakes.
  2. I use several pieces of tin foil to wrap the edges of the pie while it bakes. There are other methods such as the metal pie baking rings, etc. but I’ve found that good ‘ol tin foil works best. It’s a little harder to get it in place, but don’t worry, it doesn’t have to be perfect. Just make sure the shiny side of the foil is facing the outside.

Thank you all for spending some time with me today. You can find more of my work here, and I would love to hear about your Thanksgiving traditions in the comments below! Happy Holidays!

Tuesday
Oct262010

Trick or Sweet: Peanut Butter Cookies on a Stick for Peanut Butter and Co.

CakeSpy Note: You knew I did recipes for Peanut Butter & Co., right? Here's my latest one.

There are probably foods out there that aren’t improved by being served on a stick, but none come to mind at the moment.

But which one is the most fun to serve around Halloween? My vote goes to these peanut butter cookies on a stick. They’re part trick, decorated to look like pumpkins–but they’re even more treat, with a rich, cakey texture and rich, peanut buttery flavor that is far more delicious than any fun-size candy bar could ever hope to be.
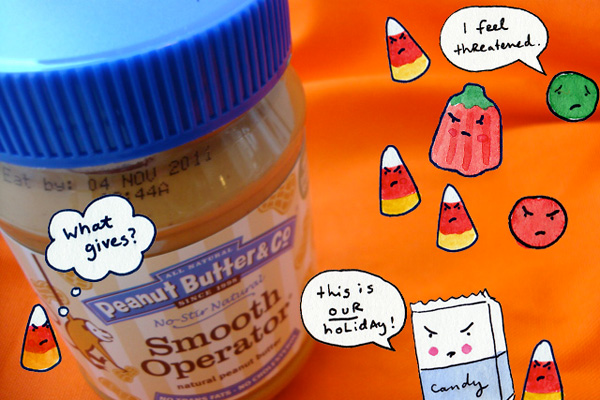
For the full entry, visit Peanut Butter & Co.!

Monday
Oct252010

Swiss Miss: Deep-Fried Swiss Rolls on a Stick Recipe

File under "Things you should never do, ever": Deep-frying Swiss Rolls on a Stick.

Oh, who am I kidding--you totally should. Because as I learned when I found myself with a slight excess of fry batter (from when I was deep frying Halloween candy, natch), not only is the deep fried Swiss Roll delicious, and like just about everything, it's even better on a stick.

And now, I'm delighted to share the method by which you can make this magic happen in your very own home.

Oh, and if you enjoy seeing Swiss Rolls being tortured, you might like to revisit the Little Debbie Death Match!

Deep-Fried Swiss Rolls on a Stick

  • 12 Swiss Rolls 
  • 8 cups vegetable oil, for frying
  • 1 1/2 cups flour, divided
  • 1 teaspoon baking soda
  • 1 cup milk
  • 1 tablespoon white vinegar
  • 1 tablespoon vegetable oil

Procedure


  1. Begin by freezing your Swiss rolls: insert the sticks, and place them on a plate or cookie sheet. Freeze them for at least 2 hours, until they are solid and frozen throughout.
  2. When you're nearing the end of the chilling period, start heating the oil for frying. Pour vegetable oil into a large, heavy-bottomed saucepan until it is three inches deep (the amount of oil you use will depend on the size of your saucepan). Turn the heat to medium-high, and insert a candy/deep fry thermometer. Heat until the oil reaches 375°F.
  3. While you're waiting for the oil to heat up, prepare your frying station and batter. Place 1/2 cup of flour in a bowl and set aside. Place the remaining cup of flour in a small bowl and mix with the baking powder and salt; add the milk, vinegar, and oil, and whisking the wet ingredients into the dry until you have a relatively lump-free, smooth, thick batter.
  4. Remove the frozen rolls from the freezer. It's go time.
  5. Dredge each roll in flour, covering it completely. Happily, it's helpful that they're on a stick so you won't get batter all over your fingers.
  6. Quickly place the battered Swiss Roll into the heated oil, holding the end of the stick and being careful not to drop it and cause oil to splash up (you might want to wear gloves for safety, 'cos hot oil can HURT, but I lived dangerously and to tell the tale). It will fry up quickly. 
  7. Once the treat has reached an appealing golden hue, remove from the hot oil and place on a plate covered with a paper towel to absorb excess grease. Repeat the battering and frying process with the remaining Swiss Rolls. While frying, be sure to monitor the temperature of the oil and adjust your heat up or down accordingly, as the candy will melt if it is too hot, and it will take too long to fry and become greasy if the heat is too low.
  8. Let cool slightly, but serve while still warm.


Wednesday
Oct202010

Fry, Baby: Deep-Fried Halloween Candy for Serious Eats

It's a funny thing about Halloween candy: it actually makes you hungrier. At least, that's my theory behind how the same person who can't finish off an entire candy bar can easily put away ten "fun size" candy bars or 30 mellowcreme pumpkins in one sitting.

But there's a way to bring a substantial dimension of deliciousness to your Halloween candy: deep-fry it.

That's right. Batter up your Halloween candy and fry it in hot oil, and you've got yourself little nuggets that are beyond decadent, and bound to satisfy—one or two of these morsels is more than enough.

Note: I tried a variety of Halloween candies in this experiment, including candy corn, mellowcreme pumpkins, Reese's Peanut Butter Cups, Twix, Kit-Kats, and Whoppers. The biggest hit by far was the Peanut butter cups.

For the full entry and recipe, visit Serious Eats!

Sunday
Oct102010

Better Together: Beer Cupcakes With Chocolate Covered Potato Chips Recipe from Bredenbeck's Bakery, Philadelphia

Sweet or salty? Why decide, when you can have both--and beer, too--in one deliciously decadent cupcake parcel? Yup, that's right: Beer Cupcakes. Topped with Chocolate Covered Potato Chips. It's a recipe kindly donated by Bredenbeck's of Philadelphia. Awful or awesome? Maybe a little of both, in the best way possible. Make it happen at home thusly:

Beer Cupcakes Topped With Chocolate Covered Potato Chips

Ingredients for cupcakes:

  • 1 cup of Guinness® Draught
  • 1 stick plus 1 tablespoon unsalted butter, cut into pieces
  • 3/4 cup unsweetened cocoa powder
  • 2 cups dark brown sugar
  • 3/4 cup sour cream
  • 2 eggs
  • 1 tablespoon vanilla extract
  • 2 cups all-purpose flour
  • 2 1/2 teaspoon baking soda Pinch of cinnamon

Glaze:

  • 8 ounces cream cheese
  • 1 1/4 cup confectioner’s sugar
  • 1/3 cup Guinness® Draught

Chips:

  • 1⁄2 pound high quality milk chocolate, chopped
  • 4 cups ridged potato chips

Procedure

  1. Make the cupcakes. Preheat oven to 350 degrees. In a large sauce pan over low heat, combine Guinness® and butter, stirring until butter melts. Remove pan from heat and whisk in cocoa powder and brown sugar. In a medium bowl, whisk together sour cream, eggs and vanilla. Combine with beer mixture. Sift together flour and baking soda, then fold into batter. Pour into greased muffin tin, filling each cup about 2/3. Bake for 20-25 minutes. Cool in tin for 10 minutes, then remove from tin and place on a wire rack to finish cooling.
  2. Make the glaze. With a mixer, whip cream cheese until smooth. Sift confectioner’s sugar into cream cheese, and beat. Add Guinness®, and beat until smooth. Apply to cupcakes using a flat spatula.
  3. Prepare your garnish. Place 3/4 of the chocolate into a heat safe bowl, and place over the top of a pan of simmering water. Heat, stirring occasionally until the chocolate has melted, then continue to heat the chocolate to 110F degrees, stirring occasionally. As soon as the chocolate reaches this temperature, remove from heat. Stir in remaining chocolate until melted. Using tongs, dip potato chips one at a time into the chocolate. Place on waxed paper to cool. Once cooled, place atop cupcakes. Enjoy!

Of course, if you have no time—or desire—to bake your own Beer Cupcakes, you can stop into Bredenbeck’s Bakery and try their version! They're also busy baking all your favorite fall confections: pumpkin bread, caramel apple cheesecake, pumpkin cheesecake with cinnamon whipped cream, carrot cake, s’mores pie and much, much more.

© Cakespy, all rights reserved. Powered by Squarespace.