Home Home Home Home Home Home Home
CakeSpy

Featured: 

My adventure at Ben & Jerry's in Vermont!


Unicorn Love: the Eating Disorder Recovery Blog


 Buy my brilliant books!

Buy my new book!

Buy my first book, too! 

CakeSpy Online Retail!


Archives
Gallery

Fantastic appliance for cake making on DHgate.com

everyrecipe.co.nz

Craftsy Writer

Entries in recipes (704)

Wednesday
Feb242010

Go Nuts: Peanut Butter Blondies with Peanut Butter Frosting Recipe

CakeSpy Note: This is a guest post and recipe from Cake Gumshoe Julia, a 26 old wife, exercise fiend, and baking enthusiast. Her writing can be find at her site, Fat Girl Trapped in a Skinny Body.

 Do you love peanut butter?

Did you know I love peanut butter?

I mean LOVE peanut butter. Not in a romantic way, but in a mouth watering, makes my taste buds sing kinda way. As I am getting older, not old, just older, I'm growing out of the idea that a dessert has to be based around chocolate. I now understand that a freaking amazing, mouth watering, makes you jump in the air with excitement, dessert can be based on something other than chocolate: peanut butter.

Saturday morning I woke up super early with lots of excitement and anticipation about what I would bake that day--and I realized it must be Blondies. And I could add peanut butter and make them extra delicious. I felt content with my decision. And after you make these, you will understand why I was so content. I can't say I am in love with these, because I am in love with my husband (ahh, how romantic of me). But I can say, with confidence, that these are one of my all time favorite desserts.

Peanut Butter Blondies

Recipe adapted from My Kitchen Addiction

 Ingredients

  • 1/2 cup (1 stick) unsalted butter
  • 2 cups dark brown sugar
  • 1/2 cup peanut butter
  • 2 eggs 
  • 1 teaspoon vanilla extract
  • 2 1/2 cups all purpose flour
  • 1 teaspoon baking powder
  • 1/4 teaspoon baking soda
  • 1/2 teaspoon salt
  • 1 cup milk chocolate chips

Peanut Butter Frosting

Recipe adapted from Ina Garten

 Ingredients

  • 1 cup peanut butter
  • 1 cup powdered sugar
  • 1/3 cup half and half
  • 1 tsp vanilla extract
  • 2 tbsp butter, softened
  • 1/8 tsp kosher salt

 Procedure

  1. Preheat the oven to 350°F. Grease a 9-inch by 13-inch pan and set aside.
  2. In a saucepan over medium heat, melt the butter and brown sugar, stirring constantly until smooth.
  3. Remove from the heat, and stir in the peanut butter.
  4. Allow to cool while combining the dry ingredients – flour, baking powder, baking soda, and salt – in a large mixing bowl.
  5. Add the eggs, one at a time, to the brown sugar and peanut butter mixture, mixing well after each addition.
  6. Add the vanilla extract and stir to combine.
  7. Pour the mixture into the prepared dry ingredients, and stir to create a thick, smooth batter.
  8. Transfer the batter to the prepared pan, spreading the batter evenly to the edges of the pan.
  9. Sprinkle with the milk chocolate chips, lightly pressing them into the batter.
  10. Bake for 25 minutes. Allow to cool in the pan.
  11. Mix all the frosting ingredients in a bowl with a hand mixer. Beat for about 2-3 minutes; until all the ingredients are incorporated. Spread onto the cooled blondies.
  12. Sprinkle with mini chocolate chips. Cut into 15 large squares, serve and enjoy with a glass of ice cold milk!

These are rich, dense, and simply delicious!

Thursday
Feb182010

Ringing It In: Olympic Ring Cookies for Serious Eats

The Olympics: a time to celebrate the infinite abilities of the human body and spirit.

Of course, if you're more of an armchair athlete, you'll be happy to have plenty of cookies to keep you company while watching those sporty types do their thing.

While my original hope was to link the cookies together in the tradition of Betty Crocker's Magic Rings, it didn't quite work out; however, when trimmed while still warm and fitted together, they form a lovely Olympic ring, served as a unit that is basically an excuse to eat five delicious cookies at once. And with cookies like this--lightly chewy in the center, crisp on the edges, and full of butter-sweet flavor, you may just find yourself going at these like it's an Olympic sport.

For the full post and recipe, visit Serious Eats!

Tuesday
Feb162010

Up In Eclair: Oscar-Inspired Eclairs for Serious Eats

Up in the Air, or as I like to call it, that movie with George Clooney and airplanes, is a bittersweet tale of a dude who leads a largely empty life, traveling around the country for a job where he fires people, never really cultivating any real bonds or finding any real fulfillment.

Oh, George. Clearly, you don't know that so many voids can be filled with delicious eclairs, and so I'd like to present a sweet cinematic pairing: Up in Eclair. In deference to the film, the pastry is light as air and shaped like the planes which permeate the plotline. The lemon filling is sweet with a tinge of sour as a nod to the bittersweet story, and for your eating pleasure, the icing on top brings it all home for a sweet ending.

Check out the full post and recipe over at Serious Eats, part of the Movie Awards Season Recipe Series brought to you by Hyundai

Sunday
Feb142010

Sweets for the Sweet: Valentine's Day Cupcake Tutorial from Hello Naomi

Now would be an appropriate time for me to act very high and mighty on the subject of Hello Naomi in a "I discovered her way before the fact" sort of way. After all, she was first featured on CakeSpy over 2 years ago, while she was still a student and baked only as a Flickr-posting hobbyist. But I'm not gonna be like that--I can share.

Of course, awesome like hers couldn't be contained, and now she's moved on to wonderful things including starting her own baking business, and she's also dipped into party planning and works with a company that does invitation design

And happily, she's offered up a sweet tutorial for Valentine's Day Cupcakes. It's not too late to whip up a batch for your sweetie!

Valentines Day Cupcake Tutorial

Makes 12

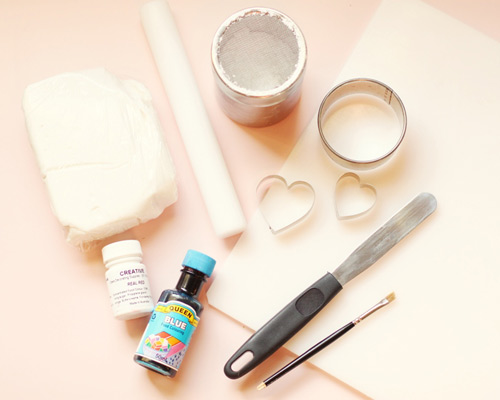
What you will need:


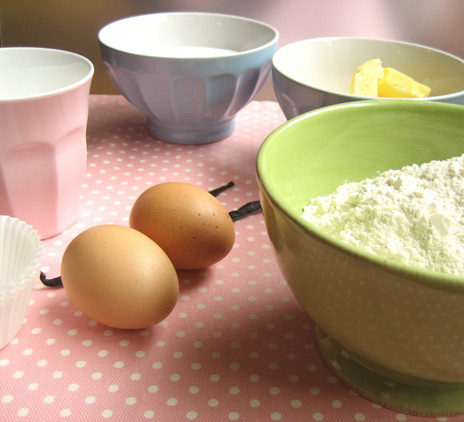
  • 12 vanilla cupcakes (here's Naomi's recipe)
  • 500g ready to roll white icing (fondant)
  • Red gel food dye
  • Blue food dye
  • Circle cutter (the same size as your cupcake tops)
  • 2 size heart cutters
  • Non-stick small rolling pin
  • Plastic mat
  • Pure icing sugar for dusting
  • Water or cake decorating glue w/ small paintbrush


 Procedure

  1. Divide the fondant into 4. Using a plastic mat, dye one lot of fondant red, one pink, one blue and leave the other white. Colouring is done by kneeding drops of colour into the fondant until mixed through evenly. Pink is made by using a small amount of the red dye, red is eventually achieved by using a fair amount of dye (using a gel dye is much faster than using liquid dye). Use sifted icing sugar to soak up any moisture from the dye and prevent sticking. Wrap each colour in cling wrap. Wipe mat after each colour.
  2. Roll out the white fondant until aprox ¼ inch thick. Dust icing sugar on the top and bottom if sticking and dust away excess.
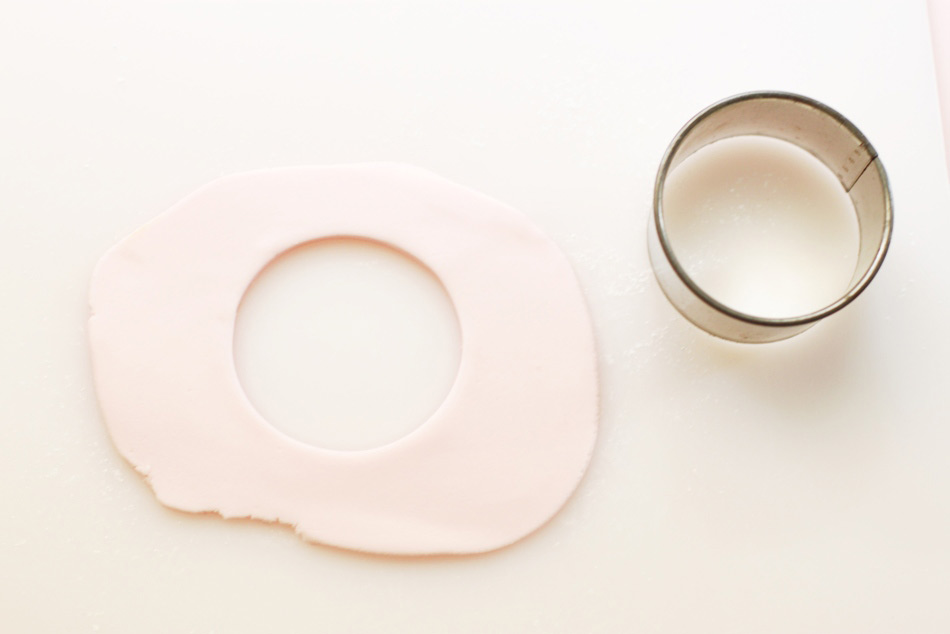
  3. Cut out 3x circles using the circle cutter. Using a pallet knife or flat knife lift each circle, lightly wet the back using a paint brush and place onto a cupcake. Smooth the top and edges using the palm of your hand. Wrap excess fondant in cling wrap.
  4. Repeat for 3 pink cupcakes and 6 blue ones.
  5. Once all the cupcakes are covered it is time to decorate them. Roll out the remaining pink fondant and cut out 3 large hearts. Lightly wet the back and place in the middle of 3 blue cupcakes. Roll out the remaining white fondant, cut out 3 large hearts, lightly wet the back and place in the middle of the remaining 3 blue cupcakes.
  6. Roll out the red fondant, cut out 12 hearts, lightly wet the back and place in the middle of each cupcake.
  7. Package them in a cute box with tissue paper, alternating designs, and give them to someone special!

About the contributor: Naomi was studying her PhD in Computer Engineering when she discovered her love of cake decorating. By posting photos onto the photo sharing website flickr under the user name ‘hello naomi’ she quickly became well known for her original designs and demand quickly grew to the point where she decided to start a business in 2009. Since then she has also ventured into party planning, collaborating with Imprintables invitations to form scissors.paper.cake.

Sunday
Feb142010

Sweet Cakes: Naomi Henderson's Vanilla Cupcake Recipe

Hello Naomi's Vanilla Cupcake Recipe 

Perfect for use with this tutorial for Valentine's Day Sweetheart Cupcakes!

Makes 12

Ingredients

  • 1/2 cup unsalted butter
  • 1 cup castor sugar
  • 2 vanilla beans or 1/2 teaspoon vanilla extract
  • 2 free range eggs
  • 1/2 cup milk
  • 3/4 cup self-rising flour
  • 3/4 cup all-purpose flour

Procedure

  1. Preheat the oven to 170°C (350°F ) . Line a 12 hole cupcake trays with standard size papers.
  2. Sift the flours together and set aside.
  3. Soften butter in the microwave.
  4. Warm the milk in the microwave to luke warm.
  5. Place the softened butter in a mixing bowl and beat with an electric mixer (med-low speed) for 1 min until smooth.
  6. Beat on med and add the sugar 1/3 at a time beating for a minute between additions. (The fluffier the butter and sugar is, the fluffier and higher your cupcakes will rise)
  7. Add the vanilla seeds or extract and beat though
  8. Add the eggs one at a time mixing on med-low and for a minute in between additions.
  9. Once the eggs are mixed remove mixing bowl from stand and using a wooden spoon mix in 1/3 of the flour. Mix until there are no lumps.
  10. Add 1/2 of the milk and mix until well combined.
  11. Add another 1/3 of the flour, mix until no lumps. Mix through the rest of the milk until well combined and then mix through the rest of the flour until there are no lumps.
  12. Spoon mixture into cupcake papers about 2/3 full using an ice cream scoop. Bake on the middle rack for 18-20 minutes until golden (rotate tray after about 15 min).
  13. Remove from trays and cool on a wire rack for at least 45 minutes before decorating.
  14. Frost as desired, or according to this awesome tutorial!

Store in an airtight container for up to 4 days.

Wednesday
Feb102010

Wining and Dining: Red Wine Valentine Cookies from The Hot Cookie

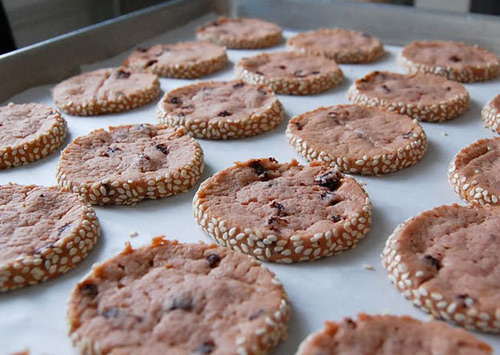
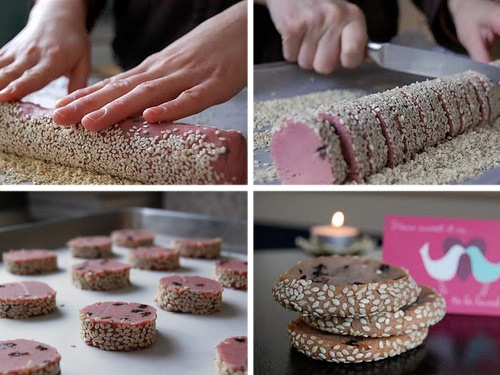
When CakeSpy contributor Sarah of The Hot Cookie sent over the recipe for these cookies, I first saw the light pink hue and sesame seeds in the rolling pictures (below) and thought "sushi cookies!". Well, no, but reading on I learned they were something far more delicious: Red Wine Valentines. Infused with buttery flavor cut with sweet and tart wine, these sweet treats will undoubtedly set the tone for romance--as Sarah wisely says,

Fewer things can be more meaningful than a homemade treat. Whether it's made by your own hands or crafted from an independent bakery, these Red Wine Valentine cookies will spark an interest in your other's eyes.

Here's the recipe:
Red Wine Valentines

Ingredients
  • ½ cup port wine
  • 2 Tbsp. beet juice*
  • 1 cup butter
  • 1 ¼ cup sugar
  • 1 egg
  • Zest of half an orange
  • 3 cups flour
  • ¼ tsp. salt
  • 1 tsp. baking soda
  • 1 cup dried currants
  • Sesame seeds
Procedure
  1. In a small sauce pan bring wine and beet juice to a boil. Once boiling occurs, reduce heat to medium and simmer for 20-22 minutes. Remove from heat and let cool.
  2. Sift together flour, salt, and baking soda. Set aside.
  3. Cream butter and sugar. Add egg, orange zest, and cooled wine/beet reduction. Mix until combined.
  4. Mix in flour mixture until just incorporated. Add currants.
  5. Divide dough into thirds and roll into logs about 2 inches in diameter. Wrap dough logs with wax paper or parchment paper and refrigerate for at least 4 hours.
  6. Preheat oven to 350 degrees F.
  7. Unwrap dough and roll/press dough into sesame seeds.
  8. Slice log into ¼ inch slices. Place on greased or parchment lined baking sheet.
  9. Bake for 10-12 minutes or until the edges are firm and centers appear undercooked. Let cool on baking sheet.

About the contributor: The Hot Cookie is a small, all-natural cookie company in Indianapolis run by two go-local/pro-green ladies with a thirst for life and a hunger for sweets. All of their two-bite cookies are made in small batches with as many high quality, local, and organic ingredients available.

You can shop here, visit the website here, and keep up to date via their blog!

Saturday
Feb062010

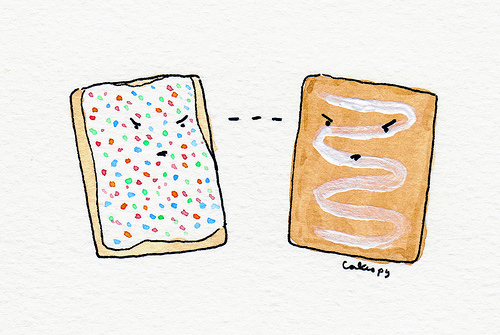
Sweet Tarts: Homemade Pop Tarts Recipe a la Peabody

Oh, Pop Tarts. No matter what the makers of Toaster Strudel may say, I'd never hoard you uneaten in my locker.

After having made a batch of Avatar-inspired pop tarts for my most recent Serious Eats post, from which I adapted a recipe for homemade pop tarts on Culinary Concoctions by Peabody, I was naturally also tempted to make a batch in the more traditional pop tart format.

Made using an all-butter crust (Peabody's called for part shortening, but lacking shortening I went the all-butter route), these are a bit flakier and less soft than the pop tarts I remember, but they've got a leg up in the delicious department--and who wouldn't be delighted to choose their own Pop Tart flavorings? (isn't that every child's--and some adults'--dream?)

The sky's the limit with these babies--you could fill them with jam and top them with a thin icing with sprinkles for the traditional look and feel of the pop tart--or you could go straight for the fatty jugular as I did with half my batch, filling them with decadent dark chocolate and topping them with peanut butter icing (photo to come). You're welcome.

Homemade Pop Tarts

Makes 6-8 tarts, maybe even more, depending on size; adapted from wonderful, wonderful Culinary Concoctions by Peabody

For the crust
  • 1 1/2 cups flour
  • 1/2 teaspoon salt
  • 1/2 cup (1 stick) butter, softened and cut into cubes
  • 3 tablespoons cold water

For the filling

Jam, about 1 heaping teaspoonful per pastry (your choice of flavor; I used blueberry)

For the icing

  • 1 cup confectioners' sugar, sifted
  • heavy cream, to thin (you could use milk...but I like cream)

Procedure

  1. Preheat oven to 450°F. Line a baking sheet with parchment paper; set to the side.
  2. Combine flour and salt in a large bowl. Add butter and blend with a fork, pastry cutter, or your impeccably clean hands. Blend until the mixture is fairly coarse. Add the water, bit by bit, gently mixing the dough after each addition, until the dough is cohesive enough to form a ball.
  3. Place dough on a lightly floured surface and roll into a rectangle, about 1/8 inch thick. Cut out rectangles approximately the size of index cards (3x5 inches), or smaller if you prefer a more modest portion (I didn't). Make sure you have an even number of cutouts. I think that mine might have been a little thicker than 1/8 an inch, but I ended up with 12 rectangles (for 6 pastries).
  4. On half of the rectangles, place a small spoonful of the jam of your choice in the center. You don't want it to be too thick or the top crust will mound on top of it.
  5. Place the remaining rectangles of dough on top of the ones with jam. Crimp all four edges by hand or with a fork to ensure that your filling won't ooze out. I also poked the top of each with a fork, to vent them.
  6. Place the tarts on your prepared baking sheet, and bake for 7 to 8 minutes, or until light golden on the edges. Remove from the oven and let them cool completely.
  7. While the tarts cool, prepare your icing; make sure it is fairly thin but not so thin that it will just drip off. Once the pop tarts are cool, drizzle it on top. Garnish with sprinkles.
Thursday
Feb042010

Beet It: Beet Mash Chocolate Cupcakes with Beet Frosting Recipe

Photo credit: Bobby Marro Photography

Let's face it: beets are probably not going to be the first food you think of as an aphrodisiac. But maybe they should be--as the kind folks at Del Monte were more than happy to share with me, they are rich in boron, which is thought to "get the love juices flowing" (well, doesn't that beet all?)--and per Wikipedia,

Since Roman times, beetroot juice has been considered an aphrodisiac. The juice is a rich source of boron, which plays an important role in the production of human sex hormones. Field Marshal Montgomery is reputed to have exhorted his troops to 'take favours in the beetroot fields', a euphemism for visiting prostitutes.

Who knew, right?

But even sweeter than the love that these jewel-toned nuggets of natural goodness inspire are these delicious cupcakes--a recipe shared with me by Del Monte from Dave Lieberman:

Beet Mash Chocolate Cupcakes with Beet Frosting

Recipe care of Dave Lieberman, campaign spokesperson for the Del Monte “Value without Sacrifice,” Chef and Author of The 10 Things You Need To Eat

- Makes 12-15 cupcakes -

Ingredients For the cupcakes

  • One 14.5 oz. can sliced Beets, drained (Dave suggests Del Monte)
  • 2 sticks unsalted butter, melted
  • ½ cup vegetable oil
  • 2 ½ cups granulated sugar
  • 3 eggs
  • ½ cup warm water
  • 1 ½ cups all-purpose flour
  • ¾ cup sweetened cocoa
  • 2 teaspoons baking powder
  • ½ teaspoon salt

Ingredients for the Frosting

  • 2 sticks unsalted butter
  • Approx. ½ a can of sliced beets, drained (once again, you guessed it, Del Monte is suggested)
  • 1 pound confectioners sugar

Procedure

  1. For Cupcakes: Preheat the oven to 350ºF.
  2. In a small bowl, mash the drained can of beets finely with a potato masher and set aside.
  3. In a large mixing bowl, whisk together the melted butter, granulated sugar, oil, eggs, and water. In a separate bowl, whisk together the dry ingredients until thoroughly combined. Gradually mix the dry ingredients into the wet. Fold in the mashed beets and mix well.
  4. Pour the batter into greased cupcake tins. Bake about 15-20 minutes, until set but moist. (Or until toothpick inserted in the center comes out clean)
  5. Make the Icing: Mash the ½ can of beets finely with a potato masher. Melt 1 stick of butter in a saucepan and add mashed beets. Simmer on very low heat for 5 minutes. Meanwhile, cream the second stick of butter with a mixer in a bowl. Mix in the melted butter and beet mixture until fully incorporated. Gradually beat in the confectioners sugar.
  6. Frost the cooled cakes liberally with beet frosting.
Tuesday
Feb022010

Peanutty Buddies: The Famous Salted Peanut Crisps of 1950-55

So, I wasn't actually alive in 1950, but if I had been, I can tell you what cookie I would have been eating: the Salted Peanut Crisp. According to my favorite source for all things cookie, the Betty Crocker's Cooky Book , this cookie was in high demand mid-century. As the recipe introduction notes,

Cookies Please the Younger Set -- The baby boom, begun following World War II, continues in the new decade. With "kids" in the house, cookies disappear like magic and "moms" need quick and easy cookies like this one.

Now, perhaps it's not so unexpected that recipes containing peanuts in general were rising in popularity during this time--during the war, when meat shortages were common, peanuts and peanut butter became a much valued source of inexpensive protein. Of course, after becoming hooked on its deliciousness, peanut butter sandwiches were to become an enduring staple in lunches everywhere, and the cookies and confections containing the rich, flavorful stuff were here to stay.

And to that point, as is further noted in the recipe intro,

One of our home testers wrote, "My 12-year old son carried them out by the handful." "Only modesty prevents me from calling them perfect plus," said another tester.

And you know what? Over 50 years later, I concur. Of course, I made a couple small alterations in the recipe to better suit them for modern times--first, where the original calls for 2 cups of salted peanuts, I did about 1 cup salted peanuts and 1 cup peanut butter; this gave them a nice density and chewiness. Second, instead of dropping the dough on the cookie sheet by teaspoonfuls, I went ahead and used an ice cream scoop--so instead of 6 dozen small cookies, I got about 2 dozen jumbo cookies, some of which I stuffed with mini peanut butter cups inside the dough for an even more decadent outcome. And it turns out that bigger and more decadent is even better: these cookies managed to turn at least one peanut butter cookie hater into a believer, and I hear that they even derailed an Atkins Diet follower. Yes!

Here's the recipe:

Salted Peanut Butter Crisps 

(Note: Though they are officially "Salted Peanut Crisps", since I added peanut butter too I have taken liberties)

Adapted from Betty Crocker's Cooky Book  

Ingredients

  • 1 cup butter
  • 1 1/2 cups packed brown sugar
  • 2 eggs
  • 2 teaspoons vanilla
  • 3 cups flour
  • 1/2 teaspoon baking soda
  • 1 teaspoon salt
  • 1 cup salted peanuts
  • 1 cup peanut butter 

(Note: original recipe calls for 2 cups salted peanuts and no peanut butter; feel free to play with the ratios)

Procedure

  1. Grease or line a baking sheet with parchment; put to the side.
  2. Heat oven to 350 degrees F (original recipe calls for 375 but I found a longer bake at the lower temperature worked better, possibly because I made my cookies bigger).
  3. Mix butter, sugar, eggs, and vanilla thoroughly.
  4. Sift flour and blend with soda and salt; stir in with wet ingredients. Mix in peanuts and peanut butter.
  5. Using a cookie or ice cream scoop, scoop the dough and release onto your prepared baking sheet, leaving at least 2 inches between cookies. If desired, place a mini peanut butter cup in the center of the dough while it is still in the scoop, shaping the dough around it so that the dough fully covers the candy before releasing it on to the baking sheet. 
  6. Bake for 10-12 minutes, or until golden brown on the edges (if you make your cookies smaller, it may be more like 8-10 minutes).
Monday
Feb012010

Soup's On: Tomato Soup Cake Recipe from Baker's Cakes, Durham NC

Per Danielle of Baker's Cakes, "here's our family's cake recipe! I'm pretty sure this recipe originated during times when certain ingredients were in limited supply, much like the popular chocolate "crazy cake." Today, I guess it's vegan! This is essentially an interesting spice cake."

Nana Murphy's Tomato Soup Cake

(Makes 9" square pan)

  • 2 cups sifted flour
  • 1 cup sugar
  • 2 teaspoons baking powder
  • 1 teaspoon cinnamon
  • 1 teaspoon nutmeg
  • 1/2 teaspoon cloves
  • Dash of salt
  • 1 can tomato soup
  • 2 tablespoons oil
  • 1 can's worth of water
  1. Preheat oven to 35 degrees; grease a 9x9-inch baking pan (circle or square).
  2. Sift the dry ingredients, except for the baking soda.
  3. Mix 1 teaspoon baking soda into 1 can of tomato soup- stir vigorously then add to the dry ingredients.
  4. Add 2 tablespoons oil and 1 can of water and mix well.
  5. Stir in 1 cup of raisins and 1 cup of chopped pecans.
  6. Bake 35-45min in preheated oven, lightly greased pan, at 350 degrees.
  7. Frost with cream cheese frosting.

Danielle's Note: I like to make a White Chocolate Cream Cheese Frosting: Melt 1 bag (12oz) of white chocolate chips and beat into 1 package (8oz) room temp. cream cheese.

© Cakespy, all rights reserved. Powered by Squarespace.