Home Home Home Home Home Home Home
CakeSpy

Featured: 

My adventure at Ben & Jerry's in Vermont!


Unicorn Love: the Eating Disorder Recovery Blog


 Buy my brilliant books!

Buy my new book!

Buy my first book, too! 

CakeSpy Online Retail!


Archives
Gallery

Fantastic appliance for cake making on DHgate.com

everyrecipe.co.nz

Craftsy Writer

Entries in guest blog (62)

Monday
Nov092009

Sweet Bounty: Discovering the Art of the Venetian Table with Cake Gumshoe Megan

Venetian Dessert Table Guest post from Cake Gumshoe Megan
CakeSpy Note: Cake Gumshoe Megan thought she’d seen it all when it came to wedding desserts, but recently she was pleasantly surprised by what can only be described as a sugar smorgasbord.

The backstory: Over the weekend I attended my college roommate’s wedding. With seven bridesmaids, she was peppered with questions all throughout the rehearsal dinner, and most of mine revolved around the food. I’ve been to weddings with good, bad and no food, so I’m always curious what lies ahead.

I needn’t have worried. Beyond the endless finger foods the bridal party ate all day, the cocktail hour - which served more food than some people’s receptions - and then her actual reception, I should have been stuffed to the gills by the time dessert (literally) rolled around. And I actually was, but when the wait staff raced the loaded-down tables onto the dance floor, I had to make room.

Discovering the Venetian Hour: Whether you call it a Viennese or Venetian Hour, the point is decadence. Wikipedia defines a Venetian Hour as a Sicilian tradition in which the bride and groom display “a dazzling array of pastries, fruits, coffees, cakes, presented in great quantity with much celebration.” That’s a big ten-four. The dessert table at my friend’s wedding was a large oval made up of at least eight tables (I was too stunned to count) and involved pyrotechnics (see above photo).

We had our choice between fresh fruit kabobs and a chocolate fountain, an ice cream sundae bar featuring our choice of ice cream flavors as well as five different toppings and whipped cream and/or hot fudge, and then there were the cakes and cookies – tiramisu, diner-style strawberry shortcake, Black Forest, Napoleon, sfogliatelle, zeppole, Italian cookies…I could go on, but the liqueur shots taken out of edible (and yummy) chocolate thimbles made my memory a little fuzzy. I am absolutely not ashamed to admit my groomsman and I circled the tables twice!

Coming to America: While researching this delightful and heretofore unknown tradition, I realized it existed in small pockets of the US in another form. Brought to America by Italians and Eastern Europeans immigrants who settled into the industrial areas of northeastern Ohio and the coalmines of western Pennsylvania, it morphed into the cookie table, a common feature at weddings, showers, birthdays and graduations there.

For the wedding cookie table, the cookies are traditionally prepared by the bride’s female relatives. Each woman can be responsible for up to seven dozen cookies, depending on how many people participate. Communal baking also serves as a time for the women to catch up on each others’ lives.

In a very pleasant turn of events, researching this custom opened my eyes to the presence of it in my own childhood. I have relatives in central Pennsylvania, and every wedding I attended with that part of the family involved a cookie table. I thought it was just my aunt over-baking! I made so many trips to that table, hiding the cookies in my hand so my parents wouldn’t see how much I ate. And my aunt was always sending relatives home after the receptions with napkin-covered plates heaped with cookies of all flavors and types.

The final word: I’ve reached an age where my friends are starting to get married, so I’m going to do my part to bring this tradition to the mainstream. As far as I’m concerned, the more dessert, the better!

Wednesday
Nov042009

Gingerbread, Man: A Sweet Recipe from Cake Gumshoe Julia

Gingerbread cake, c/o Cake Gumshoe Julia
CakeSpy Note: This is a guest post and recipe from Cake Gumshoe Julia, a 26 old wife, exercise fiend, and baking enthusiast. She is always looking for ways to make recipes healthier and to enhance the fresh flavor (without losing deliciousness!). It can't always be done, but if it can be, then she will do it!  Her writing can be find at her site, Fat Girl Trapped in a Skinny Body.

Ever since I made the Ultimate Ginger Cookies a few days ago I have been craving gingerbread. I can't get it off my mind. What the heck, I figured--I should probably just make some. So when 5:15 am came Saturday morning I decided that was the perfect time to start my baking.

Things started out with a measure of uncertainty: the batter seemed a little too sweet and runny; I didn't know how the baked product would turn out. It was my first time in years to make gingerbread; I have been so focused on pumpkin and mint the past few fall seasons that I nearly forgot about gingerbread. But not this year, my friends. Gingerbread is reining supreme so far in Autumn 2009. And since this bread uses no oil or butter and even has some whole wheat flour, it's practically health food.

When the bread puffed up perfectly, I was so happy. And then when I tasted it, oh my word, success! The lemon is sort of an odd component to add to the cake, but it gives it an extra freshness. You could use orange as well and that would be wonderful. But don't omit the lemon!
Gingerbread cake, c/o Cake Gumshoe Julia
Gingerbread Cake

  • 1 cup all purpose flour
  • 1 cup whole wheat flour
  • 1 teaspoon baking soda
  • 1/2 tsp baking powder
  • 1/4 teaspoon salt
  • 1 1/2 teaspoons ground cinnamon
  • 1 teaspoon ground ginger
  • 1/8 teaspoon ground cloves
  • 1/2 cup apple sauce
  • 1/2 cup (105 grams) light brown sugar
  • 2 large eggs
  • Zest of 1 lemon
  • 1/2 cup unsulphured molasses
  • 1 cup 1% milk (you can use non-fat or whole also)

Procedure
  1. Preheat oven to 350 degrees and place rack in center of oven. Grease your pan of choice with non stick spray. Note: You have a variety of pan options: 24 Cupcake Pan (bake for only about 20 minutes) - 9 inch loaf pan - 9 inch round cake pan (bake for about 30-35 minutes). Set aside.
  2. In a bowl whisk together the flour, baking soda, baking powder, salt, ground cinnamon, ginger and cloves. Set aside.
  3. In a separate bowl of your electric mixer, beat the applesauce and sugar. Add the eggs, one at a time, beating well after each addition. Add the lemon zest and molasses and beat to combine. Add the dry ingredients and milk, alternately, beginning and ending with the dry ingredients. Beat just until incorporated.
  4. Pour the batter into the prepared pan and smooth the top with an offset spatula. Bake for 40-45 minutes or until a toothpick inserted into the center of the cake comes out clean. Remove from oven and let cool on a wire rack for 10 minutes before removing cake from pan. Let cool completely and then frost (I just used chocolate frosting from a can for the little cake. Remember, it was 5:15 Saturday morning. Making gingerbread was enough of an accomplishment that early).

Friday
Oct302009

Salty Sweet: Bacon Chocolate Ice Cream Recipe

Chocolate Bacon Ice Cream
CakeSpy Note: This is a guest post from Cake Gumshoe Bonnie, a 25 year old graduate student who finds sanity in the kitchen. If it doesn't turn out the first time, try again, and add some cinnamon; it always spices things up. She's on twitter too! Take it away, Bonnie:

I know it sounds disgusting. But you have to get past it and think of it like a chef: the perfect combination of salty and sweet will keep your guests wanting more. Did you know that the Lays potato chip people have this mixture down to a science? Those chips aren't that good, they just keep you wanting more sugar or more salt so you reach in handful after handful. So think of this creation as that: a perfect blend of salt and sugar that really does leave you wanting more.

Now, I must say that if I did this again I would use full fat ice cream. It is much better to have one scoop of full fat ice cream that is mouth-waterinlg good and has natural ingredients than have two scoops of non-fat ice cream that is so-so in taste.

Also, per my friend Julia's suggestion, I would make the bacon bits larger. I was so nervous about having bacon in ice cream that I cut them very small. The truth is they were very good, and thus we learn a lesson: if you are going to do something, be bold about it, and do it with gumption. Anyway, here we have it:
Chocolate Bacon Ice Cream

Chocolate Bacon Ice Cream

Ingredients:

  • 1 cup whole milk (I used Organic Rice Milk, pick your variation, but the less fat, the less creamy)
  • 6 ounces of bittersweet or semisweet chocolate
  • 2 cups low-fat vanilla yogurt (I used Organic Greek Yogurt to make up for the thin Rice Milk)
  • 1/4 cup sugar (Organic)
  • 6 strips of organic bacon
  • 6 tablespoons organic brown sugar

Note: It's all about what you have. You don't have the exact ingredients? Make a variation. You don't want to use whole milk? Don't. Try it out and if you hate it, then you learned for the next batch. No harm done.


Directions:
  1. Pre-heat the oven to 400 F. Cover a cookie sheet with aluminum foil, shiny side facing up. Place the bacon strips evenly on the cookie sheet and sprinkle about a tablespoon of brown sugar on the side facing up. Be generous, and if you need more, just use more. Don't be too uptight about measurements here.
  2. Once the oven is pre-heated, place the bacon inside the oven and set the timer for 12-14 minutes. Half way into the baking process, open to oven and use tongs to rub the bacon in the melted brown sugar and flip it over. This way, both sides are coated. Let it cook for the remaining time. You will know the bacon is ready because the brown sugar on and around the bacon will have turned a dark, maple brown. Remove from oven and set on a cooling rack to allow to cool. Once it has cooled, chop into small pieces, you can determine the size based on how prominent you want the bacon to be. Set aside.
  3. Now it's time for the ice cream/frozen yogurt part. Most ice cream makers call for the container to be frozen at least 24 hours before use, please check with the manual on this one. Combine the milk and chocolate in a blender or food processor, until smooth, about 20-30 seconds. Add the yogurt and sugar and process until smooth, about 15 seconds.
  4. Turn the Ice Cream machine ON and pour mixture into freezer bowl through the "pour spout" and let thicken which is about 25-35 minutes. You can watch the thickness here, and you can tell how it's turning out. In the last 5 minutes or so of mixing, pour the bacon into the mixture as it churns. Add the bacon in segments so that it gets all throughout the ice cream.
  5. Once the ice cream is all churned up, turn the machine to the OFF position and remove pouring spout and plastic "blade." Some ice cream will have stuck to the blade, just be patient and remove it with a spoon. Now you are ready to enjoy your treat. The freezer bowl should still be cold, so either scoop and enjoy immediately, or put into an air tight container and place into the freezer. If you are making the ice cream ahead of time, I would suggest the latter, and then placing it at room temp about 5-10 minutes before you are serving it. This will allow for it to soften just a bit.
  6. This dessert is so rich and flavorful, I would suggest serving as is. Some ice creams may need a bit of sauce or syrup, but that will overpower the flavor here, and take away from the combination of sweet and salty. Plus, the point is to taste the bacon. Oink, oink...enjoy!


Thursday
Sep242009

Drunken Cookies: The Hot Cookie Presents the Jagerdoodle

Jägerdoodles
CakeSpy Note: This is a guest blog post from Sarah of The Hot Cookie. Looking for a creative new cookie idea? Look no further:

What in the devil is a Jägerdoodle?

Well dear, when a Snickerdoodle and a shot of Jagermeister fall in love...umm...uh, I'll tell you when you're older.

Now, this is not necessarily an easy sell of a cookie. When I told my mom that I made a Jäger-y cookie, she asked me twice if I really put Jäger in the cookies. The answer was yes both times. Hence the name, ma. (Don't hate me for teasing you. Remember, you love me very much.)

Here the doodles are all dressed up in sugar and anise. Yes, anise. It enhances the Jageriness. Brace yourselves...bold flavor straight ahead. These spicy morsels can trick the eye, but definitely not the nose. You can smell that licorice-y goodness a mile away. It was torture for cookie-taster Karli, who is no fan of black licorice. What Jägermeister blasphemy!

Want to make your own Drunken Snickerdoodles or Jägerdoodles? Here is a basic field guide:

  • Prepare your favorite Snickerdoodle dough, using Jägermeister in place of the vanilla extract and anise in place of cinnamon. 
  • Eat them heartily with a tall glass of Jager...I mean milk...with a chaser of Jager...or...nevermind. 
  • You can also experiment with your favorite liquors and make an assortment of Drunken Snickerdoodles! Sounds like a party to me!

Sarah Richcreek and Karli Kujawa are the co-owners of The Hot Cookie. The two bake tiny, all-natural artisan cookies by hand for the good of humanity in Indianapolis, Indiana. You can keep updated on their goings-on via their blog, or (better yet!) buy their cookies online here.


Thursday
Sep242009

Cakespy Undercover: A Cake Gumshoe's Thoughts on Retro Bakery, Las Vegas NV

Java Cupcake Guest Post on Retro Bakery, LV
CakeSpy Note: This is a guest blog post from Betsy of Java Cupcake. To get the scoop on what sweet stuff she's been sampling, be sure to visit her site, and keep updated with her twitter feed!

When I spent last week in Las Vegas, NV with my husband, I knew that we needed to stop at Retro Bakery. Boy, it did not disappoint!

Just about 20 minutes from The Strip in Vegas, Retro Bakery is located just off the highway in a quaint little shopping center. I was greeted by a super cute, super friendly bundle of joy named Kari, whom I had messaged via twitter earlier that day to let her know I was coming.

Most importantly though: on to the cupcakes. There were so many delicious cupcakes to choose from--it was very hard to pick. My husband and I decided we'd each pick two.

I chose the Peanut Butter Cup (chocolate cake topped with peanut butter buttercream and dark chocolate shavings) and the Cinnamon Toast (vanilla cake topped with cinnamon buttercream dusted with cinnamon and sugar) while my husband chose the Cotton Candy (vanilla cake topped with pink cotton candy buttercream and blue glitter sugar) and the Creamsicle (vanilla cake topped with a vanilla/orange swirl buttercream).

The tag line on the bakery's business card is "It's All About the Buttercream" and they aren't kidding! The buttercream on these cupcakes was absolutely to die for. Creamy, flavorful, smooth... it just rolled across my tongue with each bite. Each buttercream flavor was distinctly the flavor it said it was going to be--so, for instance, when I bit into the peanut butter, it actually tasted like peanut butter, and surprisingly, the cotton candy buttercream tasted exactly like cotton candy!

As I look back, I wish I had tried one more cupcake with a different base flavor. We had three with vanilla and one chocolate. The chocolate was so delicious... moist and chocolatey; however, I have got to give it to the vanilla because it was by far the best vanilla cupcake I have ever tasted! It was dense, but not mushy, springy and moist, full of flavor and baked to perfection. I could have eaten those vanilla cupcakes alone if the buttercream had not been so heavenly!

So thank you to Kari for being so sweet when we came to visit! And thank you to Retro Bakery for making such delicious cupcakes! I can't wait to get back to Las Vegas to try four more flavors.

Retro Bakery, 7785 N. Durango Dr. #130, Las Vegas (702)586-3740; online at retrobakerylv.com. You can also follow them on Twitter, and if you want more of the inside scoop be sure to read the CakeSpy interview with owner Kari!

Sunday
Sep202009

Seeking Sweetness in Greenwich, London: Suggestions from Cake Gumshoe Luan

Rhodes Chocolate cake
CakeSpy Note: Have you found yourself hungry for sweet stuff in Greenwich? Thankfully Cake Gumshoe Luan (whose awesome photos you can check out here) has kindly donated some suggestions for where to get your sweet fix in the area. Here goes:

Greenwich is known for many things like being the home of time, the start of the meridian line, and the place Michael Jackson was due to play his comeback gigs this summer. It’s also full of cafes, and home to some of the tastiest cakes, tarts and tea in London.
Royal Teas Scone
For that traditional British experience of cream tea, I recommend Royal Teas, a tiny, cosy cafe hidden by Greenwich Royal Park.

You are served an endless supply of tea, freshly cut sandwiches with typically British fillings like cucumber or salmon, followed by a fat sultana studded scone which is served warm, accompanied by a small glass bowl of strawberry jam (I believe in the states you call it jelly) and another of clotted cream.

You can then choose a huge slice of homemade cake; they have ginger, chocolate, treacle, orange marmalade, banana, honey and carrot. I honestly can’t recommend one cake, they all taste like they’ve been baked with love by someone’s grandma and are too delicious.
Rhodes
While Royal Teas is typically British, the Rhodes Bakery is typically London. It’s pricey, full of busy coffee swigging important people and has surly staff, which is very common in London but all is forgiven when you see the cake counter.

This small glass fronted cafe sits on the corner of the antiques and craft market. Its founder Paul Rhodes is a triple Michelin chef who also runs a bakery/factory in the area that supplies all the top restaurants in London with their bread and cakes. Between the factory and cafe it claims to bake 2,000 cakes every day! While I couldn’t possibly eat all that myself, I love the idea of it.

The tart range includes chocolate, lemon and various fruit topped ones, which change with the seasons, like winter blackberries or summer strawberries. Rhodes also does giant jam biscuits, which are simple but always sway me with their prettiness; it also does a killer classic chocolate cake, chocolate brownie and pain au chocolate.

Though for sweet lovers the main plus point is that Rhodes offers a range of miniature pastries to help indecisive people, like myself, make a choice, or rather just try more.
Real Baking
Finally, Greenwich is also known for its great markets, which have the most random mix of everything, from Ethiopian cuisine stalls to craft stalls where they specialise in making Harry Potter characters out of pistachio shells.

The Real Baking Company is one of my favourites. Us Brits love to queue up, but when it comes to getting the last cupcake from this stall you have to do a bit of ruthless pushing and shoving to get served.

The cupcakes are so perfect looking; you would think they were display only, all pastel coloured and delicious. The sponge is fluffy and the frosting, which makes up about 60% of the cake, is just hmmm.

In winter the stall also does hot custard and sponge cakes.

The stall’s speciality is brownies and blondies, it starts every weekend morning with large trays of them which quickly disappear. It does a mean chocolate and raspberry swirl brownie, which is sickenly good. The chocolate is rich and dense, while the raspberry is really sweet and tangy, it really works but sadly my attempts to recreate have failed.

Places mentioned:

Royal Teas, online at royalteascafe.co.uk
Rhodes Bakery, online at rhodesbakery.co.uk
The Real Baking Company, part of the Greenwich Market; more information online here.

Thursday
Sep172009

Sugar Buzz: Gelato Martinis at Sugarland, Chapel Hill NC

Gelato Martinis at Sugarland, Chapel Hill NC
a sweet dispatch by Cake Gumshoe Shannon Connell

If you’ve never found yourself ordering a scoop of gelato with the phrase, “Shaken, not stirred,” then think twice.

Sugarland, a Chapel Hill-based bakery that’s been featured on Good Morning America has taken to serving up their gelato in the rare form of frozen gelato martinis. The flavors range from twists on classics such as gin and tonic, lemon drop and pina colada to the more inventive, including the Nutty Irishman, a blend of hazelnut gelato, Bailey’s Irish cream and vodka, and the Kiwi Kamikazi, a mix of kiwi gelato, a splash of lime, Midori and vodka.


During my visit to the sweet shop, I sampled Sugarland’s signature Tartini, named for the college town’s beloved Tar Heels. The Tartini is a creamy, blue concoction of lemon, peach, orange and pineapple that goes down cooler and smoother than traditional gelato-free martinis. The flavor was citrusy sweet, and the richly flavored gelato masked the unpleasant taste and burning sensation that can accompany alcoholic sippers.


Sugarland mixes up a variety of gelato martini flavors to fit a range of tastes. If you’re in the mood for something sweet and tart, then the Pink Pomegranate is your match. If you’re craving a richer, more decadent drink, then the Chocolate or Mochatini with a base of white chocolate gelato and Godiva liqueur is meant for you.
Sugarland Inside the Bakery
In addition to a bevy of gelato flavors, which can be served up straight (sans alcohol), Sugarland also offers coffee, cupcakes, cakes and other baked goodies made with local, organic products.

Sugarland, 140 East Franklin St., Chapel Hill, NC 919-929-2100; online at sugarlandchapelhill.com. For more of Shannon Connell’s work, check out her website here.


Monday
Aug242009

Put a Lid On It: How To Ship Cupcakes in Mason Jars, from Beantownbaker.com

How-to: Cupcakes in Jars, a guest blog post from Beantown baker
Continuing our monthlong celebration of birthdays and all things sweet, Jen from the very sweet site Beantown Baker has dreamed up a thoughtful way to share birthday cake with friends who are far away: cupcakes baked in Mason Jars! Here she goes:

One of the things I love most about baking is sharing my baked goods with other people. Whether it's baking something for a friend who had surgery, got a promotion, or for no reason at all, I get real joy out of baking for other people. Since most of my family is 1000+ miles away, they don't usually get to experience my baked goods. Last fall when we were coming into what I call birthday season, 6 birthdays from Oct-Dec, I really wanted to bake for my family members with birthdays coming up.

Since cupcakes are my favorite thing to bake, I decided to send them cupcakes. I had seen this idea online and decided to give it a shot. I sent cupcakes in a jar to family members across the country. They were all pretty shocked when the packages came. It was fun to get the phone calls from each of them thanking me for the creative way to share my baking with them. My Dad loved it so much, I've been told that he tells everyone about it. As a not-so-subtle hint, he also gave me a box of new jars for my birthday. I think he's expecting more cupcakes in a jar this year for his birthday!
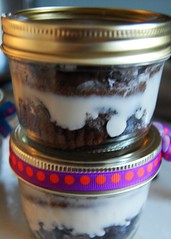
Cupcakes in Jars: Guest Blog from Beantown BakerCupcakes in Jars: Guest Blog from Beantown Baker

How to Make and Ship Cupcakes in Mason Jars


You'll need: a batch of cupcakes (Jen's recipe for Funfetti cupcakes with chocolate frosting follows); one half-pint Mason jar per cupcake, plus ribbon for garnish.
  1. Bake cupcakes as directed and allow to cool completely. Remove cupcake liner and cut cupcake in half either vertically or horizontally. Place 1/2 of the cupcake into a sterilized 1/2 pint wide mouth jar. Add frosting to jar. At this point, add some fun extra, such as crushed Oreos or sprinkles. Place the other half the the cupcake in the jar (if you cut the cupcake vertically, it is easier to put both halves in the jar and pipe frosting between the two pieces). 
  2. Frost the cupcake as if it weren't in a jar. Add lid and ring to jar. Decorate with ribbon if you want. Be sure to tell your recipients to slide the lid off the jar as opposed to just pulling it up. Otherwise half of the frosting will stick to the lid.
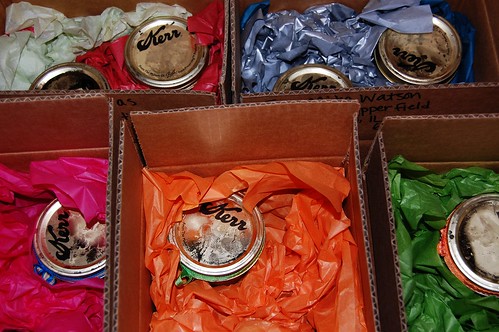
  3. Mail immediately or place in freezer for a day or two then mail them. I like to freeze them and let the thaw as they are traveling to the unsuspecting recipients.

Cupcakes in Jars: Guest Blog from Beantown Baker
Yellow Funfetti Cupcakes
  • 3 cups cake flour
  • 1 Tbsp baking powder
  • 1/2 tsp salt
  • 1 cup unsalted butter, cubed and softened to room temperature
  • 2 cups sugar
  • 5 large eggs
  • 2 tsp vanilla
  • 1 1/4 cups buttermilk
  • 1/4 cup sprinkles
Directions:
  1. Preheat oven to 350. Butter and line with parchment paper two 8×2-inch pans (These cakes rose over the top of my 2-inch pans - you could very well have a mess on your hands if you try 1.5 inch pans). Set aside.
  2. In a medium bowl, sift together the flour, baking powder, and salt. Place butter in the large bowl of an electric mixer, fitted with a paddle attachment. Beat for 3 minutes on MEDIUM-HIGH speed until the butter is light and creamy in color. Stop and scrape the bowl. Cream the butter for an additional 60 seconds.
  3. Add the sugar, 1/4 cup at a time, beating 1 minute after each addition. Scrape the sides of the bowl before each addition. Add the eggs one at a time. Reduce the mixer speed. Stir vanilla into the buttermilk. Add the dry ingredients alternately with the buttermilk. Mix just until incorporated. Scrape the sides of the bowl and mix for 15 seconds longer. Stir in sprinkles.
  4. Spoon the batter into the prepared pan and smooth the top with a knife or off-set spatula. Lift up the pan with the batter, and let it drop onto the counter top a couple of times to burst any air bubbles and allowing the batter to settle. Center the pans onto the lower third of the oven and let bake 45 to 50 minutes or until the cake is lightly brown on top and comes away from the sides of the pan and a toothpick inserted in the center comes out clean.
  5. Let cool completely in the pans before removing the cakes and frosting.

Chocolate frosting
  • 1 stick (1/2 cup) butter or margarine
  • 1/3 cup HERSHEY'S Cocoa
  • 3 cups powdered sugar - I used 2 1/2 cups
  • 1/3 cup milk
  • 1 teaspoon vanilla extract
Directions: 
Melt butter. Stir in cocoa. Alternately add powdered sugar and milk, beating to spreading consistency. Add small amount additional milk, if needed. Stir in vanilla. About 2 cups frosting.


Keep updated on all of Jen's sweet adventures on beantownbaker.com!


Sunday
Aug162009

Taste the Rainbow: A Homemade Funfetti Recipe from iheartcuppycakes

Sprinkles have been spilled.
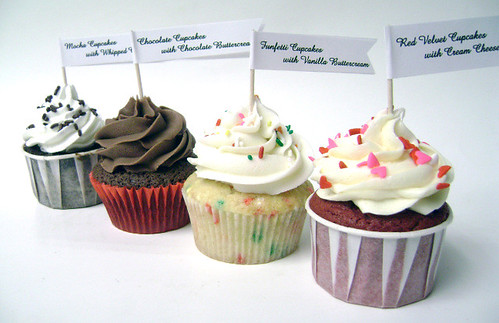
Continuing our monthlong celebration of birthdays and all things sweet, CB from the inimitable iheartcuppycakes.com has kindly donated not only some sweet birthday memories, but also her super sweet recipe for homemade Funfetti Cupcakes. All the fun of a classic childhood treat--but grown up for more adult palates. Here goes:

My birthday is in July. I'm an Independence baby. Tom Cruise eat your heart out! When I was very little my mom would make me a Funfetti birthday cake from cake mix while I "helped" by licking the beaters. It was my favorite part! Even to this day. Don't judge me! It's Funfetti. HA! I think that's why I am not as anti-cake mix like some other bakers because of those great birthday memories with my mom.
Guest post from iheartcuppycakes

Here is my recipe for homemade Funfetti Cupcakes:

Funfetti Cupcakes


Recipe adapted from Cupcakes by Shelly Kaldunski


Makes about 12 cupcakes

For the cupcakes

  • 1-1/4 cups AP flour
  • 1-1/2 tsp baking powder
  • 1/4 tsp salt
  • 3/4 cup sugar
  • 6 tbsp butter, room temperature
  • 1 large egg + 1 egg white, room temperature
  • 1 tsp vanilla extract
  • 1/2 cup milk (I used half-and-half instead)
  • 2 tbsp rainbow sprinkles

For vanilla buttercream
  • 2 sticks butter
  • 7 cups powdered sugar, sifted
  • 1/4 cup milk
  • 1 teaspoon vanilla

Guest post from iheartcuppycakes
Instructions


To make cupcakes—

  1. Preheat oven to 350F.
  2. Line cupcake pan with paper liners.
  3. In a large bowl, sift flour, baking powder and salt. Set aside. In a stand mixer, fitted with flat beater, beat the sugar and butter until well combined, about 2-3 minutes. Add egg and egg white, one at a time, beating on low.
  4. Then add vanilla. Gradually add flour mixture in 3 additions, alternating with milk in 2 additions, ending with the flour mixture. Fold in rainbow sprinkles.
  5. Fill cupcake liners about 1/2-2/3 full. Bake for about 17-20 minutes or until a toothpick inserted in the middle comes out clean. Remove from pan and cool completely on a wire cooling rack before frosting.

To make buttercream—
In a stand mixer, fitted with flat beater, beat butter until creamy, about 2-3 minutes. Add 5 cups of sifted powdered sugar, milk, and vanilla, beat until combined. Add more powdered sugar until you get to the consistency you want.


[NOTES: I think I added about 6-1/2 cups, give or take a few tbsp, to get the consistency I wanted. If its too stiff, you can add a little more milk.]

Frost with vanilla buttercream and garnish with more rainbow sprinkles.

ENJOY!


Keep up with CB at iheartcuppycakes.com or via her twitter feed!


Thursday
Aug132009

Guest Blog Post: Lemon Berry Cupcakes by Pâtisserie Natalie

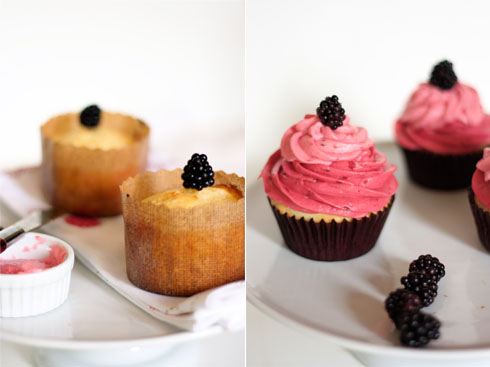
Lemon Berry Cupcakes by Pâtisserie Natalie
When you visit Pâtisserie Natalie, you'll undoubtedly be impressed. The pictures are simply gorgeous; the recipes are creative and sophisticated, yet unfussy.

But you'll be even more impressed knowing that the baker/writer/photographer behind it all is still in high school. No, really.

With a professional-looking portfolio of photographs and recipes already under her belt, Natalie's future sure does look sweet; happily, she has prepared a guest post exclusively for CakeSpy.com! Here goes:

Hi, my name is Natalie, from Pâtisserie Natalie. I'm so excited to get to do a guest post for CakeSpy; I've been a fan for a long time. I'm a high school student from Seattle who loves photography, food styling, and baking. I've been interested in the arts since I was really little, and found my real calling through blogging. I didn't discover the food blogging world until recently. I also didn't realize how much I would love it. My blog gives me a way to share my design and creative flow with other people, as well as see other artist's work.

Lemon Berry Cupcakes by Pâtisserie Natalie
I started baking more seriously about 2 years ago, but it is now an addiction. Ask anyone who knows me and they will tell you I am more frequently in the kitchen then not. I absolutely cannot stay away from my kitchen aid mixer and my camera. I am self-taught in html/css coding, and do all my own graphics and layout work for my blog (CS Note: she's interested in pursuing a career in web/graphic design and photography).

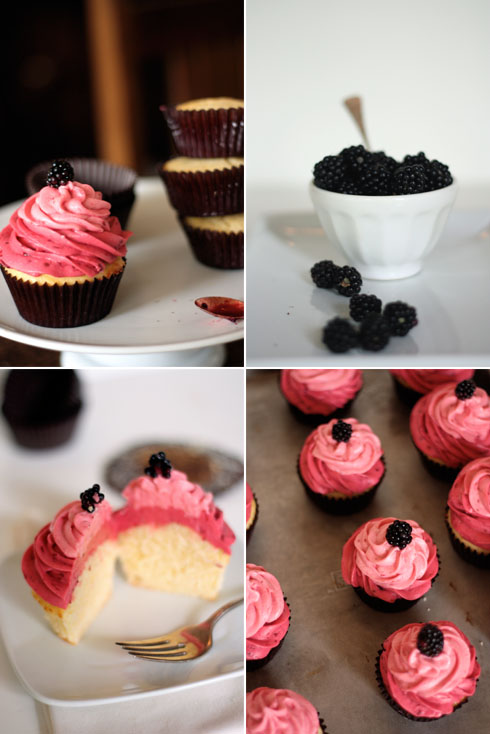
I decided to make these Lemon Berry Cupcakes because as many people know, Seattle doesn't have that many sunny days during the year. Summer flavors for me are lemon and berries. Seeing as the sunny days are limited, I felt that I needed to make something that used those flavors. While I don't mind the rain at all (I love it, actually), many people are a little bummed that our summer days here are ending. With that in mind, I made these cupcakes as a sort of "summer revival." I've been working on the recipe for this lemon pound cake for a while, but I think I've finally got it. I'm often disappointed by lemon cake, as it doesn't actually taste lemony. That is not a problem for this cake at all. It's very moist and soft, which is not usually the case with pound cake. The frostings are made from raspberries and blackberries, which is why those frostings are so pink.


Lemon Pound Cake

  • 3 cups all purpose flour
  • 1 teaspoon salt
  • 1/2 teaspoon baking powder
  • 1/2 teaspoon baking soda
  • 2 sticks unsalted butter; softened
  • 2 cups sugar
  • 3/4 cup plain yogurt
  • 3 tablespoons lemon zest
  • 2/3 cup lemon juice
  • 5 eggs
  1. Preheat oven to 350 degrees F.
  2. Sift together the flour, salt, baking powder, and baking soda. Whisk together in a large bowl thoroughly, and set aside.
  3. In a stand mixer, beat butter and sugar until smooth.
  4. In a medium bowl, stir together yogurt, lemon zest, and lemon juice.
  5. Add the eggs to the butter and sugar one at a time, beating in between each addition.
  6. With the mixer on a low speed, add the flour mixture in 3 parts, alternating with the yogurt mixture in 2 parts. Start and end with the flour mixture.
  7. Line a muffin pan with paper liners and scoop even amounts of the batter into the cups, filling almost to the top.
  8. Bake for 16 minutes, rotating the pan after 8 minutes. Once golden brown around the edges, remove from oven and place on a cooling rack for at least 2 hours before icing.


Lemon Berry Cupcakes by Pâtisserie Natalie
Blackberry & Raspberry Buttercreams

  • 2-1/2 sticks unsalted butter; softened
  • 1 teaspoon salt
  • 2-1/2 cups powdered sugar; sifted
  • 1/4 cup blackberry sauce
  • 1/4 cup raspberry sauce
  1. Beat butter and 1 cup of powdered sugar until smooth. Divide into two parts, removing half from the mixer bowl. Add the blackberry sauce to the mixer bowl, along with 3/4 cup of powdered sugar. Place buttercream in a piping bag and pipe a circle around the outer edge of the cupcake top, spiraling in towards the center.
  2. In the same mixer bowl, add the remaining half of the butter and powdered sugar that was set aside. Add the raspberry sauce and 3/4 cup powdered sugar and beat until smooth. Place in a piping bag and pipe an extra dollop on top of the blackberry buttercream.

Blackberry Sauce
  • 1 cup blackberries
  • 2 teaspoons sugar
  • 1 teaspoon lemon or lime juice
Combine ingredients in a sauce pan and place over medium heat. Stir frequently until juices from berries boil. Using a wooden spoon, crush the berries in the pan. Let boil for 2 minutes to make sauce more dense. Strain the mixture if you prefer to have smoother frostings. Cool in refrigerator.

Raspberry Sauce
  • 1/2 cup raspberries
  • 2 teaspoons sugar
  • 1 teaspoon lemon or lime juice
Combine ingredients in a sauce pan and place over medium heat. Stir frequently until juices from berries boil. Let boil for 2 minutes to make sauce more dense. Cool in refrigerator.


© Cakespy, all rights reserved. Powered by Squarespace.