Home Home Home Home Home Home Home
CakeSpy

Featured: 

My adventure at Ben & Jerry's in Vermont!


Unicorn Love: the Eating Disorder Recovery Blog


 Buy my brilliant books!

Buy my new book!

Buy my first book, too! 

CakeSpy Online Retail!


Archives
Gallery

Fantastic appliance for cake making on DHgate.com

everyrecipe.co.nz

Craftsy Writer

Entries from November 1, 2009 - November 30, 2009

Wednesday
Nov042009

Gingerbread, Man: A Sweet Recipe from Cake Gumshoe Julia

Gingerbread cake, c/o Cake Gumshoe Julia
CakeSpy Note: This is a guest post and recipe from Cake Gumshoe Julia, a 26 old wife, exercise fiend, and baking enthusiast. She is always looking for ways to make recipes healthier and to enhance the fresh flavor (without losing deliciousness!). It can't always be done, but if it can be, then she will do it!  Her writing can be find at her site, Fat Girl Trapped in a Skinny Body.

Ever since I made the Ultimate Ginger Cookies a few days ago I have been craving gingerbread. I can't get it off my mind. What the heck, I figured--I should probably just make some. So when 5:15 am came Saturday morning I decided that was the perfect time to start my baking.

Things started out with a measure of uncertainty: the batter seemed a little too sweet and runny; I didn't know how the baked product would turn out. It was my first time in years to make gingerbread; I have been so focused on pumpkin and mint the past few fall seasons that I nearly forgot about gingerbread. But not this year, my friends. Gingerbread is reining supreme so far in Autumn 2009. And since this bread uses no oil or butter and even has some whole wheat flour, it's practically health food.

When the bread puffed up perfectly, I was so happy. And then when I tasted it, oh my word, success! The lemon is sort of an odd component to add to the cake, but it gives it an extra freshness. You could use orange as well and that would be wonderful. But don't omit the lemon!
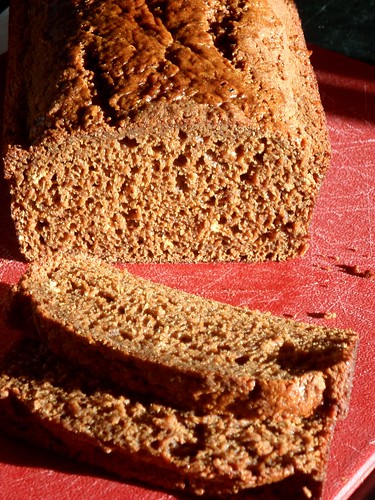
Gingerbread cake, c/o Cake Gumshoe Julia
Gingerbread Cake

  • 1 cup all purpose flour
  • 1 cup whole wheat flour
  • 1 teaspoon baking soda
  • 1/2 tsp baking powder
  • 1/4 teaspoon salt
  • 1 1/2 teaspoons ground cinnamon
  • 1 teaspoon ground ginger
  • 1/8 teaspoon ground cloves
  • 1/2 cup apple sauce
  • 1/2 cup (105 grams) light brown sugar
  • 2 large eggs
  • Zest of 1 lemon
  • 1/2 cup unsulphured molasses
  • 1 cup 1% milk (you can use non-fat or whole also)

Procedure
  1. Preheat oven to 350 degrees and place rack in center of oven. Grease your pan of choice with non stick spray. Note: You have a variety of pan options: 24 Cupcake Pan (bake for only about 20 minutes) - 9 inch loaf pan - 9 inch round cake pan (bake for about 30-35 minutes). Set aside.
  2. In a bowl whisk together the flour, baking soda, baking powder, salt, ground cinnamon, ginger and cloves. Set aside.
  3. In a separate bowl of your electric mixer, beat the applesauce and sugar. Add the eggs, one at a time, beating well after each addition. Add the lemon zest and molasses and beat to combine. Add the dry ingredients and milk, alternately, beginning and ending with the dry ingredients. Beat just until incorporated.
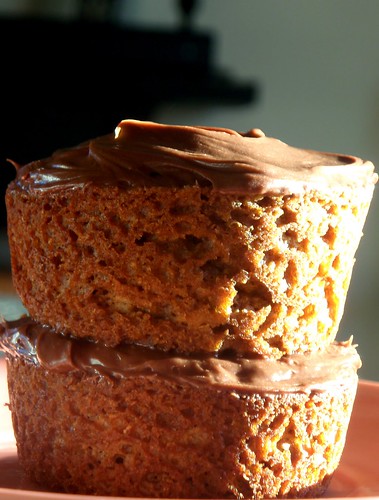
  4. Pour the batter into the prepared pan and smooth the top with an offset spatula. Bake for 40-45 minutes or until a toothpick inserted into the center of the cake comes out clean. Remove from oven and let cool on a wire rack for 10 minutes before removing cake from pan. Let cool completely and then frost (I just used chocolate frosting from a can for the little cake. Remember, it was 5:15 Saturday morning. Making gingerbread was enough of an accomplishment that early).

Tuesday
Nov032009

Batter Chatter: Interview with Food Photographer Ryan Nowell

Photo by Ryan (used for interview)
One of the best parts of looking at food websites and recipe books--bar none--is the pictures. A compelling food photo can draw the viewer in, evoke taste memories, and create new appetites. But what goes on behind the lens? Who could tell us better than Ryan Nowell, a Portland-based photographer with a great eye, and a penchant for sweets (as evidenced by the collaborative blog, The Chef and the Photographer, which he writes with his pastry chef wife).

CakeSpy: What was the last sweet you ate?
Ryan Nowell: Well the last baked good was the Chocolate Bundt cake from this post on our website. I actually ate the piece in the picture the evening of the same day. I may be biased but it really was wonderful! Nice and dense but not too chocolatey. We missed out on taking a photo of the whole thing.....wanted to eat it too much! The outside was nice and shiny and would have made a great shot. Oh well, good excuse to make another.

Photo by Ryan (used for interview)
CS: Tell me what photography means to you.
RN: Photography is really a great way to show people what I see in everyday items and moments. I always feel like there are so many wonderful images that we are surrounded by but most people are too busy to notice. Food especially is something that everyone enjoys and by taking photos it makes it easier to explain how all the ingredients came together.
Photo by Ryan (used for interview)
CS: As a photographer, how does food stack up to other subject matter (people, landscapes, etc)?
RN: Food is just about the easiest and sometimes the most challenging as compared to people or landscapes. People are really great to work with but it can sometimes depend on the person. I like to shoot candids which can sometimes catch people off guard and not everyone, in my experience, likes to have their photo taken. Landscape is another of my favorite subjects. Living in the Northwest really gives you so much to shoot but can sometimes be a challenge when its raining most of the year. With food, you have complete control of everything in the image but then some elements can be tricky to control and light. I like to mostly use natural light when its available but other times I use a light box I made at home to mimic natural light and to help with shadows. Shadows in food can be tough since each object will have so many angles, textures, and colors. Sometimes shadows can really take away from what you would normally see with your eye which has the ability to adjust to light in a fraction of a second. I don't use any flash at all at the moment which makes me work a little harder to work with what I am given.

CS: Tell more about your blog, Chef & Photographer. How did it come about?
RN: Our blog came about with my love of photography and my wife's culinary passion. Its a great way for us both to work together and to then enjoy her creations and share them with family, friends and anyone that may come across the site. It's also a great way for my wife to document a recipe that she has created and reference it later if she needs to. She also really enjoys the challenge of the setup of the shot and really does most of the styling of the food since she is sometimes looking for a specific look or detail in the food.

CS: Your wife is a pastry chef (!). What is your favorite dessert that she makes?
RN: Yes, my wife is a Pastry Chef and teaches at a local culinary school. I am not sure if I have a favorite since she hardly makes the same thing twice but a few of my favorites are her Cheesecake and Pumpkin Pies. Luckily many recipes have been created and tested on me which I thoroughly enjoy!!
Photo by Ryan (used for interview)
CS: It seems that the desserts featured on your blog seem to honor seasonal ingredients. How does it change food to keep your ingredients seasonal/local?
RN: We do try to use as much local ingredients as possible. We have a modest garden in our backyard and sometimes we end up with more then we can eat which gives my wife some more inspiration to try and create something savory or even desserts using vegetables.
Photo used w/Permission from Coco & Co
RS: You recently did some photography for the Coco and Co. Chocolates site. Now, chocolate seems like it's a particularly hard food to shoot and make look good. Any tips for getting sexy chocolate shots?
RN: The main issue with chocolate is lighting for sure. For the chocolate truffles for Coco and Co., I used the light box I mentioned earlier. It really cancels out the shadows nicely and helps to light up all sides of the truffle and works well with any textures that be present.
Photo by Ryan (used for interview)Photo by Ryan (used for interview)
CS: Where else can we view (or purchase/ commission?) your photography?
RN: I am about to release my website which will be coming soon! It will be ryannowellphotography.com. In the meantime, check out Ryan's photos via Flickr!

Tuesday
Nov032009

Candy Massacre: Leftover Halloween Candy Pie for Serious Eats

Leftover Halloween Candy Pie
Poor Halloween candy. Just a few days ago it was the star of the supermarket aisle, the festive treat on everyone's mind. But now, just two days later, these sweet treats are Halloween has-beens, relegated to sale bins, withering away in candy dishes.

But is there a way to breathe new life—to re-animate, if you will—this past its prime candy? I propose yes: by dumping it in a pie shell and melting it into one monstrous mash of a candy pie.
Leftover Halloween Candy Pie

This pie was the subject of my weekly sweet writeup over at Serious Eats--why not click over and check out the full post plus recipe?

Tuesday
Nov032009

Candy Massacre: Leftover Halloween Candy Pie for Serious Eats

Sunday
Nov012009

Pie Time: The Most Amazing Pumpkin Banana Cream Pie with Brandy Whipped Cream

Pumpkin Banana Mousse Tart with homemade brandy whipped cream
There are pies--and then there are truly great pies. And it's my great pleasure to introduce you to one of the truly great ones: Pumpkin Banana Cream Pie with Brandy Whipped Cream. This triple-decker treat is a triple-threat of awesome, combining recipes by Ina Garten and Tom Douglas, with some added variations (like Brandy whipped cream) dreamed up by my friend Nurit, ace baker and writer of 1 family. friendly. food., with whom I baked this hunk of delicious the other day. But really, words are wasted when we could be talking about how to get on the express train to having this pie in your mouth:

Pumpkin Banana Mousse Tart with homemade brandy whipped cream
Pumpkin Banana Cream Pie with Brandy Whipped Cream

Nurit's Note: We used an 11-inch tart pan but you can use a regular pie pan. In any case, you probably will have some extra custard which you can layer and serve in pretty little bowls. (Check her site for her own posting about the pie, and check back soon for a separate post about this dessert!)

More notes:The pumpkin custard is based on Ina Garten’s Pumpkin Banana Mousse Tart and the vanilla custard is based on Tom Douglas’s Coconut cream pie (but substituting banana for coconut). The dough was from a recipe of Nurit's, and the brandy whipped cream (ethereal!) was her brainchild as well.

For the dough:
2 sticks unsalted butter
2 tablespoons sugar
2 cups self-rising flour
2 egg yolks
3/4 cup banana chips, crushed in food processor

For the pastry cream:
2 cups milk
1 teaspoon vanilla extract plus 1 teaspoon vanilla paste (the original recipe called for 1 vanilla bean, split in half lengthwise)
2 large eggs
1/2 cup plus 2 tablespoons sugar
3 tablespoons all-purpose flour
1/4 cup (1/2 stick) unsalted butter, softened

1-2 bananas thinly sliced

For the pumpkin custard layer:
1/2 cup half-and-half
1 (15-ounce) can pumpkin puree
1 cup light brown sugar, lightly packed
3/4 teaspoon salt
1/4 teaspoon ground ginger
A pinch ground nutmeg
3 extra-large egg yolks
1 package (2 teaspoons) unflavored gelatin
1 ripe banana, finely mashed
1/2 teaspoon grated orange zest
1/4 cup orange juice

For whipped cream:
1 1/2 cups heavy cream, chilled
1/4 cup sugar
1 1/2 tablespoons brandy

Make the dough. 

  1. Pulse butter, sugar, and flour in a food processor, or do it with hands, until you get big crumbs. Add the yolks, pulse until the crumbs are moist. Press into a generously greased 11-inch tart pan. Press banana chips into dough. Refrigerate covered for 30 minutes or so. 
  2. Bake at 375 F for 20-25 minutes.

Make the pastry cream. 
  1. Warm the milk in a medium saucepan until it almost comes to a boil. Add the vanilla. (If using a vanilla bean, scrape the seeds from the bean and add both the seeds and pod to the milk mixture. Place the saucepan over medium-high heat and stir occasionally.)
  2. In a bowl, whisk together the eggs, sugar, and flour until well combined. Temper the eggs (to keep them from scrambling) by pouring about 1/3 cup of the scalded milk into the egg mixture while whisking. Then add the warmed egg mixture to the saucepan of milk. Whisk over medium-high heat until the pastry cream thickens and begins to bubble. Keep whisking until the mixture is very thick, 4 to 5 minutes more.
  3. Remove the saucepan from the heat. Add the butter and whisk until it melts. (Remove and discard the vanilla pod.) Transfer the pastry cream to a bowl and place it over a bowl of ice water. Stir occasionally until it is cool. Place a piece of plastic wrap directly on the surface of the pastry cream to prevent a crust from forming and refrigerate until completely cold. The pastry cream will thicken as it cools.

Make the pumpkin custard layer.
  1. Heat the half and half, pumpkin, brown sugar, salt, ginger, and nutmeg in a heat-proof bowl set over a pan of simmering water until hot, about 5 minutes. Whisk the egg yolks in another bowl, stir some of the hot pumpkin into the egg yolks to heat them, then pour the egg-pumpkin mixture back into the double boiler and stir well. Heat the mixture over the simmering water for another 4 to 5 minutes, until it begins to thicken, stirring constantly (so the eggs to scramble) until it reaches 160 F degrees. Remove from the heat.
  2. Dissolve the gelatin in 1/4 cup orange juice (or water). Add the dissolved gelatin, banana, and orange zest to the pumpkin mixture and mix well. Set aside to chill in the fridge or use the same ice bath as the vanilla cream.
Make the whipped cream.
  1. In an electric mixer with the whisk, whip the heavy cream with the sugar and brandy on medium-high speed until firm peaks form.
Pumpkin Banana Mousse Tart with homemade brandy whipped creamGoodbye, pie
Assemble it all.
When the custards and dough are cooled, assemble the pie by layering the fresh bananas on top of the dough. Then spoon with vanilla cream on top, smoothing the surface. Next, add the pumpkin custard, and last spoon the whipped cream. Decorate with banana chips or fresh banana slices (add fresh banana only shortly before serving so they don’t brown). Let pie set in the refrigerator for at least 2 hours before serving.

Keep up with my friend Nurit by visiting her site and by following her on twitter!

Page 1 ... 1 2 3 4 5
© Cakespy, all rights reserved. Powered by Squarespace.