Home Home Home Home Home Home Home
CakeSpy

Featured: 

My adventure at Ben & Jerry's in Vermont!


Unicorn Love: the Eating Disorder Recovery Blog


 Buy my brilliant books!

Buy my new book!

Buy my first book, too! 

CakeSpy Online Retail!


Archives
Gallery

Fantastic appliance for cake making on DHgate.com

everyrecipe.co.nz

Craftsy Writer

Entries from November 1, 2014 - November 30, 2014

Thursday
Nov062014

Simple, French, Perfect Tarte au Citron, or Lemon Tart

Lemon tart - Maria Zihammou

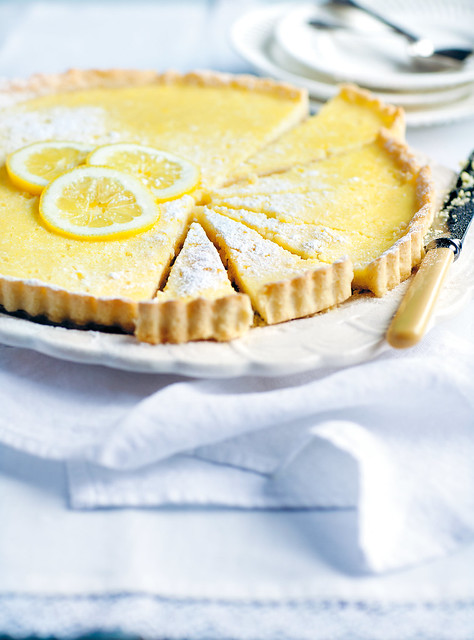
When I went to Paris, I learned once and for all that there is a difference between the tarte au citron (lemon tart) and its American cousin, Lemon bar. What is the difference? Well, the tartes are French, and therefore slightly better in every way. Here's how you make them. This lovely recipe is excerpted from French Bistro: Restaurant-Quality Recipes for Appetizers, Entrées, Desserts, and Drinks.

PS: want to read more about my overseas adventures? Here's a roundup of my last trip to Paris.

French Bistro Maria Zihammou

Lemon tart

Lemons are always in my kitchen at home—a favorite ingredient that I just can’t do without. They have a wonderful, fresh sourness that’s lovely in a creamy tart that might otherwise be too heavy and sweet. Delightfully delicious, citrusy lemon tart that simply melts in your mouth. Mmm. . .

6-8 people

dough

  • 7 tbsp (100 g) butter, room temperature
  • 1½ cups (350 ml) wheat flour
  • 1 egg yolk
  • 1 tbsp powdered sugar
  • 1 tbsp cold water

filling

  • 5 eggs, preferably organic
  • 4 organic lemons
  • 1 tbsp lemon zest
  • ½ cup (100 ml) whipping cream
  • ½ cup (100 ml) granulated sugar
  • powdered sugar, for decorating
  • whipped cream, for serving, optionally

Procedure

  1. Preheat the oven to 350°F (175°C). Start by making the dough. Mix the butter, flour, egg yolk, powdered sugar, and water. Knead together with a light touch to form a smooth dough. Press out the dough in a spring-form pan, about 9½ inches (24 cm) in diameter. Pre-bake the crust for about 10 minutes until it’s a light golden color. Take it out and let it cool.

  2. Meanwhile, make the filling: whisk together the eggs in a bowl. Squeeze in the juice from the lemons, and grate 1 tbsp of lemon zest into the bowl. Add the whipping cream and sugar, then whisk thoroughly.

  3. Fill the cooled crust with the lemon cream and cook the tart for about 30 minutes, until the cream has set and feels a bit firm. Allow the tart to cool, and decorate it with the powdered sugar. Good on its own, or with whipped cream.

Excerpted with permission from French Bistro: Restaurant-Quality Recipes for Apetizers, Entreés, Desserts, and Drinks by Maria Zihammou. Photography by Åsa Dahlgren. Copyright 2014, Skyhorse Publishing, Inc.

Tuesday
Nov042014

Slivers of Sweet Bliss: Chocolate Covered Slices of Pie

The big news today is this: chocolate covered slice of pie. 

Not that you need more explanation, but since I am a giving person by nature, I'll tell you more. Basically, the story goes like this. First, you bake a pie. You're so excited about this recipe. And when it comes out of the oven and has cooled, you couldn't imagine being more excited about a dessert.

But then, a few days later, the pie has dwindled down to the last slice and suddenly you find yourself dreaming of different desserts. Better desserts. Fresher and prettier desserts.

That's one sad unwanted slice of pie. You could write a poem about it, it's that sad. 

It's at exactly that moment that you need to take action so that final slice isn't just discarded like yesterday's news. That's when you do the following:

Coat the whole slice of pie in chocolate.

The benefits of covering a pie slice in chocolate are many. To list a few:

  • Let that pie slice burn out, not fade away!
  • You get to melt chocolate and pour it on top of something you're going to eat. This always brings me joy.
  • Most things taste better coated in chocolate, let's face it. Pie is no exception.

I first had this idea while taking a long, hard look at aforementioned sad slice of pie and trying to think of a non-milkshake solution to making it an awesome treat (I mean, I've done that before).

Turns out, coating a slice of pie in chocolate is not only funny to talk about, but it also tastes delicious. The slice in question here was from a sweet potato pie; the spicy-earthy flavor paired with the chocolate became a new dessert entirely, almost like a pumpkin truffle (since I've never seen a sweet potato truffle) but expanded to a much, much bigger scale. And, you know, with crust. 

Crust, I should say, LOVES being coated in chocolate. The buttery-flakiness is a dream when coated in chocolate, to the point where I wonder why choco-covered pie crust isn't a thing. 

But I digress. A few recipe notes:

I have based this on a single-serve basis; simply double the amount of chocolate for more slices. 

While I used a slice of sweet potato pie, I have wracked my brain for a type of pie I don't think would taste better coated in chocolate, and haven't come up with one yet.

In terms of ease of eating, you don't want the chocolate to set up entirely. You want it to set in the fridge for maybe 10 minutes, so that it has firmed but still yields when you cut into it with a fork or spoon. That is the exact best texture for the chocolate for maximum enjoyment while eating.

OK, ready? Here's the recipe.

Chocolate covered slices of pie

Makes one

You need:

  • 2 ounces chocolate, chopped coarsely
  • slice of pie 
  • spatula
  • microwave-safe bowl
  • spoon

Procedure

  1. Melt the chocolate, either in the top of a double boiler or in the microwave in short increments until it is mostly melted--the rest should melt in the residual heat if you give it a stir with a spatula.
  2. Place your slice of pie on a rack or surface that will allow excess chocolate to drip through rather than pool up at the foot of the pie. Place something below it so that you don't get all messy.
  3. Using the spatula or a spoon (or a combo), coat the pie all over with chocolate. Take care to get into the nooks and crannies, the sides and the back. Cover EVERYTHING with chocolate.
  4. Transfer to a plate, and place in the refrigerator for about five to ten minutes. This should allow the chocolate to lightly set, but not become firm.
  5. Remove and eat immediately, because that texture of slightly set but still yielding is the best moment to eat this pie for maximum pleasure.

Pleasuretown population = you.

Tuesday
Nov042014

Sweet Scenes from the Ybor Saturday Market Annual Cupcake Festival 

Follow the Red Velvet Guest blog post

CakeSpy Note: this is a delicious dispatch from Cake Gumshoe Aditi, who blogs at Follow the Red Velvet Road. Do follow her sweet adventures, starting with this one:

Ybor Saturday Market Annual Cupcake Festival 

Saturday, October 18th, 10:00am – 3:00pm

Since I moved to Tampa, I have been looking forward to this day. As a cupcake enthusiast, I have been searching for a festival that honors the glory that is the cupcake. After returning to the U.S. from Uganda, I did a great deal of research, looking for festivals or special days for cupcakes. Unfortunately, I wasn’t very successful…until I looked in Tampa.

Follow the Red Velvet Guest blog post

Every Saturday, the city of Ybor hosts a Saturday market. Most Saturdays it a market where individuals promote their small businesses by selling items. There is also a fresh produce market and various food stalls. Once a year, in the fall, there is a special themed Saturday Market especially devoted to cupcakes. On this day, cupcake bakeries from all over the Tampa Bay area are welcome to show off their best and most delicious treats.

Follow the Red Velvet Guest blog post

This year amateur bakeries were also encouraged to join in the festivities, including a cupcake competition. Bakers were judged on presentation as well as taste.

Follow the Red Velvet Guest blog post

At the event this year, there were 17 local bakers competing. The bakers ranged from professional pastry chefs to at home bakers. Most had store-fronts or online order shops, but there were a few who did bake for fun, not necessarily for money.

Follow the Red Velvet Guest blog post

The competition was solid this year. The local bakers as well as the home-based first timers were really bringing their A game. Traditional cupcake flavors like red velvet and chocolate peanut butter were present along with some really unique tastes, like chocolate Reese’s cupcakes and a Guinness stout cupcake. Follow the Red Velvet Guest blog postI believe the judges had a hard time this year, but one baker came out on top. “A Piece of Cake” bakery, located on West Hillsborough Avenue, took the first prize for taste. They concocted a Guinness stout chocolate cupcake with buttercream frosting garnished with pretzels, caramel, and chocolate drizzle.

Follow the Red Velvet Guest blog post

Compared to the other cupcakes, this one was moist, light, and the flavor combinations were delicious. Some of the other hit cupcakes were the Reese’s cupcake from the “Cupcake Mama” bakery located on West Euclid Avenue...

Follow the Red Velvet Guest blog post

as well as the Tres Leches cupcake made by “Chocolate Therapy by Jack” which is an online based bakery.


Follow the Red Velvet Guest blog post

Overall the experience was great. I got more than my fill of cupcakes and got a taste for the cupcake bakery scene here in Tampa. I look forward to re-visiting the places I enjoyed or missed. There were only a couple that weren’t to my taste, but where there are cupcakes there will be customers!

Follow the Red Velvet Guest blog post

Now I anxiously await the 2015 Ybor City cupcake festival.

All photos credits go to Siva Beharry

Read more of Aditi's adventures at The Red Velvet Road, as well as on her tasty instagram feed!

Saturday
Nov012014

What Happens When You Melt 15 Candy Bars in a Pie Crust

Have you ever wondered what happens when you fill a pie crust with 15 candy bars* and then bake it?

* = if we're talking about Fun-Size candy bars, which I personally so often am around this time of year, you want to make that 30-36 or so. 

Well, if you have ever found yourself plagued by this candy bar quandary, you're not alone. I too have been baffled-- but lucky for you, I recently rolled up my sleeves and proactively worked to find out. 

Not only was I seeking a piece of tasty pie--but peace of mind.

First, I made up a pie crust. I used the recipe and method I mastered via King Arthur Flour. 

Next, this is where I must make a confession. I didn't specifically have the number fifteen in mind with my candy bars. Basically, I just kept unwrapping the bars I had received in the mail from Legit Organics, cutting in half, and adding candy bars til the pie crust was full.

It was full at around 12 candy bars. But it occurred to me (I'm always thinking, see) that once the candy began to melt, it would reduce in volume. So to be safe, I added three more candy bars. I'm not going to keep you in suspense: it was the right decision.

I put the whole thing in a preheated 350 degree oven. At 30 minutes it looked mostly done, but at 35 it was perfectly toasty. 

When I took it out of the oven, it looked like this. What the picture doesn't convey is that it was making a snappy bubbling sound that lasted a good minute. It was beautiful. 

I can pretty much say this is the best use ever of 15 candy bars (more Fun-Size). The pie is one of those desserts that makes you say "oh, it's too much!" but then somehow you're reaching for your second slice. Don't say you don't know what I mean.

(note: This pic had a bit of ice cream on top but I wiped it off to get a clear shot of the pie (hence the small white mark on the front).

Here's how you do it.

15-Candy Bar-Pileup Pie 

  • 1 unbaked pie crust
  • 15 regular sized candy bars, cut in half, or 30-36 Fun-Size candy bars, in harmonious flavors

 Procedure

  1. Preheat the oven to 350 degrees F.
  2. Place your candy bars in the crust. Pile them high enough so that they slightly form a  crown over the edges.
  3. Just for safety, put the pie plate on top of a baking sheet. Place the whole thing in the oven.
  4. Bake for 30-35 minutes, or until the bars are melted and bubbly and the crust is browned to your liking.
  5. Remove from the oven and let cool to room temperature before serving. This can take up to an hour. 

Enjoy!

Saturday
Nov012014

Do Good While Eating Chocolates: Seattle Chocolates for the Holidays

When I first moved to Seattle, I had a "real job" at an upscale furniture store. Truthfully, it wasn't very well suited to me, and it didn't last very long. But one of the real benefits of having the job (you know, aside from the money) was the fact that I was next to a store that sold bars by Seattle Chocolates

More often than was decent, I would purchase and eat an entire "Pike Place" bar--a deep, dark chocolate bar amped up with the addition of toasty ground espresso. It was so good that it made me float for as long as I ate it, and since I would slowly suck each piece, it would really last a good long while. 

That is a very happy memory for me, so I was really-really-really excited when Seattle Chocolates reached out to me to tell me about their new program for the holidays. Basically the idea is this (from an email from their marketing department):

Through our #ChocolateGives program, we are raising money to fight hunger through a network of local food banks. One of our partners is Northwest Harvest! We would like to send you a special gift of our Seattle-based, American made chocolate and information about the program. We know your readers will enjoy, because we are happy and colorful just like you.

So, they sent me a package and darn-straight, it was jam-packed with happiness and color.

So what does my awesome box of chocolate have to do with you?

Here's how you can get involved in goodness through eating chocolate.

Fact 1: I think that Seattle Chocolates are just great. I think you should buy them.

Fact 2: If you do buy them between November 1 through the end of the ear, for every item purchased on the Seattle Chocolates website and every post of #chocolategives on social media, Seattle Chocolates will donate a serving of fresh food to someone in need. The donations will be made through a network of food banks in New York City, Boston, SF-Marin, and Seattle. 

And that--along with the chocolate you're eating--is something to feel really good about.

So go ahead, get your chocolate on! Shop at Seattle Chocolates.

Saturday
Nov012014

Pillsbury Bake-Off Countdown: Strawberry-Mascarpone-Hazelnut Chocolate Tart

Hazelnut strawberry tart - bake-off

What I love about this tart is...well, more than one thing. I love how it marries health food (strawberries) with dessert food (everything else in the recipe). I love how it looks super fancy but comes together rather quickly. And, I love that it has a cookie dough crust. YUM. Thanks to Pamela Shank of Parkersburg, West Virginia for coming up with this clever and pretty Bake-Off entry!

Strawberry-Mascarpone-Hazelnut Chocolate Tart

  • Prep Time: 30 Min
  • Total Time: 1 Hr 55 Min
  • Makes: 8 servings

Ingredients

  • 1 roll Pillsbury refrigerated chocolate chip cookie dough
  • 2 (8 oz) containers mascarpone cheese
  • 1/2 teaspoon vanilla extract
  • 1cup powdered sugar
  • 1/2 cup chocolate hazelnut spread
  • 3 cups halved large strawberries (about 2 pints)
  • 1/4 cup white chocolate candy melts or coating wafers (1 1/2 oz) or 1/4 cup white vanilla baking chips

Procedure

  1. Heat oven to 350° F. Press cookie dough evenly in bottom and 1 1/2-inches up side of ungreased 9-inch tart pan with removable bottom. Bake 15 to 25 minutes or until golden brown and edges are set. Cool completely in pan on cooling rack, about 1 hour.
  2. Meanwhile, in a large bowl, beat mascarpone cheese, vanilla and powdered sugar with electric mixer on medium speed, 2 minutes or until well blended; set aside.
  3. Reserve 2 teaspoons of the hazelnut spread. Spread remaining hazelnut spread evenly in bottom of cooled cookie crust. Spoon and carefully spread mascarpone mixture over hazelnut spread to within 1/4 inch from edge. Arrange strawberries over mascarpone.
  4. In small microwavable bowl, microwave reserved hazelnut spread uncovered on High 20 to 30 seconds or until drizzling consistency. Drizzle over strawberries. In another small microwavable bowl, microwave candy melts uncovered on High 30 to 60 seconds, stirring once or until drizzling consistency. Place melted candy melts in small resealable food-storage plastic bag. Cut off small corner of bag. Squeeze bag to drizzle melted candy melts over strawberries. Store in refrigerator.

Note: the Pillsbury Bake-Off is coming in November! Check out my coverage of the 45th and 46th Bake-Off, and follow the recipes posted so far by clicking the bakeoff tag below.

Saturday
Nov012014

Pillsbury Bake-Off Countdown: Hummingbird Macaroons

Hummingbird Macaroons

You probably didn't need to be told that Hummingbird cake is simply the bomb. That might be a cheesy thing to say, but it's such a beautiful cake it moves me to corniness.

But did you know that hummingbird macaroons are also exceedingly amazing? If you didn't, it's time to give this recipe from Melanie Eichman of San Antonio, Texas a try. It yields soft cookies that are bound to make you hum with joy.

Hummingbird Macaroons

  • Prep Time: 20 Min
  • Total Time: 1 Hr 15 Min
  • Makes: 30 cookies

Ingredients

  • 1 roll Pillsbury refrigerated sugar cookie dough
  • 1/4 cup mashed very ripe banana (1 small)
  • 2 cups flaked coconut
  • 1/2 cup finely chopped dried pineapple
  • 1/2 cup chopped pecans
  • 1/2 teaspoon Watkins™ Ground Saigon Cinnamon
  • 1/2 teaspoon Watkins™ Original Double Strength Vanilla Extract

Procedure

  1. Heat oven to 350°F. Let cookie dough stand at room temperature 10 minutes to soften. Line cookie sheets with Reynolds® Parchment Paper.
  2. In large bowl, break up cookie dough. Add remaining ingredients; beat with electric mixer on medium-low speed 1 to 2 minutes or until well blended. Drop dough by rounded tablespoonfuls 2 inches apart on cookie sheets.
  3. Bake 11 to 16 minutes or until edges are golden brown. Cool 3 minutes; remove from cookie sheets to cooling racks. Cool completely, about 15 minutes. Store covered.

Note: the Pillsbury Bake-Off is coming in November! Check out my coverage of the 45th and 46th Bake-Off, and follow the recipes posted so far by clicking the bakeoff tag below.

Page 1 ... 1 2 3 4
© Cakespy, all rights reserved. Powered by Squarespace.