Home Home Home Home Home Home Home
CakeSpy

Featured: 

My adventure at Ben & Jerry's in Vermont!


Unicorn Love: the Eating Disorder Recovery Blog


 Buy my brilliant books!

Buy my new book!

Buy my first book, too! 

CakeSpy Online Retail!


Archives
Gallery

Fantastic appliance for cake making on DHgate.com

everyrecipe.co.nz

Craftsy Writer

Entries from December 1, 2013 - December 31, 2013

Thursday
Dec192013

Felting a Chocolate Chip Cookie is Easier Than You Think

My First Felting Project

Not so long ago, I was contacted by a publisher to see if I would like to post about a new book called Feltlicious: Needle-Felted Treats to Make & Give. And I was all set to be all "I don't know..." when I found it was co-authored by my friend and hero (yes! Both!) Kari Chapin, along with the talented Keri Wessel. Suddenly, I was all "I'm in!".

But then I was asked if I would also be interested in trying out one of the projects from the book. They looked simply adorable: cute foods from pies to breakfast to sweet treats of all sorts. All felted. The only problem? I have never done felting in my life.


A few weeks later, the book arrived, along with several puffs of colored wool. Wait, I had to do it from scratch?

Listen, even though you might think I am very talented as an artist, I do not consider myself crafty. I can't knit, I am not much of a sewer, and don't even get me started on jewelry-making. I always just kind of felt like those are talents for other people.

So when I received the instructions, I kind of let them sit for a while and thought "how much would Kari hate me if I didn't do the post?". 

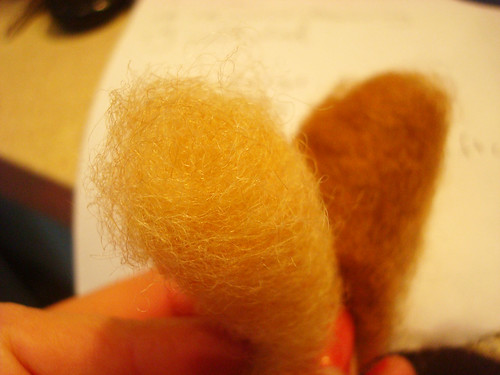
But no! I couldn't do that. So finally, today, I decided to tackle the project. Here is the instruction sheet. It came along with a big puff of light brown wool (for the cookie body, I assumed), smaller bits of yellow, slightly darker brown, and very dark brown...and white. Now this was getting confusing. 

My First Felting Project

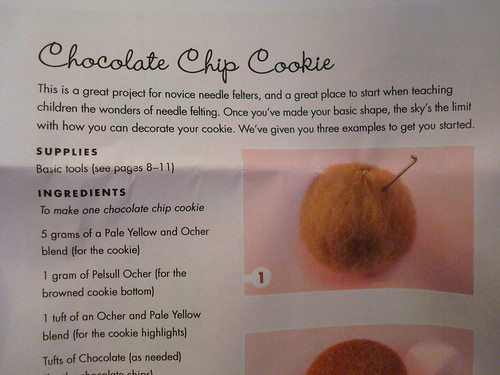
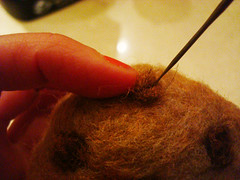
I started reading, and the instructions told me to mix together the big beigey and light yellow puffs. I did so, but then they were all messy. I was confused, but I didn't want to admit to myself that I didn't know what I was doing, so I said to myself "well, let me just see if I can wing it." So, I have never felted before, but I have seen people do it, so I grabbed a needle and started poking the wool over and over.

My First Felting Project

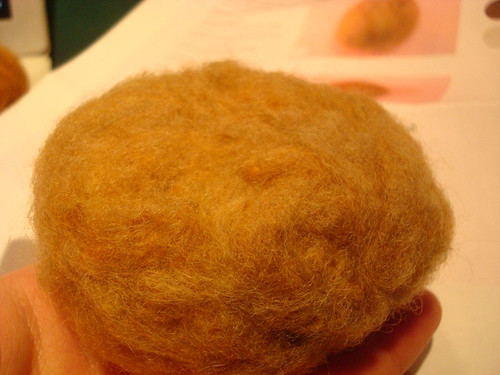
Miraculously, after a while (and at least one pin prick that drew blood) later, the wool came together to form a loose ball. I began to finesse the wool into a slightly flatter shape as I continued to poke. 

My First Felting Project

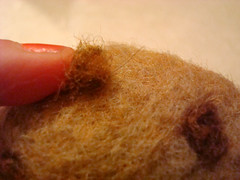
Once I was satisfied with the shape, I decided to add some chocolate chips. I mixed together some of the medium brown and dark brown wool, and made little mini puffs of wool mixed with both colors.

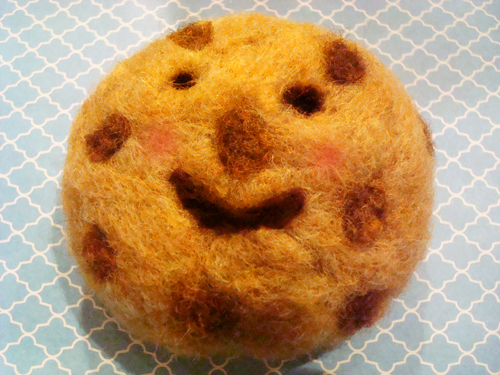
I felted them on to the cookie shape. Amazingly, I had chocolate chips! 
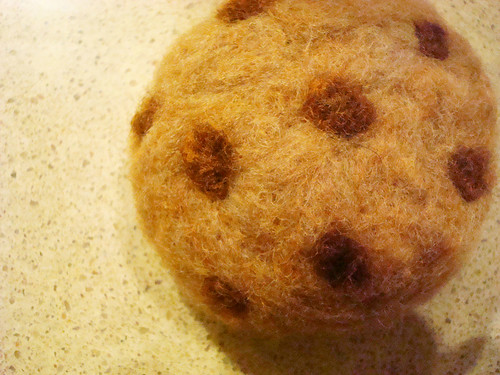
My First Felting Project My First Felting ProjectMy First Felting Project 

Hooray! 

And of course, since I am me after all, I decided to add a little of my own personality to the craft and added a litle felted face with the remaining dark wool. Happy cookie!

My First Felting Project

Make something cute! If I could do it that easily, you can too! I'm not even crafty! Buy the book here: Feltlicious: Needle-Felted Treats to Make & Give.

Wednesday
Dec182013

Bring Us Some: Figgy Pudding Recipe

Make "bring us some figgy pudding" a reality this holiday season with this delicious Figgy Pudding recipe I made for Serious Eats. 

Tuesday
Dec172013

Well Bread: Gingerbread Nanaimo Bars for Serious Eats

Huzzah! Gingerbread Nanaimo bars! Gingerbread is made awesomer, and Nanaimo bars are made more festive, all in one tasty three-level package. Find the recipe on Serious Eats!

Tuesday
Dec172013

Fallen Cupcakes: Why it Happens, How to Fix It

Fallen cupcakes

I know, I know. When you saw that picture, you probably thought "ouch". Cos we've all experienced the curse of fallen cupcakes (or cakes), right? 

But here's the good part: if your cakes constantly fall, there may be a good reason for it. Here are some common causes: 

Here are some possible causes: 

Insufficient moisture: Did you just dip the cup into the bag of flour before dumping it in the rest of the batter? The flour may have been tightly packed, and you used more than you needed to. Be sure to properly measure and sift your flour (don't say "close enough"!). This may cause the cupcakes to fall during baking (while still in the oven).

Too much moisture: Yep--too much moisture can be bad, too. If your cake rises rapidly in the oven, has been tested for doneness, but then falls a few minutes after being removed from the oven, it could be a result of too much moisture. This is a common problem in humid conditions, where the flour may pick up excess moisture from the air before it’s added to the mix. Keep flour in an airtight container if you live in humid conditions. Note: If the cake falls in the center but is completely baked through, you may still be able to use it by leveling the cake to the lowest point.

Under-baking: The cakes looked done, but immediately after removing from the oven, the middle sinks and is slightly sticky inside. To ensure doneness, insert a cake tester or skewer in the center of the cake before removing icakes from the oven. If it comes out mostly clean, you’re done.

You opened the door of the oven early in the baking process: You shouldn’t open the door of the oven until the cake is more than halfway baked. And even then, it’s problematic if you keep opening the oven door every couple of minutes to check. (It’s tempting, I know!) By opening the oven door, you can interrupt the reactions that are kick-started by heat, which cause a cake to rise correctly.

If my cakes fall, can I still use them? It's possible that you can--it depends on what you're going for. I personally have found that if I spoon a filling of sorts in the hole, such as ganache, it generally can level the surface of the cupcake and make it suitable for frosting. Or you could stick a candy in! Why not? Even if they're ugly I betcha they still taste good. 

Fallen cupcakes

Want more causes for common cake baking pitfalls? Check out my recent post on the subject on Craftsy.

Sunday
Dec152013

Tubular: Easy Mint Chocolate Chip Cookies Using Refrigerated Sugar Cookie Dough

Cookie tree

Somehow, it's happened: you find yourself in need of a batch of homemade cookies, STAT. It might be for the cookie swap you thought was tomorrow, not today, or the school party you totally forgot, or maybe you just want to whip up something sweet in record time.

Green cookies

As these cookies prove, a time crunch need not mean that you sacrifice all the fun of baking--they are actually made from "doctored" refrigerated sugar cookie dough. They're assembled in less than five minutes and baked in about 10 minutes--even with cooling time, the process of going from mere ingredients to "let's party" all happens in about 30 minutes. 

ALL YOU NEED:

Green cookies

All you have to do? Mix that dough with mint and chocolate chips (they're easily found in the baking aisle this time of year), a teaspoon of peppermint extract and maybe a few drops of green food coloring. Roll into balls and bake as specified on the package. They bake up like a minty, buttery, sweet Christmas miracle!

Mint Chocolate Chip Cookies Using Refrigerated Sugar Cookie Dough

Makes about 24

  • 1 tube refrigerated sugar cookie dough
  • 1 teaspoon peppermint extract
  • 1 cup mint and chocolate chips, mixed together
  • 4-5 drops green food coloring

Preheat the oven to 350 degrees F. Line two baking sheets with parchment paper.

In a large bowl, break up the refrigerated cookie dough by hand. Add the food coloring and peppermint extract. Combine well.

Make them green

Add the morsels, mixing by hand to knead them evenly but gently throughout the dough.

Green cookies

Divide the dough into 24 equal parts. (First divide in two, then those two pieces into two to make four, then break each of those parts into three pieces, then divide those in two. You'll have 24. Don't get confused.)

Roll each piece into a ball and place on the baking sheet, well spaced. Green cookies

Bake for 8-11 minutes, or until soft in the center but lightly browned on the edges. I don't know how to say it other than this, but the middles might not look 100 percent set. They will bake a touch more when you remove the cookies, though, so it's ok.

Green cookies

Note: At this point, instead of baking, you can freeze the dough balls on the sheets if you prefer not to bake right now (if you want to do it in the morning, say). Just don't forget to turn off the oven and remember to preheat it again before you bake. 

Let the cookies cool on the sheets for 6 minutes before transferring to a wire rack to cool completely. Use a spatula for the transfer; if the cookies seem too soft, wait another minute or two before transferring.

Saturday
Dec142013

CakeSpy for Craftsy: How to Make a Yule Log Cake

You might think making a traditional buche de noel is difficult - but it's really not! I break down all the individual steps in making it here. Enjoy!

Friday
Dec132013

Baker's Dozen: A Batch of Sweet Links!

Baby buche de noel cookies. Too cute!

Tips for shipping baked goods for the holidays!

This is cute: Santa hat icy hats!

A good christmas cookie: snowy snickerdoodles!

The best cookies ever: chocolate chip pistachio cookies.

Not sweet, still delicious: how to make risotto (I wrote the article!).

How to toast spices! Make everything taste better.

The story of the Christmas Cake.

Cool infographic about the history of baking!

Solutions for common cake baking pitfalls.

Cookies that will make Santa give you coal.

Chocolate-gingerbread cookies! Yum.

Sweet gift idea for newbie bakers: the book The Clueless Baker: Learning to Bake from Scratch

Thursday
Dec122013

CakeSpy Teaches a Baking Class for Kids

Baking class for kids

At this time of year, you have plenty of options if your heart is in need of some warming, including Hallmark or Lifetime holiday-themed movies, multitudes of volunteering opportunities, or perhaps simply sharing some cookies with the ones you love.

But if your heart needs a little more warmth, worry not. Let me tell you all about how I taught a cookie baking class for kids last weekend.

It was a hands-on class, and these kids were very dedicated to baking.

The class was at the Santa Fe Culinary Academy (which also deserves credit for the cooking class photos featured in the post), right up the street from the historic Santa Fe Plaza. The title of the class was "Kid's Class: Holiday Cookies". Well, if you guessed that we spent the class baking up some of Santa's favorites, you are correct. The kids mainly ranged from 6 to 10 in age, but there was one little brother who was three who also (quite ably!) participated.

After introducing myself and asking if they knew where gingerbread men sleep (on cookie sheets!), we got to work. 

We made snowballs...

and candy cane cookies...

and of course, cut out and decorated gingerbread men. 

Then we went into no-bake territory and made some cornflake wreaths. Have you ever made those? The process is similar to making rice krispies treats, but you use cornflakes, tint the marshmallow mixture, and shape them into wreaths. 

At the end of our 2 hours-and-change class, we had a wonderful variety of cookies, and each student had a little gift bag including a card, a bookmark, and a button. 

Baking class for kids


During breaks or dough resting periods, I taught them how to draw a variety of my characters, including Cuppie the cupcake, as well as my unicorn and robots. They had crayons and craft paper on the tables--here are a few shots of their brilliant work.

Baking class for kids Baking class for kids Baking class for kids

I told them that I brought one of my little mascot Cuppie figurines and placed it on the edge of the baking space, because in case anything went wrong, then I could blame Cuppie. They *loved* the idea of that: BLAME CUPPIE!

Clay cuppies

In fact, one student was so inspired that she sent me this a few days later. Note the fine attention to cupcake detail, and the "blame cuppie" incorporation.

Baking class for kids

Another student gave me this:

Baking class for kids

flip side of the envelope:

Baking class for kids

and inside, this note:

Baking class for kids

Doesn't it just melt your heart?? As for me...my reaction is that I must have done my job well! I was so impressed by these creative little baker-elves, and felt a renewed sense of wonder and magic at the art of baking after spending time with them.

What is your favorite cookie that we made? 

Thursday
Dec122013

CakeSpy for Craftsy: How to Make Stained Glass Cookies

Tuesday
Dec102013

Mon petit Cherry: The Most Amazingly Delicious Cherry Buttercream

Cherry buttercream

I have a deep-seeded belief that among cake lovers, there are two types.

There's the type of cake lover who deeply loves and appreciates the cake. These people have a high appreciation for a tender crumb, and know that a fine cake doesn't need frosting.

Personally, I have no idea what is wrong with that sort of cake lover. I'm part of the other type: Team Frosting! Members of team frosting think that cake is great, but its primary function is delivery vehicle for all that delicious, creamy frosting. 

That having been said, I would like to introduce you to the new buttercream that has me wondering if I can invent a sort of IV drip so as to just keep a constant stream of this coming into my body.

It's cherry buttercream, but don't worry, it's not made with health food. It's made with cherry morsels. 


Chocolate covered cherry stuffed cupcakes

I know! Cherry morsels! They carry them at the Albertson's near where I'm living right now. I think they're the bee's knees. And they tint the buttercream pink with no additional food coloring needed!

I got a bee in my bonnet to create a cherry buttercream for a very exciting recipe I'll be sharing soon on Craftsy, and I'm proud to give you a sneak peek (just the buttercream, you'll have to wait for the entire package!). It's a good piping buttercream, too.

Cherry buttercream


Here is my recipe for cherry buttercream. I could eat it by the spoonful, and think that if you don't happen to have a fine cake on hand, you might find that you can do the same.

Cherry Buttercream

Makes a big bowl (enough for a batch of cupcakes or to frost a two layer cake)

  • 12 ounces (1 bag) cherry morsels
  • 1 stick unsalted butter
  • 1 brick (8 ounces) cream cheese, softened to cool room temperature- not low fat
  • pinch of salt (optional)
  • 4 cups (give or take) confectioners' sugar, sifted

Procedure


  1. In a double boiler (or carefully over low heat) melt the morsels with the stick of butter. It goes quicker if you cut the butter in pieces, FYI. This mixture will look ugly and weird, but it will all come together in the next step.
  2. Remove from heat once melted, and let it mellow out on a cool surface while you cream the heck out of your cream cheese in a stand mixer, beating until nice and fluffy and smooth--5 to 7 minutes.
  3. Add the morsel and butter mixture. Heck, add a pinch of salt if you want. Stir until combined.
  4. Now, with the mixer on low, add in the confectioners' sugar, one cup at a time, until your desired spreading or piping consistency has been achieved.


Are you team cake or team frosting?

© Cakespy, all rights reserved. Powered by Squarespace.