


Guest Post: How To Make Homemade Sugar Decorations by Nellie Cakes
 CakeSpy Note: This is a guest post from Nellie Cakes, a blog written by Nell, a mom who taught herself how to bake so her daughter could have way cooler cupcakes on her birthday than anyone else in school.
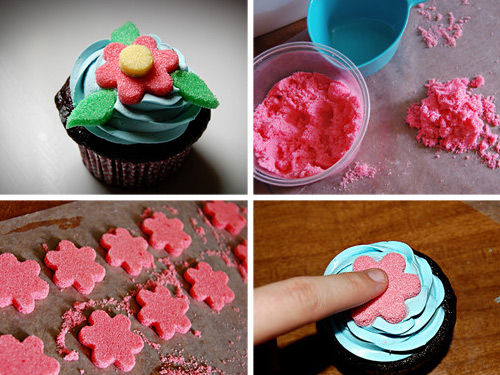
I was originally going to write about how to make your own sanding sugar, which is cool in and of itself, but while I was coloring the sugar for the photos I was going to post I got inspired and decided to make some home made sugar decorations too (finished product pictured top left).
The cupcake is plain old chocolate, the icing is Swiss Meringue buttercream and the flower is completely made out of sugar. It’s a cute little thing, isn’t it? I’ve also decorated a cake with sugar stars and an owl.
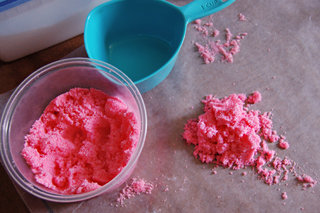
To make your own colored sugar, you’ll need a cup of regular granulated sugar, some liquid food coloring and a very tight sealing container. I’m not messing around on this point. If it’s not super air tight you’re going to end up with sugar all over your kitchen and ants may or may not invade your home and eat your kitchen down to the floor beams. If this does happen, I will not be held responsible!
All of your stuff should resemble this: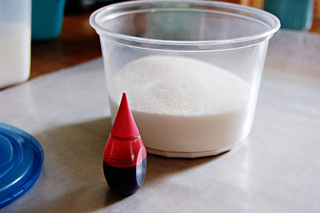
If your stuff doesn’t resemble this stuff, you have already screwed up too badly to go on. Disregard the rest of the post if you can’t put some sugar in a container.
Next, put a few drops of whatever color you’d like into the bowl. I decided on pink for the flowers, but you can make them any color you’d like. Or you don’t have to make flowers at all. I guess it just depends on what cookie cutters you have. Or what food coloring. Anyway, it should look like this now:
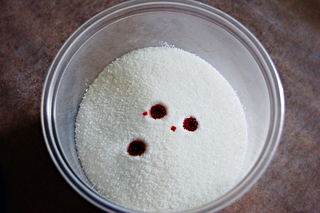
Start out with only a few drops because it’s harder to lighten the sugar than it is to darken it. If you try to lighten it you’ll have a more speckeld effect.
I have to warn you, your colored sugar isn’t going to look like the store bought kind. That stuff has something in it to make it shiney. This stuff will be a little less sparkly, but still very pretty. It works out though, because when you make the sugar decorations, using the store bought stuff makes it harder to get a clean edge on your design. The crystals on the store bought stuff are bigger, which is a pain when you try to put the cookie cutter through it.
Once you have a few drops in, close up the lid nice and tight. You might even want to put the container in a zip lock bag just to be safe. After you’ve made sure it’s on lock down, shake theshit out of it. Really go crazy! The harder you shake it the faster the color will disperse. You have to change the dirrection of your shaking every so often too. The goal of the shaking is to break the ball of wet sugar into a bunch of tiny pieces so the color can be mixed around. Is your arm tired yet? Does it look like this?
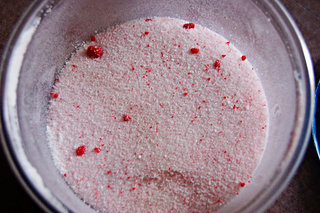 If it looks like this, you’re not done. You can either close it back up and shake the shit out of it some more, or you can take a fork and break up the little balls of food coloring, then close it up and shake it some more. When it’s finally finished, it will look like this:
But less wet. The wet comes later.
Isn’t that pretty? I used about 8 drops of the neon grocery store food coloring for this pink.
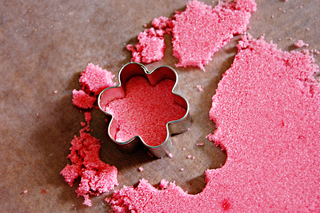
Now that you have your pretty sugar, it’s time to make the decorations. Get out your trusty 1/2 teaspoon measuring spoon, some wax paper, something nice and flat (I’m using the bottom of my 1 cup measuring spoon), and tiny cookie cutters of your choice (or random house hold objects like a bottle cap for a circle).
Measure out 1/2 a teaspoon of water for each cup of sugar you colored and pour it into the container. Close it up and shake the shit out of it again. All of the same rules apply. You still want to break that ball of sugar up so the moisture spreads itself around. Once you’re done, it should feel like wet sand. Squish some of it between your fingers. If it holds a shape, you’re good. If it doesn’t, try adding a tiny bit more water, drop by drop and then reshake it until it does.
Once you have some wet sugar, lay out a big piece of wax paper and dump some of the sugar on top of it. Take the flat thing you have and push it down so you have a layer that’s about 1/4 inch. If it’s thicker, that’s ok too. You just want it to feel like it’s packed down.
Take your cookie cutter and press it into the sugar like you’re cutting out cookies but don’t lift it back out! Instead, keep the cookie cutter flat on the surface and drag it to the side, like so:
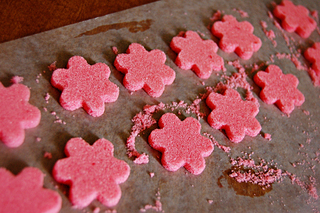
 Keep it on the waxed paper, and start a line of sugar cut outs as far away from your mound of sugar as possible to allow yourself more room. Once you get however many you will need, make a few more. You will end up breaking some, I promise. I know you guys know what a line of these will look like, but here’s a picture of them anyway.
 Aren’t they pretty? I made some leaves and yellow dots for the centers, but the flowers look cute without all that too. Here are my leaves and dots:

Once you have a billion of these things cut out, let them sit there for a few hours. The longer the sit there, untouched, the sturdier they’ll be. I left mine over night. If you don’t end up breaking a few of these like I did, they’d make super cute sugar cubes for a little girl’s tea party or a baby shower.
If you made them a really dark color, they will make your coffee look funny. One time, I made WAY too much blue sugar so my husband was forced to put it in his coffee. It looked really gross when it dissolved. Coffee should never look that way.
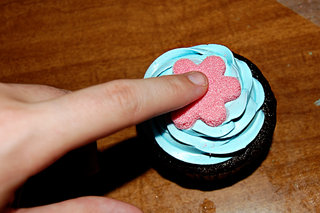
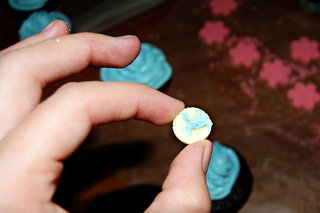
Anyway, after they’re all set and hard, just push them into the icing on your cake or cupcake, like this:
 For the yellow dots, I used a little bit of the icing (not too much! You don’t want it to squish out the sides!) and glued them onto the flowers:
I stuck a couple of the leaves in there, and ta da! Pretty, completely edible decorations! I like how they look home made and perfect at the same time.
Good luck! I’d love to see pictures if you end up making some! You can email them here (and I’ll probably end up posting them)! Happy decorating, and I wish you the best with the herd of ants.
 Print Article
Reader Comments (14)
The whole family doubted they would work but I persevered and now have many yellow and green sugar shapes secreted in the drying room of the house, away from the cats.