


Cutting (Cake) Corners: Cakespy Experiments with a Daring Bakers Challenge
In case you didn't know it, the Cakespy team is part of a group called the Daring Bakers. Each month, a challenge is posted for members, and each member posts their results on the same day on their websites. This month, we were encountered by a challenge that was tres exciting to us: the Perfect Party Cake by Dorie Greenspan. But--and here's a moment of honesty--when we started looking through the recipe, it seemed awfully...involved. (Of course, at Cakespy, as much as we admire fine baking, we are the first to call ourselves expert tasters, novice bakers). And so, making like Shary Bobbins in the Simpsons, we decided to see how much we could get away with by "cutting every corner". But truly, this was an experiment of curiosity rather than pure brattiness. Though we suspected that our end result would be less than bakery-caliber, we wanted to know--would it be completely inedible? Or would it be, you know, kind of ok? Here's how it went.
For the Cake
- 2 1/4 cups cake flour (we used all-purpose)
- 1 tablespoon baking powder
- ½ teaspoon salt
- 1 ¼ cups whole milk or buttermilk (we used soy milk)
- 4 large egg whites
- 1 ½ cups sugar
- 2 teaspoons grated lemon zest (we left this out)
- 1 stick (8 tablespoons or 4 ounces) unsalted butter, at room temperature (we got impatient so we nuked it)
- ½ teaspoon pure lemon extract (we left this out--no lemon handy)
For the Buttercream
- 1 cup sugar
- 4 large egg whites
- 3 sticks (12 ounces) unsalted butter, at room temperature
- ¼ cup fresh lemon juice from 2 large lemons (we left this out)
- 1 teaspoon pure vanilla extract
 For Finishing (we left this out--just frosted it, plain and simple)
2/3 cup seedless raspberry preserves stirred vigorously or warmed gently until spreadable
About 1 ½ cups sweetened shredded coconut
Getting Ready
Centre a rack in the oven and preheat the oven to 350 degrees F. Butter two 9 x 2 inch round cake pans and line the bottom of each pan with a round of buttered parchment or wax paper. Put the pans on a baking sheet. (We didn't have parchment or waxed paper so we just buttered those babies and hoped for the best.)
To Make the Cake
- Sift together the flour, baking powder and salt.
- Whisk together the milk and egg whites in a medium bowl.
- Put the sugar and lemon zest in a mixer bowl or another large bowl and rub them together with your fingers until the sugar is moist and fragrant. (since we had no lemon zest, we just added it to the butter and proceeded to step #4)
- Add the butter and working with the paddle or whisk attachment, or with a hand mixer, beat at medium speed for a full 3 minutes, until the butter and sugar are very light.
- Beat in the extract, then add one third of the flour mixture, still beating on medium speed. (we just added the flour mixture).
- Beat in half of the milk-egg mixture, then beat in half of the remaining dry ingredients until incorporated.
- Add the rest of the milk and eggs beating until the batter is homogeneous, then add the last of the dry ingredients.
- Finally, give the batter a good 2- minute beating to ensure that it is thoroughly mixed and well aerated.
- Divide the batter between the two pans and smooth the tops with a rubber spatula.
- Bake for 30-35 minutes, or until the cakes are well risen and springy to the touch – a thin knife inserted into the centers should come out clean
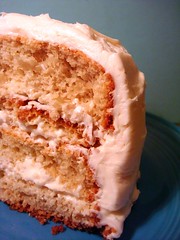
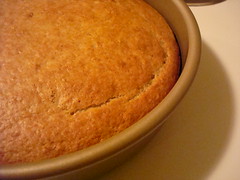
- Transfer the cakes to cooling racks and cool for about 5 minutes, then run a knife around the sides of the cakes, unfold them and peel off the paper liners. (ours came out just fine! yess!!)
- Invert and cool to room temperature, right side up (the cooled cake layers can be wrapped airtight and stored at room temperature overnight or frozen for up to two months). (We put it in the fridge to kind of speed up the process, but then got nervous about it cooling unevenly and took it back out again to do it Dorie's way).
- Put the sugar and egg whites in a mixer bowl or another large heatproof bowl, fit the bowl over a plan of simmering water and whisk constantly, keeping the mixture over the heat, until it feels hot to the touch, about 3 minutes.
- The sugar should be dissolved, and the mixture will look like shiny marshmallow cream. (Ours did, sort of).
- Remove the bowl from the heat.
- Working with the whisk attachment or with a hand mixer, beat the meringue on medium speed until it is cool, about 5 minutes.
- Switch to the paddle attachment if you have one, and add the butter a stick at a time, beating until smooth.
- Once all the butter is in, beat in the buttercream on medium-high speed until it is thick and very smooth, 6-10 minutes.
- During this time the buttercream may curdle or separate – just keep beating and it will come together again. (It did curdle, but we beat on and it did come together again--whew!).
- On medium speed, gradually beat in the lemon juice, waiting until each addition is absorbed before adding more, and then the vanilla. (We had no lemon juice to add).
- You should have a shiny smooth, velvety, pristine white buttercream. Press a piece of plastic against the surface of the buttercream and set aside briefly.
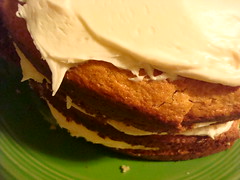
- Using a sharp serrated knife and a gentle sawing motion, slice each layer horizontally in half.
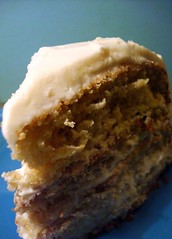
- Put one layer cut side up on a cardboard cake round or a cake plate protected by strips of wax or parchment paper. (We just put it on a plate).
- Spread it with one third of the preserves. (We skipped this, and just applied the buttercream to the sides and top).
- Cover the jam evenly with about one quarter of the buttercream.
- Top with another layer, spread with preserves and buttercream and then do the same with a third layer (you’ll have used all the jam and have buttercream leftover).
- Place the last layer cut side down on top of the cake and use the remaining buttercream to frost the sides and top.
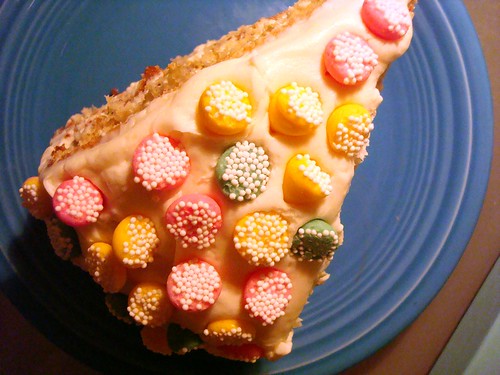
- Press the coconut into the frosting, patting it gently all over the sides and top. (We didn't use any coconut, but we topped it with our favorite melty mints, which made it very happy-looking and, you know, covered a multitude of sins).

 Print Article
Reader Comments (82)
This would be a perfect kids party cake with the mints! Looks very cute.
I'm always looking forward to what you made with these challenges. So much fun! This was my first DB challenge and I stuck with the instructions like a good girl. Seriously, I was afraid to experiment like "the DB baking police is going to come after me if I don't!". LOL. So silly... I will experiment more next time though...
I thought the cake was fantastic though. I do agree the preserves really makes a difference!
Most importantly, it sounds like you had fun. I love the zeal you have for all things sweet! I followed the recipe to-a-T & I didn't have nearly as much fun as you (well, until we had it for dinner!).
xoxox Amy
Hey, I think it's a very lovable cake, too! And I like to polka-dot thing going on!
Um, but who are the entrants you refer to?
2 hints for next time - using cake flour would really make the cake lighter.
and rubbing the lemon zest into the sugar makes a BIG difference in the taste.
you owe it to yourselves....*S*
Thanks for the daring bakers link and the scoop on the cake.
You really hit the nail on the head with "charming." It is a very charming cake.
It was a great experiment and demonstration of how cutting certain corners turns out. I think everyone cuts corners when they bake; sometimes there are just some that you should take.
Some of your substitutions, however, has given me some baking ideas, which I might share in the future.
Love it! I didnt exactly follow as written either. But we got 'er done didn't we?? ;)
Looks wonderful! I suspect you are being modest, or else it is the cook's complaint: you lose your taste a bit for things you've spent a long time preparing. I don't know why this is. Anybody?
BTW, what kind of "favorite melty mints" are those? I've never seen them before and man, are they ever cute!
You guys love those mints! I think it turned out really well with your substutions. Very cute and festive!
I love it and all those mints -yummy - it would make such a perfect birthday cake for a child.
Rosie x
The cake still looks delicious (especially with the mint candies). Better luck next time. :o)
Love your daring changes. Those melty mints are amazing, aren't they? And they made and otherwise plain-looking cake look pretty :)
When I first saw the picture and comments, I thought 'what a cute cake, why didn't I think of that?'
The melty mints would look so cute on some birthday cupcakes! That cupcake would win a pagent... she would be so cute!
I love the decorations - very cute! I think it's always wise to follow the recipe the first time around...Just so you have a sense of what it should be like, THEN make modifications as you see fit. This way, you get a more accurate starting point to compare all subsequent versions with. Just my 2 cents, though...
Colorful, whimiscal and cute!
Well to be fair...you can either spy or you can bake! Your cake is charming all the way...magical!
i enjoyed the post and the little changes you made, looks good
i fully appreciate your simpsons reference--that's a quality show if ever there was one. :)
also, i doubt my baking skills will ever surpass my mad tasting skills. highly doubt.
Sherry Bobbins! You are a Simpsons fan too! Omg we are totally kindred spirits. Your cake is so whimsical and I expect nothing less from the creator of my favorite whimsical cupcake. Great job!
Clara
Wow. You really took...liberties with that recipe. The cakes on those two blogs you linked to look amazing though!!! Ha ha ha. I still like you anyway.
I think it is interesting to see how far you could cut the corners and still get the cake! I always like experiments like that. The mints do give the cake a festiveness
gosh, this looks FANTASTIC. but even your cut corners version looks like it was tons of work! just let me know where i can buy one ;)
It's SO cute though. And really. the perfect childrens party cake, you know? Just right, not too pretentious and fun.
how fun that you participated in this month's DBC!!! If you ask me, your layer-cake looks PERFECT!! And so vibrantly beautiful :0)
The melty mints make the cake look very fun!