Home Home Home Home Home Home Home
CakeSpy

Featured: 

My adventure at Ben & Jerry's in Vermont!


Unicorn Love: the Eating Disorder Recovery Blog


 Buy my brilliant books!

Buy my new book!

Buy my first book, too! 

CakeSpy Online Retail!


Archives
Gallery

Fantastic appliance for cake making on DHgate.com

everyrecipe.co.nz

Craftsy Writer

Entries in brownies (24)

Friday
Sep242010

Life's a Witch: Fat Witch Brownies Cookbook, and a Recipe

Fat Witch Brownies is, with capital letters, a Happy Place. My first experience with them was at my first post-college job in NYC, where we purchased these sweet little morsels from their Chelsea Market retail location as client holiday gifts. Well, and a few extras for ourselves, which is how I got hooked on these fudgy, dense little treats. While my true affinity was always for their blondies, when I recently received their cookbook, Fat Witch Brownies: Brownies, Blondies, and Bars from New York's Legendary Fat Witch Bakery in the mail, I knew it was the classic brownie that I had to try first. While my brownies came out slightly chewier than the ones I had remembered, they were still plenty dense and delightfully the opposite of virtuous, and when I put them out at my store, they disappeared in record time.

Of course, I can't wait to try some of the other recipes in the book, including the one for my beloved blondies, as well as some new classics--the butterscotch flip (a fancier version of the blondie-brownie), Lemon cheesecake brownies, and cranberry blondes.

Fat Witch Brownies

Ingredients

  • 14 Tablespoons (1 3/4 sticks) unsalted butter
  • 1/2 cup plus 2 tablespoons bittersweet chocolate chips
  • 1 1/4 cups granulated sugar
  • 4 large eggs
  • 1 teaspoon pure vanilla extract
  • 1/2 cup plus 2 tablespoons ubleached flour
  • pinch of salt

Procedure

  1. Grease a 9-inch baking pan with butter. Dust with flour and tap out the excess. Preheat the oven to 350 F.
  2. Melt the butter and chocolate in a small saucepan over low heat, stirring frequently. Set aside to cool while you prepare the next step.
  3. Cream the sugar, eggs, and vanilla together. Add the cooled chocolate mixture and mix until well blended.
  4. Measure the flour and salt and then sift together directly into the chocolate mixture. Mix the batter gently until well combined and no trace of the dry ingredients remains.
  5. If you wanna, stir in nuts or any extras at this point.
  6. Spread the batter evenly in the prepared baking pan and bake 33 minutes or until a toothpick inserted comes out clean or with crumbs but not batter.
  7. Remove from the oven and let cool on rack for 1 hour. Cut just before serving. Makes 12-16 brownies.
Wednesday
Aug112010

Brownie Heaven: The Baked Brownie

Now, I don't like to talk in absolutes, but...

...without a doubt, there's definitely something wrong with you if you don't think that the Baked Brownie is the finest brownie of all.

I recently used it as the base for Mimosa Brownies, which were most excellent--but really, this is a brownie that doesn't need anything added--and for that reason, I'd like to take a few moments to celebrate the beauty that is the Baked brownie in its purest form.

This is a brownie which is fudgy and chewy but not too extreme in either direction. Each bite is redolent of chocolate, and every bite is indulgently delicious. They're perfect (but it's ok if you don't like the espresso--while I don't necessarily understand what your problem is, they still taste great without).

Here's the recipe. As you can see from the top photo, it's not only CakeSpy-beloved, but gnome-approved.

The Baked Brownie

As seen in Baked: New Frontiers in Baking  

Ingredients

  • 1 1/4 cups flour
  • 1 teaspoon salt
  • 2 Tablespoons dark cocoa powder
  • 11 ounces quality dark chocolate (60-72%), chopped coarsely
  • 8 ounces butter (2 sticks), cut into 1 inch cubes
  • 1 tsp instant espresso powder
  • 1 ½ cups sugar
  • ½ cup light brown sugar
  • 5 large eggs, room temperature
  • 2 teaspoons vanilla extract

Procedure

  1. Preheat oven to 350 degrees.
  2. Butter the sides and bottom of a glass or light colored metal pan 9x13x2 pan (I like to lay down a bit of parchment too, for easy removal from the pan).
  3. In a medium bowl, whisk together the flour, the salt, and cocoa powder.
  4. Configure a large sized double boiler. Place the chocolate, the butter, and the instant espresso powder in the bowl of the double boiler and stir occasionally until the chocolate and butter are completely melted and combined. Turn off the heat, but keep the bowl over the water of the double boiler and add both sugars. Whisk the sugars until completely combined and remove the bowl from the pan. Mixture should be room temperature.
  5. Add three eggs to the chocolate/butter mixture and whisk until just combined. Add the remaining eggs and whisk until just combined. Add the vanilla and stir until combined. Do not over beat the batter at this stage or your brownies will be cakey.
  6. Sprinkle the flour/cocoa/salt mix over the chocolate. Using a spatula (DO NOT USE A WHISK) fold the dry into the wet until there is just a trace amount of the flour/cocoa mix visible.
  7. Pour the mixture into the pan and smooth the top with your spatula. Bake the brownies for 30 minutes (rotate the pan half-way through baking) and check to make sure the brownies are completely done by sticking a toothpick into the center of the pan. The brownies are done when the toothpick comes out with a few moist crumbs.
  8. Cool the brownies completely before cutting and serving.


Monday
Aug022010

National Brownies at Brunch Month: Mimosa Brownies for Serious Eats

Hold the phone. Hold everything. Did you know that August is National Brownies at Brunch Month?

Don't waste time asking follow-up questions like why this month-long holiday exists—instead, bake up a batch of brunch-friendly Mimosa Brownies. Starting with the Oprah-approved brownie recipe from Baked: New Frontiers in Baking, this version gets champagne-and-orange juice makeover for a treat which truly embraces the decadent spirit of both brownies and brunch, all in one delectable unit.

Note: You may notice that the actual amount of champagne (or sparkling wine) is actually quite small, leaving you plenty of bubbly to make actual mimosas to accompany your brownies. As for the use of orange juice concentrate versus orange juice, I found that it offered a bright flavor and better consistency than orange juice.

For the full entry and recipe, visit Serious Eats!

Wednesday
Jul072010

Brownout: A Tale and Tasting of Two Brownies from 1923

Brownies are undoubtedly delicious, but when it comes to the story of their origins, things are less clear. While today's not the day to delve into that at great depth (soon! promise!), we are going to take a moment to discuss a bit of the brownie's ties to The Boston Cooking School Cook Book.

As I learned here, the 1896 edition of the Boston Cooking School cookbook was among the first known publications to feature "brownies" - but this version was really more like a blondie, little individual cakes garnished with nut halves.

However, as I learned here, the 1905 version of the book had a brownie redux, and this time, they had chocolate. 

But then, in the 1923 edition of the Boston Cooking-School Cookbook, with no explanation at all, there are not one but two chocolate brownie recipes--simply labeled "Brownies 1" and "Brownies 2". There were a couple of differences in the recipes--most notably the absence of butter or oil in #2, which seemed to get all of its fat content from eggs and nuts. In both cases though, the brownies are only a cousin to the brownies we know today, which are generally far denser and more chocolatey than these ones (and I vote that modern chocolate-y ones have evolved into higher states of deliciousness).

Well, naturally this prompted some curiosity, and so I baked up a few batches of each (sans nuts) and put them out at my store with this sign:

Big surprise: people were more than willing to take this challenge. As for the results?

File under duh: people wanted a combo. Tasters mostly preferred the flavor of Brownie 1 (what with its delicious butter), but overwhelmingly preferred the chewier texture of Brownie 2. Which is to say...Brownie 1.5 takes the cake?

A big thank you to the generous tasters and their input. Here are the two recipes, BTW.

Brownies 1

1 cup sugar
1/2 cup melted butter
1 egg, unbeaten
2 squares chocolate, melted
3/4 teaspoon vanilla (to mix things up you could also use almond extract, as I did in one batch)
1/2 cup flour
1/2 cup walnut meats

Procedure

Mix ingredients in order given. Line a seven-inch square pan with paraffine paper. Spread mixture evenly in a pan and bake in a slow oven (I did 325 for 30-35 minutes, just until dull on top). As soon as taken from
oven turn from pan, remove paper, and cut cake in strips, using a sharp knife. If these instructions are not followed paper will cling to cake, and it will be impossible to cut into shapely pieces.

Brownies 2

2 eggs
1 1/4 cups brown sugar
1/2 cup flour
1/2 teaspoon vanilla (or almond extract, as I did in some batches)
2 squares unsweetened chocolate, melted
1/2 cup walnut meats, in pieces

Procedure

Beat eggs lightly and add remaining ingredients. Spread evenly in a
buttered 7-inch pan and bake in a moderate oven twenty minutes (I did
350). Cut in squares.

Monday
May172010

Going Blonde: Blondie-Topped Brownies for Serious Eats

Blondies or brownies?

It's a delicious dilemma: they're both bar cookie classics, one rich in brown sugar, the other redolent of chocolate.

But why should you have to decide? Because they taste so much better when baked together, in layers.

How'd I do it? Well, since brownies generally have a longer bake time, I started out my pan with a batch of brownie batter which I put in the oven for 20 minutes while I put together the blondie batter. Since the half-baked brownies would have gotten messy had I spread the blondie batter on top, I simply spooned the batter as gently as I could right on top and put it back in the oven for about 25 more minutes; the oven's heat did a nice job of spreading the batter for a tasty two-layered treat.

For the full entry and recipe, visit Serious Eats!

Tuesday
Jan262010

Double Pleasure: Decadent Brownie Pie

Brownies. Pie. Relegated to separate quadrants of the baked good world, always on separate shelves in bakery cases.

But why, when they're so much better together?

And so, in the spirit of sweet unity, I've baked what may in fact be a masterpiece: the Brownie Pie.

Comprised of a chocolate graham crust, rich, fudgy brownie filling, and topped off with a copious amount of luxuriant cocoa buttercream frosting and a festive array of malt balls, this baby weighs about the same as (if not more than) a newborn. Of course, it's a good thing it's not actually a baby--otherwise you might be coming closer to understanding why some species eat their young.

One may be tempted to call this beast of a baked good "too much", but based on how quickly it disappeared at a Pie Day party, I'm inclined to say it's "just enough".

Brownie Pie. Now, instead of asking what's been keeping these treats apart for so long, it's time to ask--what are you waiting for?

Here's how to make it.

Brownie Pie

Elements:
Procedure
  1. Prepare your pie crust (either make it or take it out of the package); leave it off to the side.
  2. Prepare your brownie batter to the directions specified in your recipe (or on your box mix--I won't judge). But at the point where you would normally put the batter in a pan, instead put it in your pie crust. Fill it about 2/3 full; you might have extra brownie batter.
  3. Bake on top of a cookie sheet (just in case of overflow) at the temperature and heat specified in your recipe; test the doneness the same way you normally would, by inserting a pick in the center and making sure it comes out clean. 
  4. When it's ready, remove your brownie pie from the oven, and let it cool. I didn't let mine cool very long because I was pressed for time; but ideally, you'd let it cool until it reached room temperature.
  5. Prepare your cocoa buttercream or whatever chocolate frosting you'd like, but make sure that it is a fairly spreadable (not too stiff) consistency--because brownies have a flaky texture on top, you want to make sure that you can spread it with ease and won't bring up too many of the crumbs on top (that just looks messy!). Spread it on top of the brownie pie, leaving a little bit of the brownie showing on the sides.
  6. If desired, garnish with malt balls (I used Malteasers).
Recipes I used:

Fudge Brownies

Adapted from King Arthur Flour

Ingredients

  • 1 cup (2 sticks) unsalted butter
  • 2 1/4 cups sugar
  • 4 large eggs
  • 1 1/4 cups Double-Dutch Dark Cocoa or Dutch-process cocoa
  • 1 teaspoon salt
  • 1 teaspoon baking powder
  • 1 teaspoon espresso powder
  • 1 tablespoon vanilla extract
  • 1 1/2 cups King Arthur Unbleached All-Purpose Flour
  • 2 cups chocolate chips

 Procedure

  1. Preheat the oven to 350°F. Have your prepared crust ready on the side.
  2. In a medium-sized microwave-safe bowl, or in a saucepan set over low heat, melt the butter, then add the sugar and stir to combine. Return the mixture to the heat (or microwave) briefly, just until it's hot (about 110°F to 120°F), but not bubbling; it'll become shiny looking as you stir it. Heating this mixture a second time will dissolve more of the sugar, which will yield a shiny top crust on your brownies.
  3. While the sugar heats a second time, crack the 4 eggs into a bowl, and beat them with the cocoa, salt, baking powder, espresso powder, and vanilla till smooth.
  4. Add the hot butter/sugar mixture, stirring until smooth.
  5. Add the flour and chips, again stirring until smooth. Note: If you want the chips to remain intact in the baked brownies, rather than melting in, let the batter cool in the bowl for about 20 minutes before stirring in the chips.
  6. Once you've put this batter in your crust, bake for about 30 minutes (I baked mine on top of a cookie sheet in case of overflow; it didn't end up being a problem but better safe than sorry) or until a cake pick comes out clean (it may be longer depending on the thickness of your crust and cookie sheet).

Cocoa Buttercream

 Ingredients

  • 1 cup butter
  • 4 tablespoons cocoa
  • 2-3 tablespoons milk, as needed
  • 1 tsp. vanilla
  • 2-3 cups (use more or less, to your desired consistency) confectioners' sugar, sifted

Procedure

Cream butter; add cocoa, mixing well. Add milk and vanilla and mix until incorporated. Slowly beat in confectioners' sugar until it has reached your desired spreading consistency. Spread immediately. 

Monday
Dec282009

Stick It: Chocolate Covered Brownie on a Stick from Hot Cookie, San Francisco

Brownie on a Stick, Hot Cookie, SF

What food isn't enhanced by being served on a stick?

While you mull over that question for the ages, let me present the most delicious thing consumed by a Cake Gumshoe recently: the chocolate covered brownie on a stick from Hot Cookie in the Castro neighborhood of San Francisco.
Brownie on a Stick, Hot Cookie, SF
When you enter Hot Cookie, you'll notice a few things. First, the attractive and well-groomed fellas that man the store do not look like they eat many cookies. However, they are awfully friendly and cute, and serve them up with a sweet sense of humor--in addition to the expected chocolate chip, oatmeal, and peanut butter varieties, they also have a variety of bar cookies, including erotic varieties (which prompted one CitySearch reviewer to aptly dub it "sort of a younger, borderline lewd Mrs. Field's"), and--the star of this writeup--the chocolate covered brownie on a stick.

Undoubtedly you'll take on the task of eating this sweet treat already liking it (it is on a stick, after all), but happily, you'll continue to enjoy it as the chocolatey taste hits. The chocolate coating is simply ingenious--not only does it ensure that the brownie stays planted on the popsicle stick, but it also keeps the brownie moist and offers an added hit of decadence. The brownie itself is fudgy and very chocolatey, not necessarily subtle, but around bite three or four you might just find yourself not caring about that very much.

(CakeSpy Note: Oh, and if you happen to have a four-legged friend with you, we found that the nearby Best in Show had a great variety of pup-cakes and treats).

Hot Cookie, 407 Castro Street, San Francisco, CA; (415) 621-2350‎.

Hot Cookie on Urbanspoon

Thursday
Sep032009

What a Brownie-Noser: A Sweet Recipe from Julia M. Usher's Cookie Swap

Brown(ie) Noser from Julia M. Usher's Book
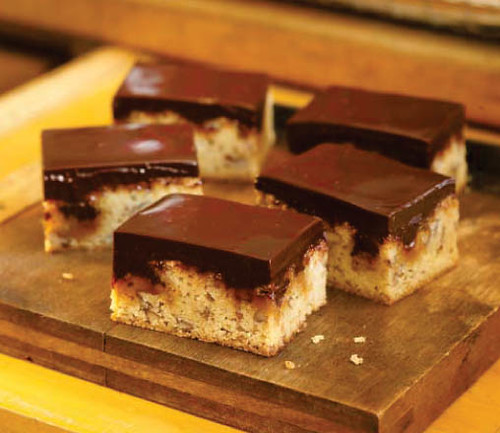
The Brown(ie) Noser: photo from Cookie Swap by Julia M. Usher used with permission.


As promised in the interview with Julia M. Usher, author of Cookie Swap: Creative Treats to Share Throughout the Year (which you can win here!), here's a recipe for decadent butterscotch brownies with caramel and ganache on top!

Caramel Topping
  • 8 ounces caramel candies (about 27 cubes)
  • ¼ cup heavy cream
  • 1 tablespoon unsalted butter
  • 4½ teaspoons all-purpose flour
  • ½ teaspoon pure vanilla extract

Butterscotch Brownies


  • 2½ cups all-purpose flour
  • 2 teaspoons baking powder
  • 3⁄8 teaspoon salt
  • 1¼ cups (2½ sticks) unsalted butter, chopped into
  • tablespoon-size pieces
  • 2¼ cups firmly packed light brown sugar
  • 3 large eggs, room temperature
  • 1½ teaspoons pure vanilla extract
  • 3 tablespoons dark rum (optional)
  • 2 cups pecan halves, toasted and coarsely chopped
  • Ganache Glaze (optional)

    • 16 ounces premium semisweet chocolate
    • finely chopped or ground in a food processor
    • 1½ cups heavy cream
    • 1 tablespoon light corn syrup
    Directions:
    1. Make the Caramel Topping. Unwrap the caramel candies and combine with the cream and butter in a small nonreactive (stainless steel or coated) saucepan. Place over medium heat and cook, stirring regularly to prevent scorching, until the caramels and butter are completely melted and the mixture has boiled. Remove from the heat. Stir in the flour, mixing well to break apart any lumps. Add the vanilla extract and set the topping in a warm place so the caramel stays fluid while you prepare the brownie batter.
    2. Position a rack in the center of the oven and preheat the oven to 350 degrees F. Line a 10 x 15 x 2-inch glass baking dish (sometimes called a roasting pan, p. 10) with foil, leaving a 1-inch overhang around the top edge of the pan. Smooth out any big wrinkles in the foil and then lightly coat the foil with nonstick cooking spray.
    3. Mix the Butterscotch Brownies. Combine the flour, baking powder, and salt together in a medium bowl. Set aside.
    4. Place the butter in a medium (3-quart) saucepan over low heat. Once the butter has fully melted, remove it from the heat and stir in the brown sugar, mixing until smooth. (Note: Don’t be surprised if the butter and sugar do not completely come together at this point; some separation is normal.) Cool a few minutes; then add the eggs one at a time, whisking well after each addition. Add the vanilla extract and rum, if desired. Gradually add the flour mixture, whisking all the while to keep the batter lump free. Stir in the pecans. Turn the batter into the prepared pan and level with a small offset spatula. (The batter will be less than 1 inch thick, but it will bake to about twice its original thickness.)
    5. Drizzle the caramel topping evenly over the batter. (If the caramel has thickened and is difficult to drizzle, gently reheat it.) Marble the top (and break apart any large caramel blobs) by drawing a spatula through both the topping and the batter in a random pattern.
    6. Bake until a cake tester inserted into the center comes out with moist crumbs on it, and the brownie has pulled away from the edges of the pan, about 35 to 40 minutes. Transfer to a wire rack and cool completely in the pan. (Areas that had larger helpings of caramel topping may sink slightly, but don’t worry; the ganache will completely cover any holes.)
    7. Prepare and apply the Ganache Glaze (optional). Make the glaze only after the brownies have completely cooled. Follow the instructions for Ganache (below).
    8. While the ganache is fluid, pour it evenly over the brownie. Gently tilt or shake the pan so that the ganache completely coats the brownie top. Cover with foil, taking care to keep it from touching the ganache. Refrigerate 3 to 4 hours, or until the ganache is firm enough to cut cleanly.
    9. Remove the brownies from the pan in one block by gently pulling up on the foil overhang. Place directly on a cutting board. Remove all foil, and trim any uneven edges before cutting into 1½-inch squares. For the neatest cuts, slice the bars while the ganache is firm and wipe the knife clean with a warm, damp cloth between slices. Serve at room temperature.
    Ganache Directions:
    1. Place the chopped (or ground) chocolate in a large bowl so it
    2. forms a shallow layer. Set aside.
    3. Pour the cream into a medium (3-quart) nonreactive (stainless steel or coated) saucepan. Place over medium to medium-high heat and scald the cream. (That is, heat the cream to just below the boiling point. The cream will put off steam, but no bubbles should break on its surface.)
    4. Immediately strain the hot cream through a fine-meshed sieve directly onto the chocolate. Let the mixture sit 1 to 2 minutes without stirring, and then gently whisk until the chocolate is entirely melted. (If the chocolate does not completely melt, set the bowl over barely simmering water in a double boiler and stir regularly until smooth. Do not overheat, or the ganache may break.) Stir in the corn syrup.
    5. To use the ganache as a glaze, pour it while lukewarm. Alternatively, for piping ganache, pour it into a shallow pan to a ½- to ¾-inch depth, cover, and refrigerate 20 to 25 minutes, or until slightly thickened. Stir occasionally during chilling to maintain a uniform consistency. (Hard, overchilled pieces of ganache should be broken up, as they can easily clog pastry tips when piping.) Chilling time will vary with starting ganache temperature, refrigerator temperature, and depth of the ganache. Watch the ganache closely, as it can quickly overchill and become difficult to pipe.


    For more information about Julia M. Usher, visit her site, become a Facebook fan or follow her on Twitter!


    Thursday
    Aug272009

    Blonde on Blondie: The Blonde Bombshell from TrixieBakes

    Blonde Bombshell Blondie by TrixieBakes
    CakeSpy Note: This post appears concurrently on CakeSpy Seattle.

    Let's talk about TrixieBakes. I had seen them before: I'd walked by their booth at the Madrona Farmer's Market, but had never purchased one of their brownies because at $4 a pop, they weren't exactly cheap. But after reading the DailyCandy feature on the brownies, paired with a reader writing to tell me how amazing they were, I knew I was going to have to fork over the cash.

    Since I am one of those few people who prefers blondies to brownies, of course I had to go for the "blonde bombshell", described on their site as

    A luscious blondie with an indecent amount of brown sugar and pecans
    You can never be too rich or too dense. Ok, that's not really how the saying goes, but it definitely applies to this big blondie.

    Doesn't that just give you a shiver of anticipation?

    So, I enjoyed the blondie for breakfast the next morning, and I am happy to report that it was a particularly fine specimen of blondiehood: dense, chewy, and full of butterscotch-y flavor. The pecans were a particularly nice touch, adding a slight crunch and flavor contrast.

    But getting back to the price. Was it worth it? Well, no doubt about it, $4 is a lot for a brownie or blondie--I think that most will agree on that. But when I reflect on my blondie experience and how decadent and satisfying it was, I do believe I got $4 worth of joy out of the experience. I'm probably not going to indulge too frequently, but maybe that just makes it more special?

    TrixieBakes blondies and brownies are available at the Madrona Farmer's Market each friday, 3-7 p.m.; they're also available at Flying Squirrel Pizza Co., 4920 S Genesee St., Seattle and Pauline Patisserie, 2315 NW Market St. Seattle; also online.

    Thursday
    Jul232009

    Gimme S'more: Delicious S'more Brownies

    S'more brownies by Nicole
    Brownies can be a polarizing subject: cakey or fudgy? Frosted or unadorned? Wars haven't been fought over the subject, but I'm pretty sure that punches have probably been thrown.

    In a 2007 NY Times article, Julia Moskin wrote that “The ideal modern brownie is simple and unadorned, but rigorously designed (like a Diane Von Furstenberg wrap dress).” While she has a powerful point here, it's clear that she's never tasted the s'more brownies made by multitalented CakeSpy buddy Nicole (who happens to be a baker, pet shop owner and occasional clothing store employee...how many hours are in her day?). These decadent little chocolatey nuggets get a perfect little slightly salted crunch from lightly crushed graham crackers and an absolutely heavenly texture from the marshmallows. She served these at a recent get together at her house, and they disappeared faster than you could say (in your saddest Oliver voice, natch) "S'more, please".

    Luckily Nicole has shared the recipe so that we may all attain this well-accessorized brownie nirvana at home.


    Nicole's S'more Brownies
    • 2 eggs
    • 1c. sugar
    • 1/2 tsp. salt
    • 1 tsp. vanilla
    • 1/3 c. shortening, melted (CS Note: Not sure how it would affect the recipe to use butter instead here, but I'm not anti-shortening and thought it gave them a nice chewiness).
    • 2 -1 oz squares unsweetened chocolate melted
    • 3/4 c. all purpose flour
    • 1 c. slightly crushed graham crackers
    • 10 large marshmallows, cut in half

    Preheat oven to 325 degrees. Beat eggs lightly with a spoon. Stir in sugar, salt and vanilla. add shortening and chocolate. Stir in flour and graham crackers. Do not beat at any time. Spread mixture into 8 inch square pan. Place marshmallow pieces on top of brownies; bake at 325 degrees for about 30 minutes. (Nicole's note: brownies should still be soft; let cool in pan
    before cutting.)


    By the way, if you're in the Seattle area, your canine friends can enjoy Nicole's baking too--she sells homemade dog biscuits at her pet store Immortal Dog Pet Supply! Just saying.


    © Cakespy, all rights reserved. Powered by Squarespace.