Home Home Home Home Home Home Home
CakeSpy

Featured: 

My adventure at Ben & Jerry's in Vermont!


Unicorn Love: the Eating Disorder Recovery Blog


 Buy my brilliant books!

Buy my new book!

Buy my first book, too! 

CakeSpy Online Retail!


Archives
Gallery

Fantastic appliance for cake making on DHgate.com

everyrecipe.co.nz

Craftsy Writer
Friday
Dec042009

Cake Byte: New Crafty Cuppie Rubber Stamps by Taylored Expressions!

New Stamps for Taylored Expressions!
Are you a crafty little cupcake? Or...do you perhaps know a crafty little cupcake who deserves a sweet surprise in their Christmas stocking this year? Well, search no longer for the perfect present, because here it is: the sweetest new set of rubber stamps by Taylored Expressions featuring CakeSpy art!

This set is doubly perfect for crafty types, because not only can you make cards and projects with the stamps--but they depict Cuppie doing all sorts of creative things!
CraftyKnitter Thank You
This set retails for $21.95 and comes nicely packaged with a beautiful color index sheet; you can purchase it here. You can also find great project ideas on the Taylored Expressions blog and stay in touch with Taylored Expressions via Twitter!
Thursday
Dec032009

Instant Pleasure: Pumpkin Cake in a Mug from Coffee Mug Cake Cookbook

Coffee Mug Cake
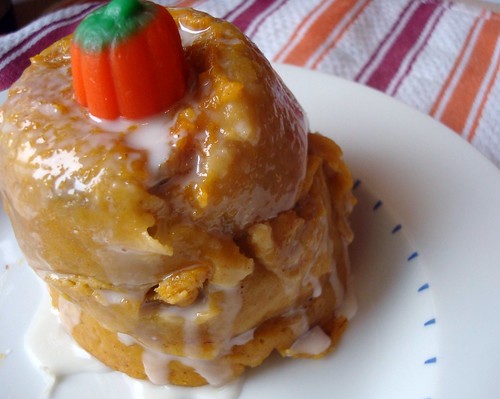
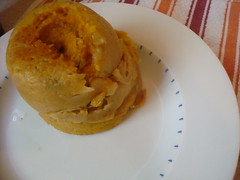
I know what you're thinking after looking at this picture. "CakeSpy," you're thinking, shaking your head sympathetically, "has been hitting the vanilla extract a bit hard".
Well, maybe sometimes. But not this time--this cake, which might be a little ugly but is actually surprisingly tasty
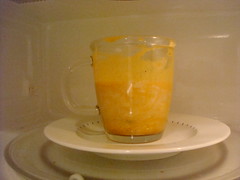
--was baked in the microwave, in a mug.
It was a sample recipe from the self-released book Coffee Mug Cake Cookbook which immediately intrigued me--after all--cake? Baked in the microwave? In a mug? I had to give this a try.
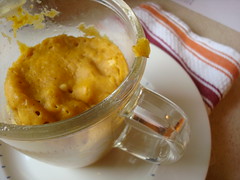
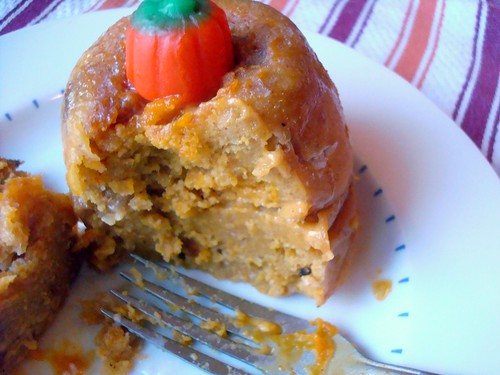
The recipe was very easy to follow; the cake itself came out with an unusual but not unpleasant texture, more like a sort of thick flan or custardy cake. To try and make it ever-so-slightly cuter I topped it with some confectioners' sugar quickly whisked with cream and a mellowcreme pumpkin. I am not going to forsake the oven, but in a pinch, this is definitely a sweet option for a quick sweet fix.

Curious about the book? It can be purchased here. Want to try the recipe? Here it is:

Pumpkin Cake in a Mug
  • 7 tablespoons flour
  • 1/4 cup brown sugar
  • 1/4 teaspoon cinnamon
  • Dash of ginger, ground cloves and nutmeg
  • 1 egg
  • 2 tablespoons milk
  • 1/4 teaspoon vanilla
  • 1/4 cup canned pumpkin
  • 3 tablespoons chopped pecans (optional) - I used walnuts

MixedIn the Microwave
  1. Mix together the flour, brown sugar, cinnamon, ginger, ground cloves and nutmeg. Add egg, milk and vanilla. Mix well, making sure to scrape the sides and bottom of the mug. Stir in the pumpkin and pecans.

    Just out of the MicrowaveFlipped

  2. Cook for 3 minutes on high on a microwavable plate, followed by 2 minutes at 50% power. Turn the mug upside down to release the cake onto the plate.

Coffee Mug Cake
Notes: 

1. CAUTION: MUG WILL BE HOT.
2. Make sure to use a microwaveable mug that is at least 15 ounces large (about 4.5 inches in height and 3 inches in
diameter). If you opt for something smaller, be prepared for massive spillage.
3. Coat the inside of the mug with a no-stick spray to ensure easy release.
4. Unless you have a mini whisk, forks work just as effectively.
5. The outside may be a bit “gooey-er” than the inside. The cook times listed are optimal for a 700-watt microwave and are the best for ensuring the cake is not too dry on the inside.

Thursday
Dec032009

Sweet News: CakeSpy Featured in the Saveur Gift Guide!

CakeSpy Featured in the Saveur Gift Guide!
Every foodie knows Saveur, one of the best food sites and magazines out there! (Oh, and by the way, if you haven't picked up the december issue, please do: they have a great holiday dessert article!).

And so considering how rad Saveur is, how sweet is this: CakeSpy artwork is featured in the Saveur Gift Guide! Here's the blurb:

In addition to her baking and blogging capabilities, the founder of Cakespy, Jessie Oleson, is also a talented illustrator, and has created an entire line of original artwork featuring characters such as Cuppie, Toastie, Pie Slice, and Doughnut. These framed and whimsical watercolors add a bit of sweet kitsch to any kitchen. $25-$45 each.


Of course, CakeSpy is in good company: also featured are Bake It Pretty, Spice House, Compartes Chocolatier, Truly Toffee, and so many more!

For the full list, click here.
Thursday
Dec032009

Cake Byte: Cuppie At the Milwaukee Art Museum!

MAM After Dark
Cuppie has made it to the big time: he's officially been acknowledged by the Milwaukee Art Museum!

OK, granted, it's a very tiny image, but hey: we've got to start somewhere, right? Next stop, solo show at MoMA!

Cuppie was used as a promotional image for the Milwaukee Art Museum's MAM After Dark: A Very Red Velvet Holiday event, which is also brought to you by the lovely and amazing Sandy Ploy of Iron Cupcake. For more information on the Andy Warhol-meets-cupcakes event, visit their site!
Thursday
Dec032009

Cookie Love: Red and Green Christmas Cookies

Red and Green Christmas Cookies
What do black and white cookies wear to holiday parties? Festive red and green frosting, of course! This fun take on the classic New York treat starts with the classic cakey drop cookie, but instead of the traditional fondant, I went for a more rich (and in my opinion, more delicious!) combo of colored buttercreams for the top. This was also a great choice because Challenge Dairy was kind enough to send me a bunch of coupons for free butter to bake with (say what you will, but I will always accept candy from strangers and free butter)! They were intended for a party, but they didn't last long enough!
Red and Green CookiesYum

The recipe can also be found on my latest entry for Serious Eats!

Red and Green Christmas Cookies

- makes 8 to 12 cookies, depending on size -

For the cookies:
  • 1 1/4 cups all-purpose flour
  • 1/2 teaspoon baking soda
  • 1/2 teaspoon salt
  • 1/3 cup well-shaken buttermilk
  • 1/2 teaspoon vanilla
  • 1/3 cup (5 1/3 tablespoons) unsalted butter, softened
  • 1/2 cup granulated sugar
  • 1 large egg
For the frosting:
  • 1 stick (1/2 cup) butter--I used Challenge Dairy's unsalted butter
  • 2 cups confectioners' sugar (you may not use all of it)
  • 1/4 teaspoon vanilla
  • red and green food coloring
  1. Make the cookies. Preheat the oven to 350°F. Whisk together flour, baking soda, and salt in a bowl; in a separate small bowl, stir together buttermilk and vanilla.
  2. Beat together butter and sugar in a large bowl with an electric mixer until pale and fluffy, about 3 minutes, then add egg, beating until combined well. Mix in flour mixture and buttermilk mixture alternately in batches at low speed (scraping down side of bowl occasionally), beginning and ending with flour mixture. Mix until smooth (the texture is somewhere between cake batter and drop cookie batter).
  3. Using a cookie or ice cream scoop, put mounds of batter about 3 inches apart on a parchment-lined baking sheet. If you use a cookie scoop, you will probably get about 12 medium-sized cookies; if you use an ice cream scoop, which is generally a bit bigger, you will get about 8 big cookies. Bake in middle of oven until tops are puffed and pale golden, and cookies spring back when touched, 15 to 17 minutes. Transfer with a metal spatula to a rack and let cool until they are room temperature.
  4. While the cookies cool, make the frosting. In an electric mixer, cream the butter, adding the vanilla, and then the confectioners' sugar, bit by bit, until it has reached your desired consistency. Separate your frosting into two separate dishes. Combine the frosting in each dish with food coloring (I used about 10 drops of green and 10 drops of red for strong, vibrant colors) until fully combined.
  5. To frost, first turn the cookies over—you will actually frost the flat bottom side. Frost the cookies one side at a time. I found that I could get a sharper line down the middle if I started frosting from the outside in, finishing with a stroke down the center. When adding the second color of frosting, the key is to make sure you frost the part where the two colors touch last, frosting the dividing line in one smooth stroke (no backtracking or you will drag the other color of frosting back with you!).
  6. Serve immediately; store at room temperature in an airtight container. I found that these tasted best either the day made or the next day.
Page 1 ... 2 3 4 5 6 ... 141 Next 5 Entries »
© Cakespy, all rights reserved. Powered by Squarespace.