Home Home Home Home Home Home Home
CakeSpy

Featured: 

My adventure at Ben & Jerry's in Vermont!


Unicorn Love: the Eating Disorder Recovery Blog


 Buy my brilliant books!

Buy my new book!

Buy my first book, too! 

CakeSpy Online Retail!


Archives
Gallery

Fantastic appliance for cake making on DHgate.com

everyrecipe.co.nz

Craftsy Writer
Wednesday
Nov042009

Decadent Sweets Inspired by Dana Treat: Caramel Apple Pie Bar Recipe

Piggie loves Apple Pie Bars
It's not that I don't like apple pie. It's just that the parts I do like happen to be the ones that don't really involve apples: the buttery, rich crust, and the equally buttery, rich topping--which, if I have my say, is always some sort of brown sugar crumbled goodness. So when I saw a recipe for Apple Pie Bars on the Dana Treat website, I knew I had found the apple pie that my soul had always been searching for: i.e., mostly crust and topping, with a little filling sandwiched in between. I had to make these bars. I did make these bars, the very same day I found them--adding in a layer of caramel too for good measure. With a bar this rich, was that necessary? No. But it sure was good. In fact, the only mistake I made with these bars is that I halved the original recipe, which was a mistake because we ran out all too soon.

Apple Pie Bars
Caramel Apple Pie Bars
Adapted from Dana Treat
- Makes about 24 bars -

Notes: I made some changes to Dana's recipe. First, I halved her original recipe, instead making my batch in an 8x8-inch pan. This was probably a mistake as we definitely could have eaten more. I also added aforementioned caramel layer. Good decision.

For the crust
1 1/2 sticks unsalted butter, softened
1/3 cup sugar
1 1/2 cups flour
1/4 teaspoon kosher salt

For the filling
(optional) 1/2 cup caramel sauce, such as Fran's Dessert Sauces (or if you're feeling saucy, you could make your own; or, you could just use a dozen or so caramel candies--choose your own adventure!)

3 tablespoons unsalted butter
1/4 cup light brown sugar
3 large Granny Smith apples, cut into thin slices (I didn't peel mine, and nobody judged me)
1 tablespoon cinnamon cinnamon
1/4 teaspoon nutmeg

For the topping
1/2 cup walnuts
1 1/2 cups quick-cooking oats
1 cup flour
3/4 cup light brown sugar
1 teaspoon cinnamon
1/4 tsp. baking soda
1 1/2 sticks salted butter (the original recipe calls for unsalted, but I like a really salty crumb, so I used salted), cut into 1/2-inch cubes and chilled

Procedure
  1. Make the crust. Preheat the oven to 375°F. Grease an 8x8-inch pan thoroughly. In an electric mixer fitted with a paddle, beat the butter with the sugar at medium speed until light and fluffy, about 2 minutes. At low speed, beat in the flour and salt until a soft dough forms. Press the dough over the bottom of the prepared pan, leaving the edges slightly higher (but still even all around). Bake in the center of the oven for about 12-15 minutes, until the crust is golden and set. Let cool on a rack.
  2. While this is cooling, make the filling. In a large skillet, the butter and brown sugar. Add the apples to the skillet and cook over high heat, stirring occasionally, until softened, about 10 minutes. Stir the cinnamon and nutmeg into the skillet, making sure it has evenly coated the apples. Cook until the apples are caramelized and very tender and the liquid is evaporated, about 10 minutes longer; scrape up any bits stuck to the bottom of the skillet, and if necessary add a small amount of water to the pan to prevent scorching (I didn't have to).
  3. Make the topping. Lightly toast the walnuts in the oven for about eight minutes; let cool, then coarsely chop them. In a large bowl, mix the oats with the flour, light brown sugar, cinnamon, and baking soda. Using a pastry blender or two knives (or your very clean hands!) cut in the butter until the mixture resembles coarse meal. Stir in the walnuts and press the mixture into clumps.
  4. Assemble and bake. Spread the 1/2 cup caramel sauce (or caramel candies) over the bottom layer, ensuring even coverage. Spread the apple filling directly on top of the caramel. Scatter the crumbs on top, pressing them lightly into an even layer. Bake in the center of the oven for 30-40 minutes, or until the topping is golden; rotate the pan halfway through baking. Let cool completely on a rack before cutting into bars.
Note: Dana says that these bars can be stored in an airtight container at room temperature for 4 days or frozen for a month, but I can't be sure as ours didn't last that long.

For more of Dana's sweet recipes, check out danatreat.com. You won't regret it.
Wednesday
Nov042009

Sweet Art: A Romantic Anniversary Commission

Custom anniversary illustration
Romance can be as sweet as cupcakes, as evidenced by this sweet commission I recently took on for an anniversary present! Kris asked me to create this custom illustration for his wife Ashley (a cupcake baker!) for their three year anniversary. It combined a variety of places, things, and seasons that they both love and have shared. It's always such a pleasure to work on custom pieces which I know will be going to a perfect home!

May you two have many more sweet years ahead!
Wednesday
Nov042009

Oh So Good: A New Take on Osgood Pie, for Serious Eats

What is Osgood Pie, anyway?
Have you ever heard of Osgood Pie? Didn't think so. Actually neither had I, until I discovered it via Not Martha!

While the pie, which is in the tradition of old-time vinegar and chess pies, doesn't necessarily sound like the most appetizing dessert--it's comprised of eggs, sugar, vinegar, and raisins--I was nonetheless intrigued, and I tried to modernize it a bit for my latest contribution to Serious Eats by swapping raisins for cherries and adding some almonds for an added texture and flavor contrast.

If I do say so myself, it turned out pretty tasty--once you've wrapped your mind around the vinegar pie idea, that is. You can check out the entire post and recipe, as well as more Osgood Pie lore, over at Serious Eats!
Wednesday
Nov042009

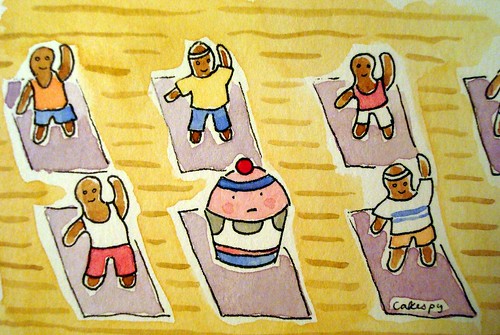
Sweet Art: Skinny for Illustration Friday

Cuppie Gets Physical
How does Cuppie maintain such a streamlined physique and avoid the dreaded muffin top?

By Sweatin' to the Oldies, of course!

This illustration is an oldie but goodie, and seemed perfect for this week's Illustration Friday theme of Skinny.
Wednesday
Nov042009

Gingerbread, Man: A Sweet Recipe from Cake Gumshoe Julia

Gingerbread cake, c/o Cake Gumshoe Julia
CakeSpy Note: This is a guest post and recipe from Cake Gumshoe Julia, a 26 old wife, exercise fiend, and baking enthusiast. She is always looking for ways to make recipes healthier and to enhance the fresh flavor (without losing deliciousness!). It can't always be done, but if it can be, then she will do it!  Her writing can be find at her site, Fat Girl Trapped in a Skinny Body.

Ever since I made the Ultimate Ginger Cookies a few days ago I have been craving gingerbread. I can't get it off my mind. What the heck, I figured--I should probably just make some. So when 5:15 am came Saturday morning I decided that was the perfect time to start my baking.

Things started out with a measure of uncertainty: the batter seemed a little too sweet and runny; I didn't know how the baked product would turn out. It was my first time in years to make gingerbread; I have been so focused on pumpkin and mint the past few fall seasons that I nearly forgot about gingerbread. But not this year, my friends. Gingerbread is reining supreme so far in Autumn 2009. And since this bread uses no oil or butter and even has some whole wheat flour, it's practically health food.

When the bread puffed up perfectly, I was so happy. And then when I tasted it, oh my word, success! The lemon is sort of an odd component to add to the cake, but it gives it an extra freshness. You could use orange as well and that would be wonderful. But don't omit the lemon!
Gingerbread cake, c/o Cake Gumshoe Julia
Gingerbread Cake
  • 1 cup all purpose flour
  • 1 cup whole wheat flour
  • 1 teaspoon baking soda
  • 1/2 tsp baking powder
  • 1/4 teaspoon salt
  • 1 1/2 teaspoons ground cinnamon
  • 1 teaspoon ground ginger
  • 1/8 teaspoon ground cloves
  • 1/2 cup apple sauce
  • 1/2 cup (105 grams) light brown sugar
  • 2 large eggs
  • Zest of 1 lemon
  • 1/2 cup unsulphured molasses
  • 1 cup 1% milk (you can use non-fat or whole also)

Procedure
  1. Preheat oven to 350 degrees and place rack in center of oven. Grease your pan of choice with non stick spray. Note: You have a variety of pan options: 24 Cupcake Pan (bake for only about 20 minutes) - 9 inch loaf pan - 9 inch round cake pan (bake for about 30-35 minutes). Set aside.
  2. In a bowl whisk together the flour, baking soda, baking powder, salt, ground cinnamon, ginger and cloves. Set aside.
  3. In a separate bowl of your electric mixer, beat the applesauce and sugar. Add the eggs, one at a time, beating well after each addition. Add the lemon zest and molasses and beat to combine. Add the dry ingredients and milk, alternately, beginning and ending with the dry ingredients. Beat just until incorporated.
  4. Pour the batter into the prepared pan and smooth the top with an offset spatula. Bake for 40-45 minutes or until a toothpick inserted into the center of the cake comes out clean. Remove from oven and let cool on a wire rack for 10 minutes before removing cake from pan. Let cool completely and then frost (I just used chocolate frosting from a can for the little cake. Remember, it was 5:15 Saturday morning. Making gingerbread was enough of an accomplishment that early).
© Cakespy, all rights reserved. Powered by Squarespace.