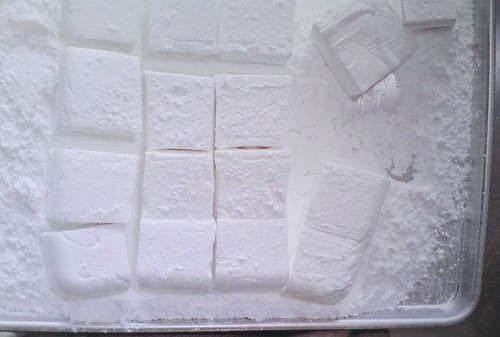
I'm a big believer in the fact that if a food is made well, even if it's not a foodstuff you typically like, it can make you a believer.
Such is the case with the homemade marshmallows at Butter, a bakery in Vancouver. They were kind enough to share their recipe, from the newly released book, Butter Baked Goods: Nostalgic Recipes From a Little Neighborhood Bakery. Here's the recipe, starting with the headnote:
If there is one item that really put Butter on the map, I would have to say it’s our marshmallows. Back in 2007, when Butter first opened, the gourmet marshmallow was still a bit of a mystery. Most people didn’t know there was a tasty alternative to store-bought marshmallows available. But word soon got out, people started talking, and my brain got ticking. Butter now makes 18 flavors of marshmallows, and I’m always coming up with new varieties—but Butter’s Vanilla Marshmallows are the classic we opened our doors with.
Butter’s Famous Marshmallows
MAKES: About 64 (1- × 1-inch) marshmallows YOU WILL NEED: (9- × 9-inch) baking pan, buttered
From Butter Baked Goods: Nostalgic Recipes From a Little Neighborhood Bakery
- 1 cup water
- 3 envelopes unflavored gelatin
- 2 cups granulated sugar
- 1⁄2 cup light corn syrup
- 1⁄2 teaspoon salt
- 2 tablespoons pure vanilla
- Generous amount of icing sugar to coat the marshmallows, about 2 cups
Procedure
1. In a stand mixer fitted with a whisk attachment, pour in 1⁄2 cup of the water and sprinkle with the gelatin. Set aside to allow the gelatin to soak in.
2. In a medium saucepan over high heat, add the sugar, corn syrup, salt and remaining 1⁄2 cup of water. Bring to a rolling boil and continue to boil for 1 minute. Remove from the heat.
3. Turn the mixer to low and mix the gelatin once or twice to combine it with the water. Slowly add the hot sugar mixture, pouring it gently down the side of the bowl, and continue to mix on low. Be really careful at this point because the sugar mixture is smoking hot! It’s not a job for little ones.
4. Turn the mixer to high and continue to whip for 10 to 12 minutes until the marshmallow batter almost triples in size and becomes very thick. Scrape down the sides of the bowl frequently to avoid the batter overflowing as it grows. Stop the mixer, add the vanilla, and then whip briefly to combine.
5. Transfer the mixture to the prepared baking pan and use a spatula or bench scraper to spread it evenly in the pan. Work quickly, as the marshmallow becomes more difficult to manipulate as it sets.
6. Grease a sheet of plastic wrap with butter and lay it across the top of the marshmallow. Press down firmly on the plastic wrap, to seal it smoothly and tightly against the mixture.
7. Leave the marshmallow to set at room temperature for at least 3 hours or, even better, overnight. The marshmallow will be too sticky and soft to cut if you try too soon.
8. Sprinkle a work surface or cutting board with the icing sugar. Run a knife along the top edge of the pan to loosen the marshmallow slab. Invert the pan and flip the marshmallow out onto the counter or board. Scoop up handfuls of the icing sugar and rub all over the marshmallow slab.
9. Use a large knife to cut the slab into 1- × 1-inch squares. Roll each of the freshly cut marshmallow squares in the remaining icing sugar to coat them completely. If you—and most of your kitchen—are speckled with marshmallow by the time you finish this recipe, fear not! It’s mostly sugar, so a little hot water and elbow grease will have things as good as new in no time.
Marshmallow Variations
- TOASTED COCONUT MARSHMALLOWS My personal favorite! Just substitute the 3 cups icing sugar with 3 cups unsweetened shredded coconut. To prepare the coconut: Preheat the oven to 325°F. Sprinkle the coconut onto a cookie sheet in one even layer and bake in the preheated oven for 15 minutes, until the coconut is a lovely golden brown, stirring every 5 minutes to make sure it toasts evenly. Remove from the oven and allow to cool. Follow Steps 8 and 9 to coat the marshmallows completely in toasted coconut.
- RASPBERRY MARSHMALLOWS In a small saucepan over medium heat, warm 1⁄4 cup raspberry jam (any variety will do) until it becomes runny, about 3 minutes. Remove from the heat. Place a fine sieve over a small bowl and pour the warm jam through the sieve to catch any seeds and create a puree. Add the puree and one drop of red food coloring at Step 4 of the recipe.
- MINT MARSHMALLOWS These are fantastic in hot chocolate! Add 1 teaspoon of mint extract and 1 drop of green food coloring at Step 4 of the recipe. Make sure you do this at the end of the whisking process—if you add it too early it prevents the marshmallow from achieving its proper volume.
- COFFEE MARSHMALLOWS Add 1⁄2 cup of strongly brewed coffee or espresso instead of the water in Step 1, and add another 1⁄2 cup instead of the water in Step 2.
- CINNAMON MARSHMALLOWS Another yummy option for your hot chocolate or, even better, melted on top of your sweet potatoes at Thanksgiving. Add 2 teaspoons of ground cinnamon at Step 4.
