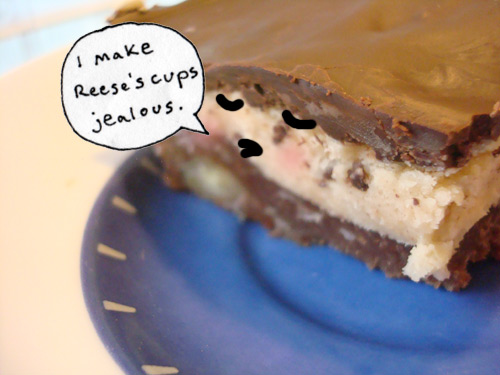
 Nanaimo bars are quite possibly one of the most perfect foods out there, comprised of a dense, chocolatey crust, a dreamy middle layer of custardy buttercream, and a thick slab of chocolate on top as a crowning glory. But what happens when you add peanut butter to all this awesome?
What happens, friends, is that you get an indescribeably rich, irresistible, salty-sweet dessert experience: this is the type of treat that peanut butter cups dream of becoming when they grow up.
Wanna try it out? Here's the recipe.
Peanut Butter Nanaimo Bars
- makes about 36 bite-size bars -
Adapted from a recipe found on the City of Nanaimo website
Ingredients for bottom layer
- 1/2 cup unsalted butter
- 1/4 cup sugar
- 5 tablespoons cocoa
- 1 egg, beaten
- 1 1/4 cups graham cracker crumbs
- 1/2 cup finely chopped roasted peanuts (or walnuts or almonds work nicely too)
- 1 cup shredded coconut
Ingredients for middle layer
- 1/2 cup unsalted butter
- 2 tablespoons creamy peanut butter
- 2 tablespoons vanilla custard powder or instant vanilla pudding powder
- 2 cups confectioners' sugar
- 1/2 teaspoon salt (omit this if your peanut butter is salted)
Ingredients for top layer
- 4 squares semi-sweet chocolate (1 ounce each)
- 2 tablespoons unsalted butter
Procedure
- Prepare bottom layer. Melt the butter, sugar, and cocoa in a double boiler until fully incorporated, but do not let the mixture come to a boil. Add the beaten egg and stir constantly until the mixture begins to thicken. Remove from heat and stir in the graham cracker crumbs, coconut, and nuts. Press down firmly into an ungreased 8 x 8-inch pan; try to make the mixture as flat as possible in the pan. Let this cool for about an hour.
- Prepare the middle layer. Cream the butter, peanut butter, instant pudding powder, salt, and confectioners' sugar together, beating until the mixture is light and fluffy. If it is too thick, you might want to add a small quantity of milk or cream to the mixture, til it is of a spreadable consistency. Spread over bottom layer, once again trying to make the surface as flat as possible. At this point, I like to put the pan in the refrigerator, as it is easier to spread the top layer on when the buttery middle layer is a bit more solid.
- Prepare the top layer. Melt chocolate and butter slowly over low heat. Once fully melted and incorporated, remove from heat and allow to solidify to the point where it is thick but still pourable. Pour over second layer as quickly as you can so that the middle layer doesn't begin to melt.
- Let the bars cool for at least one hour in the refrigerator before serving.